When you Autolink Affiliate links to Keywords in WordPress website, there is a chance that you will make more sales. I use Thirstyaffiliates plugin to automatically add affiliate links to words on my WordPress site. In this article, I will show you how I automatically link keywords with affiliate links. If you are new to affiliate marketing, read my guide about What is affiliate marketing and how to start it. You must read 10 Best affiliate networks that I use in my blogs.
What is the use of Auto-linking affiliate links?
Suppose you have created an affiliate link to Sony Vaio laptop product page. You may place it manually in one or more posts. If you already have many posts on your website where you may want to put this affiliate link. Then Editing all posts manually may take time. In that case, auto-linking will help you.
You can specify particular keyword on which your affiliate link will display. For example, you can show Sony Vaio laptop affiliate link on keywords, laptop or Sony Vaio or Sony or computer. These keywords will have your affiliate link. Thirstyaffiliates plugin will do this very easily.
Why Thirstyaffiliates?
I prefer to use Thirstyaffiliates for managing affiliate links. Because I think it is the best plugin. It is working very well, and their support is too good. Its basic version is free. When you need extra features like auto-linking, geo-target, stats, etc., you need to buy its Pro version. Otherwise, you can use the free version for your basic need.
ThirstyAffiliates Discount
The first time customers Will get a special $50 discount on Thirstyaffiliates PRO plans.
How to Autolink Affiliate links to Keywords in WordPress
Video Tutorial:
In the video below we explain in detail the process of auto-linking affiliate links to keywords in WordPress through the thirsty affiliates plugin. Watch it or just continue with the steps mentioned after the video.
When you want to Autolink Affiliate links to Keywords in WordPress website, you need to buy Thirstyaffiliates Pro Version.
You will get a license key. And download the Pro version to your computer.
Before uploading it to your WordPress site, you must have activated Thirstyaffiliates basic version.
Go to Plugins -> Add New. Search with word ThirstyAffiliates. Install and activate the plugin.
Now go to Plugin -> Add New -> Upload Plugin. Upload the downloaded plugin.
Settings
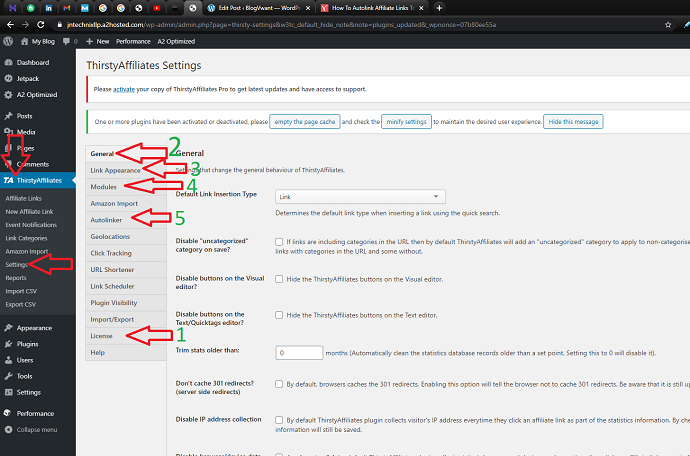
After uploading the pro version, that will ask you to activate with license key. If you don’t see activation window, you can go to ThirstyAffiliate -> Settings -> License. Enter your Email and license key to activate it.
You will have to change some settings under General and Link appearance. You can change link prefix, you can add nofollow attribute, and you can make all affiliate link open in the new tab under Link appearance settings.
You need to make sure Autolinker is checked under Modules section. By default, all modules will be selected. You can uncheck which is not necessary for you. Otherwise, unnecessary modules may consume your server resources.
Select Autolinker option.
You can use 1 or 2 or 3 in the keyword limit. If you place 1, your affiliate link will be shown to one keyword in a post. Like that, if you place 2 affiliate link will be shown two times in a post.
I think remaining options are straight forward. You can understand everything.
How to create affiliate link with auto linking feature
Go to ThirstyAffiliates -> New Affiliate Link.
Type your link name. Paste affiliate link in Destination URL.
Scroll down up to Autolink Keywords section.
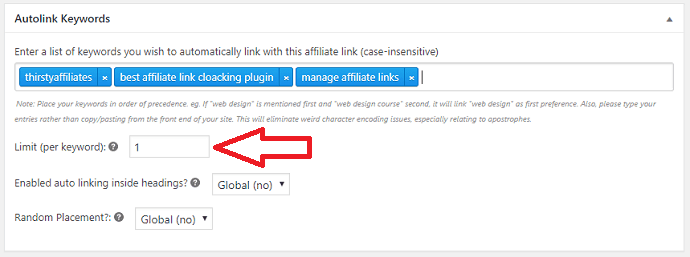
Type your keywords in the box. You can type as many as you like. Here I am using 3 keywords for my Thirstyaffiliates affiliate link. So those 3 keywords always show my affiliate link. When I use any one of above four keywords in my other posts, it will automatically show my affiliate link.
You can set Limit (per keyword) option. Or it will automatically display global setting. Here I have set 1. because I wanted to show my affiliate link once per keyword in a post. When you want to show 2 times, you can set 2. That number is considered per post.
For example, if I use Manage Affiliate links keyword two times in a post, affiliate link shows only one time, the second word does not have the hyperlink. If I set 2 as my limit. Those two terms will show affiliate link.
I prefer to set it as 1. Because too many links will have the negative impact.
- Next Topic To Read: Easy Method to Geo Target Affiliate links in WordPress
- Must-Have Affiliate Marketing Tools
If you want to disable Autolinking feature for any particular page or post, you can disable it. You will see Disable Autolinker option at the right side just below Featured Image option in the post editor.
Conclusion:
Auto-linking keywords with affiliate links are the best and powerful feature to improve your CTR and revenue. Thirstyaffiliate add-on works flawlessly. I am using it in two websites. I can say, it is a must-have plugin.
Now you may know How to Autolink Affiliate links to Keywords in WordPress. If you like it, please help us by sharing this article with your friends. Want more BlogVwant updates, follow us on Facebook, Twitter, and YouTube.