
Are you running membership WordPress site? Want to automate your flows to build solid membership business? Then you need to install and activate MemberPress plugin and MemberPress Developer Tools Addon on your WordPress site. And integrate MemberPress with Zapier. The official MemberPress Zapier integration makes automating your workflows super easy.
If you want to not only build and sell courses easily but also to make automating your flows more easy. Then you need to use MemberPress plugin on your WordPress site. The official MemberPress Zapier integration really aids MemberPress users to automate their workflows. And manage their membership sites easily than before.
In this article, we will show how to integrate MemberPress with Zapier and create zaps in just 4 steps.
What is MemberPress?
MemberPress is a boon to all those who want to run and mange their membership sites easily, with no hassle and code. It is an all-in-one membership and super easy-to-use plugin for WordPress. It aids MemberPress users:
- Build impressive WordPress sites.
- Sell online courses.
- Accept credit cards.
- Sell digital downloads.
- Control who sees your course content.
- Build curriculum visually.
- Connect to Zapier. And this integration automate your workflows.
- Much more.
What is Zapier?
Zapier is a great and single platform for business and marketing websites to connect to over 2000 web apps including MailChimp, Slack, Gmail, Webhooks, etc. And by connecting your site with two or more apps, you can automate your tasks or workflows. That too, without touching a single line of coding and hiring developer.
In brief, Zapier is an easy online automation tool for busy people.
Why MemberPress Zapier Integration
The official MemberPress and Zapier integration benefits MemberPress users in several ways:
- This official integration lets MemberPress users to automate their Workflows. And this way makes it much easier for you to manage your membership sites.
- This integration enables you to connect MemberPress to billing systems, autoresponders, CRMS, etc.
- With Zapier, MemberPress users can connect with over 2000 different apps to generate more leads, bring more users to their membership sites, etc.
- With this integration, you can customize user experience without touching a single line of code.
- Also Read: Check out all-new Classroom mode in MemberPress Courses!
- Top 6 Best WordPress Membership Plugins In Friendly Budget
Make automating your workflows super easy with Official MemberPress Zapier Integration
MemberPress is a great and all-in-one platform for membership WordPress sites. This is because this platform lets you to build and sell courses, connect to over 2000 web apps with official Zapier integration, automate your workflows, etc with no much effort and code.
The official MemberPress and Zapier integration makes automating your workflows more easy. Dueto this, you can easily run and manage your Membership sites. In brief, MemberPress aids you not only to create impressive membership sites easily but also manage them easily.
Now go through the following to know how to create Zapier integrations in MemberPress in just 4 steps.
How To create great Zapier integrations in MemberPress
In this section, you can view how to integrate MemberPress with Zapier and create zaps in just 4 steps.
Total Time: 5 minutes
Step1: Subscribe to MemberPress Pro or higher plan. Install and Activate it.
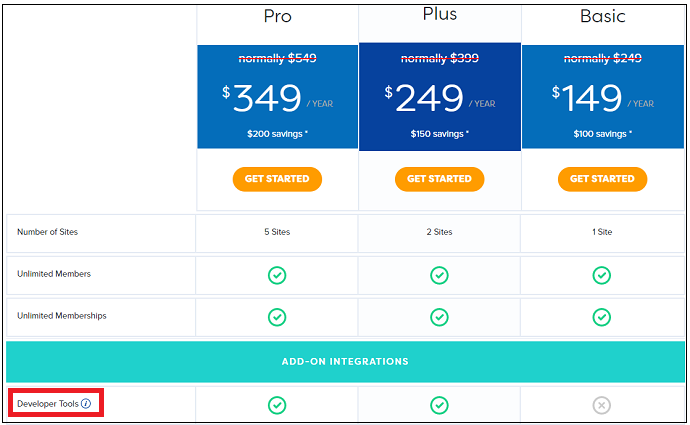
1. You need to subscribe to MemberPress Pro or higher plan. Because MemberPress Developer Tools Add-on is available only in its Pro or higher plan. And you need MemberPress Developer Tools Add-on to use Zapier integration.
2. After subscribing, go to the MemberPress site and login. And download the zip file for the plugin.
3. Move to your WordPress site dashboard. Then navigate to Plugins >> Add New >> Upload Plugin.
4. Choose the recently downloaded “MemberPress.Zip” file and upload it.
5. Click on Install Now and then on Activate Plugin.
That’s it! Now you have successfully installed and activated the MemberPress plugin on your WordPress membership site.
Suppose you already have installed and activated the MemberPress plugin on your WordPress site. Then skip this step and jump to step2.
Step2: Install MemberPress Developer Tools Add-on.

1. Go to your WordPress site dashboard. And navigate to MemberPress >> Add-ons.
2. Scroll down to the MemberPress Developer Tools add-on. Then install and activate it.
3. Next, you can view the Developer option under the MemberPress Menu. 
If you have already installed the Developer Tools add-on. Then make sure that it is updated to at least version 1.1.21.
Step3: Connect Zapier to MemberPress

1. Go to Zapier site and log into Zapier account.
2. Click on My Apps.
3. Next, search for MemberPress and select it. 
4. Here, the app is still in Early Access. That is, if you connect MemberPress for the very first time, you may view No matching connections result. In such a case, you need to join it first by clicking here.
5. After you select MemberPress. Then a new window will pop up asking your API Key and Site URL.
(Here remember that your Site URL must be your domain name (including http:// or https://) without the ending slash (/). Because you are transferring sensitive user data, you must ensure your website uses “https” to secure the connection between MemberPress and Zapier.
And if your WordPress site is in a sub-directory, for example, sample.com/wordpress/. Then you must include the sub-directory as well in the Site URL.)
6. Next, to find your API Key, navigate to your WordPress site dashboard >> MemberPress >> Developer >> REST API page.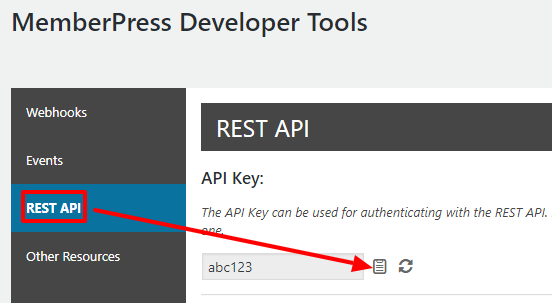
7. Next, come back to your Zapier site and enter your API Key. 
8. Next, click on Yes, Continue button. Then Zapier connects to your MemberPress.
9. Once MemberPress connects to Zapier, you can view the Custom integrations tab under My Apps page.
Step4: Create Zaps with MemberPress
Now it is very easy for you to create Zaps and automate your workflows in your MemberPress website.
For example, we will show you how to automatically add a new MemberPress subscriber to your MailChimp list, upon having a ‘Complete’ Transaction.
Here, MemberPress and Zapier integration makes this easy to do.
1. Go to Zapier site and login to your Zapier account.
2. Click on Make a Zap button. 
3. Next, search for MemberPress over the search bar. Then select MemberPress as the trigger app. 
4. Choose the “Member Signup Completed” trigger option. Then click on Save+Continue button. 
5. Next, choose your MemberPress account. And click on Save+Continue button. 
6. Next, you can view the data pulled from your MemberPress site. You can use the default one created. Or you can search for particular one that you wish to test with. Here, we will use the default. Click Continue when completed. 
7. Next, to start creating an action trigger, click Add a Step or the link provided.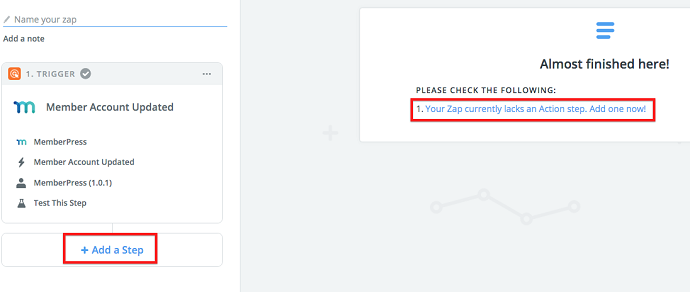
8. Search for MailChimp and select it.
9. Choose Add/Update Subscriber. And click on the Save + Continue button.
10. Click on Connect an Account to connect your MailChimp account.
11. Enter your MailChimp account credentials. And click on Login button.
12. Once connected, your MailChimp account will be selected by default. Once you see it, click on Save+Continue button.
13. Now you need to select the required fields for the subscriber.
• Select the Audience List retrieved from your MailChimp account under Audience field.
• Choose the Email under the Subscriber Email field.
• Choose No under Update Existing field. So that updates aren’t made to an existing email address that already
found on your MailChimp list.
• Scroll down to include other optional subscriber value fields like the First Name and Last Name.
Then click on the Continue button to save your selections.
14. You can now test to ensure that your test subscriber gets added correctly to your MailChimp list by clicking the Send Test to MailChimp button. Double-check your MailChimp list to view if the subscriber is added.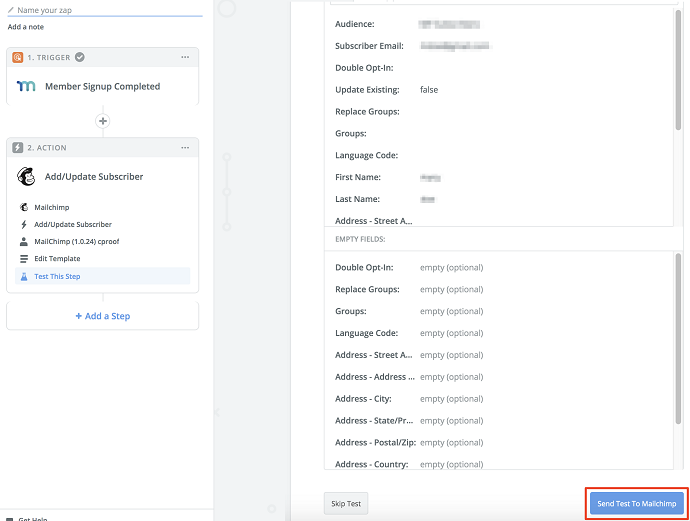
15. Once verified, click on the Finish button to complete the testing step.
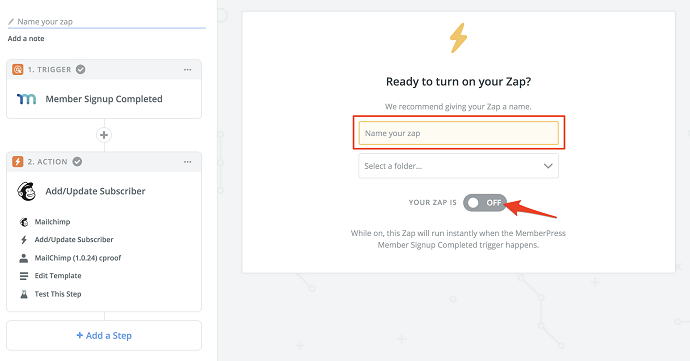
16. As a last step, name your zap and Turn ON your zap.
At last, do a live sign up in MemberPress as a test subscriber. Then make sure that the email address and name gets added to your MailChimp Audience list.
Estimated Cost: 249 USD
Supply:
- MemberPress
Tools:
- MemberPress Developer Tools Add-on
Materials: Software
- Also Read: Killer feature! Drip content in MemberPress – read now!
- Top 8 WordPress Affiliate Plugins To Skyrocket Your Sales:
Conclusion
Now you can know how to integrate MemberPress with Zapier and create zaps. With the official MemberPress Zapier integration, you can connect your MemberPress site to over 2000 web apps including MailChimp, Gmail, Slack, etc with no code and much effort. This way automate your workflows. And generates more leads, bring more users to your site, etc.
MemberPress is really an all-in-one and easy-to-use platform for those who are running membership sites. Because this makes building and selling your courses easy. And automates your workflows as well.
I promise that this tutorial, MemberPress Zapier make automating your workflows more easy, helped you to integrate MemberPress with Zapier and create zaps in just 4 steps. If you like this article, please share it with your friends. If you want more blogging tips, follow BlogVwant on Facebook, Twitter, and YouTube.
MemberPress Zapier make automating your workflows more easy: FAQs
What is the benefit of MemberPress Zapier integration?
Automate your workflows by connecting your MemberPress site to over 2000 web apps including MailChimp, Slack, Gmail, etc.
Is MemberPress free?
No. MemberPress is premium WordPress membership plugin.
What is official MemberPress Zapier integration?
MemberPress has introduced its integration with Zapier to connect your MemberPress sites with over 2000 different apps and services.