It is a must to change WordPress settings after installing WordPress. Don’t publish any post or page before changing settings. In this tutorial, I will show you what are the required settings and how to change them. Everyones need is different You can change them according to your need.
If you don’t know how to install WordPress or how to create a blog, you must read my tutorial about How to create a WordPress website within 5 Minutes and How to earn money with the blog. When you don’t want to spend the time to set up your WordPress website, you can hire a freelance WordPress developer from any one of the Top Freelance websites like Freelancer or Fiverr.
How to Configure WordPress settings
Video Tutorial:
For the reader’s convenience, we always create a video tutorial. Either you can watch and learn or simply skip the video and continue with the steps mentioned afterward.
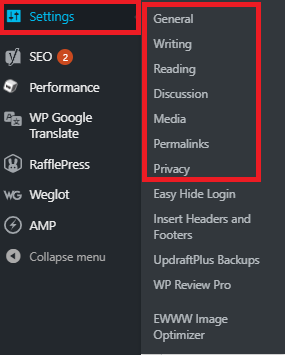
Login to your WordPress dashboard. Hover to the Settings option on the left menu. You will see available settings. The below screenshot shows my website settings. You will see only the first seven options. The remaining options came from the plugins. Remember, only the user with the Administrator user role will have access to Settings.
General Settings
General Settings will help you to add your site title, tagline, date, time, URL and much more.

Select the General tab. You will see an option to enter your site details. You can check below screenshot for my website General Settings.
Site Title: You can give any thing as your site title. You need not give your URL as the title. You can give more informative line as the title. It is better to reflect your site content in the title. Site title will appear in the header of many themes. It will also appear in the Title bar of your browser.
Tagline: You need to give the description of your website in one line. Some themes will display it in the header. Some themes will not display the tag line. But you will always see it in the Title bar of your browser.
Open your live website in the new tab. Hover mouse to the browser tab, you will see Site Title and Tagline.
WordPress Address(URL): It is the directory address of your WordPress installation. If you have installed WordPress in the root directory. Give URL as https://blogvwant.com. If you want the small URL, you can remove WWW from the URL. That means you can just use like https://blogvwant.com.
If you had installed WordPress in a sub directory or other folder like “forum”. You need to give URL as https://blogvwant.com/forum. You could select this option while installing WordPress on your server. It is always better to install WordPress in the main directory. When you need to create another website in the same root directory, then only you can install WordPress on another folder or directory.
Site Address(URL): It is the URL which your users will have to type in their browsers address bar. You can give the WordPress Address URL as the Site Address URL.
Email Address: Enter your Email address. You will receive all WordPress activity notifications to this Email. The notifications might include creating new users or getting comments. This Email will never be displayed on your website.
Membership: If your site is a membership site, then you can use this option. If you have a blog you need not select this option.
New User Default Role: I always advice keep it as Author. You can always change it to Editor or Admin while creating a new user. Author user role has limited access to your WordPress dashboard compare to editor and admin user roles. So that you will be safe.
Other than above options, you will also see the options to change your site language, Timezone, Date format, time format and Week starting date.
Writing Settings
You need not change any settings in the Writing Settings.
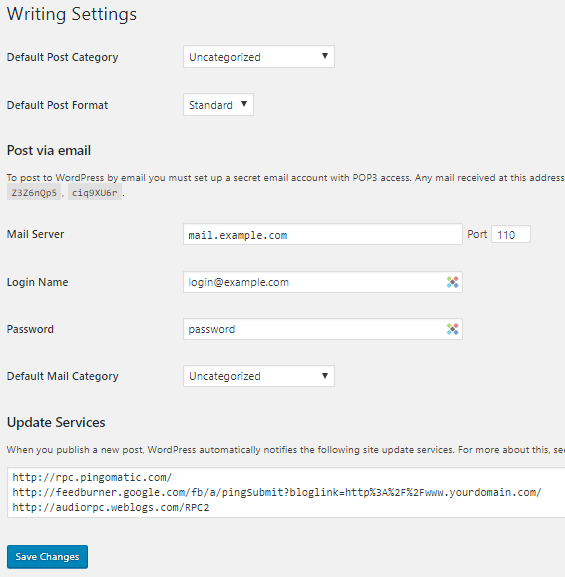
Default Post Category: You can keep it as Uncategorized. You can also change it to any one of your new categories. By default, your post will be in this category. Of course, you can change the category while writing the post.
Default Post Format: It is used by your theme to create different styles for different options. If your theme does not support it, you will not see these options in the post editor. It is better to keep it as Standard.
Post Via email: You can use your email to post to your WordPress website. I did not use this option. I think it is not necessary. You can leave this option.
Update Services: You must enter the list of update services here. When you publish any new post, WordPress will automatically notify to the services listed in this section. It will definitely improve your traffic. You just need to copy the Update services list given in this link and paste in this section of your WordPress dashboard. Make sure every URL separated with the line break.
Reading Settings
Reading settings will give you the option to change the front page and your feed. You can change the number of posts to appear on the front page and feed. You can show full page or summary on feed. You can also discourage search engines from indexing your site. You can also change comment follower statement.
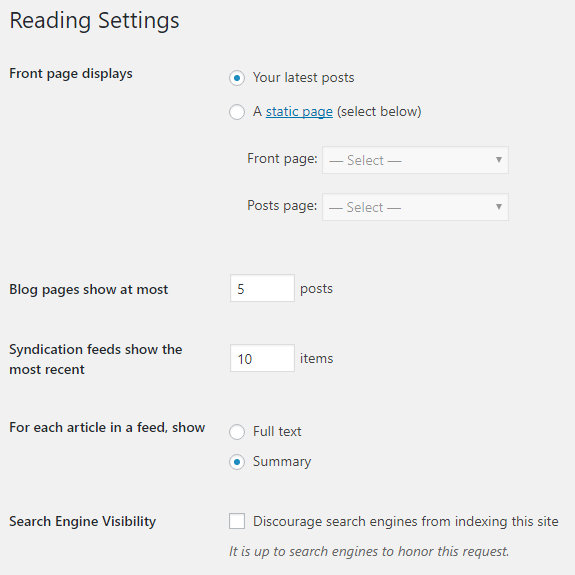
Front Page Displays: You can set your front page to display the latest posts or any other static page.
Blog pages show at most: You can enter the number to show the particular number of post on front page. You can use 5 or 6 or..10… If you use bigger number, your website front page takes too much time to load. It is better to show the fewer number of posts on the front page.
You can see above image to set for other two options.
Search Engine Visibility: You must not check this option. If you check this option, your website will not feature in search engines.
Discussion settings
Discussion settings will allow you to control comments on your website. You can also control comment spam from this section.
Default Article Settings
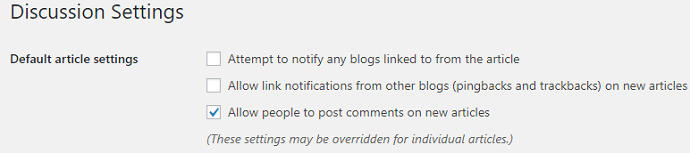
The first option will allow your blog to notify other blogs if you link to them in your article. Your mention will show up in their comment section if they allow pingbacks. It will boost your link building and traffic but there is a chance that this process will slow down your site. It is better to uncheck this option.
- Related: What are backlinks in SEO and how to Use high-quality backlinks
- 6 Must Use Places to Build Backlinks
The Second option will allow the ping backs to your site from other websites who linked to your article. You will see the notification in the comment section. It will produce huge comment spam. It is also better to disable this option.
The third option will allow people to comment on new articles. If you don’t like comments on new articles, then only disable it. Otherwise, it is good to check this option.
Other Comment Settings

You need to check the first option. If you want to get anonymous comments, you can disable the first option.
There is no need to check the second option and third option. Enabling or disabling the third option is depended on your personal opinion. If you want, you can disable comments on older posts.
It is good to enable threaded comments. If you enable it, WordPress allows replies to comments. You can control how many replies to allow for the single comment by using levels deep option. It is good to keep default 5 as Levels deep option. If you increase it to the big value, WordPress will allow more replies and it will disturb the readers.
If you have a number of comments, readers have to scroll down page heavily to reach to the last comment. It will also slow down your page load speed. It is good to break the comments into pages. You can use my options shown in above screenshot to see the latest comment first.
- Related: 6 Ways to Turn off/disable/remove comments from WordPress website
- 4 Ways to Remove Website field from WordPress Comments
Remaining Options
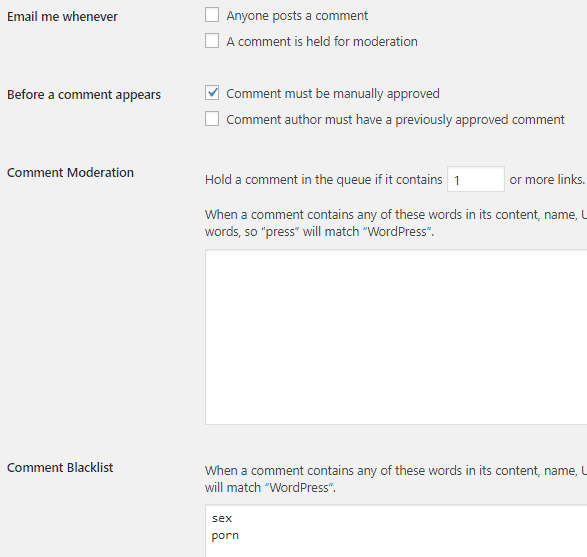
Email me Whenever: I prefer not to check these two options. You can check if your website is new. When your website gets popular, you will get many comments and you will get annoying Emails for every comment.
Before a Comment appears: It is must enable Comment must be manually approved option. If you don’t check this option, every comment will be published automatically without coming to your notice. Any one can write any thing through comments. Spammers and hackers will place malicious links in your comment section. You need not enable the second option.
Comment Moderation: You need not use this option when you enabled the previous option which will send all comments to moderation. If you disabled the previous option then you need to use this option.
Comment Blacklist: If you write any words in this area, comments which contain those words will automatically be sent to spam folder. You need not moderate them.
Avatars
The next section is the Avatar section. You need to enable it. It shows the comment author profile image next to his name. WordPress uses the Gravatar service to show the image. If the author does not have a profile image associated with his Email on Gravatar, WordPress will show the symbol which was set in the Default Avatar section. You can select any one of the images as a default avatar.
Media Settings
When you upload an image, WordPress will create 4 to 5 different sized images from a single image. It will consume your server’s hard disk storage. If you use image compressor plugins like Shortpixel (50% Extra Credits Link) or EWWW Image Optimizer, it will compress 5 images and charge you for 5 images even if you upload one image. To avoid this problem, you can use Media settings effectively.
- Related: How I compress images up to 80% for my WordPress website
- Don’t you resize images for the website? You must do. Read Why?
- 5 Sites for Royalty free stock images for Commercial use

If you set “0” in the Max Width and Max Height fields, WordPress will not generate those images. If you don’t want to generate the thumbnail, you can even set “0” in the Thumbnail fields. I wanted thumbnails because WordPress shows the thumbnail image as the featured image on the archive pages.
It is good practice to check the option Organize my uploads into month and year-based folders. If you check it, WordPress will create a new folder every month under the Uploads folder and store your images in that folder. Otherwise, all your images will be stored in the Uploads folder.
Permalink Settings
Permalink is the permanent URL structure of your blog post or page.
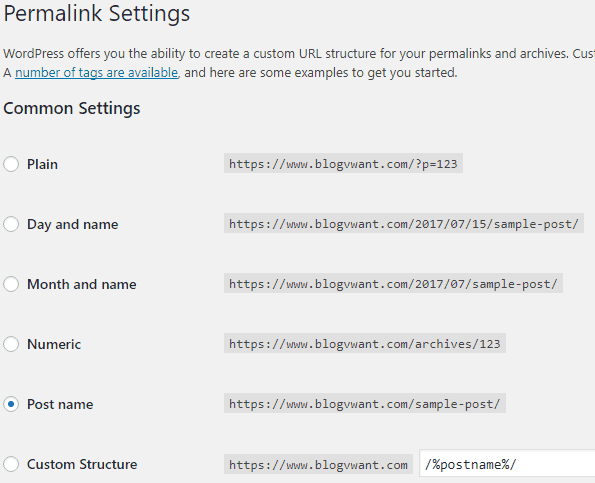
By default, WordPress uses the first option. But it is always recommended to use the SEO friendly URL. Post Name option will give your a better SEO friendly URL structure. This option will give your post title as your URL. You can always change your URL while writing posts. You can also use the Custom Structure option to include your category name also in the URL.
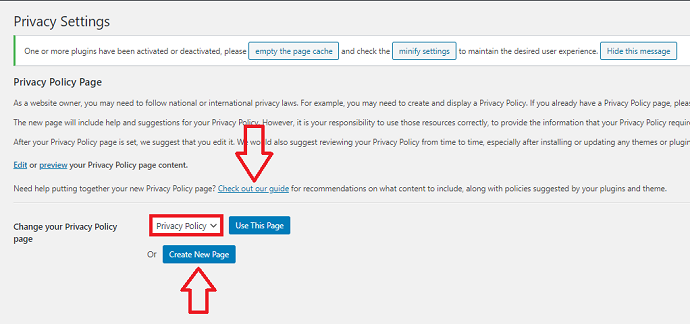
Privacy Settings
Here you only need to set the privacy policy page. If you do not set up a privacy policy page yet then you must create first then set it here. Basically privacy page is the page where every website owner provides important details such as what data they are collecting from users, information related to affiliate programs, AdSense disclaimer, and much more.
You can check the guide to learn more about the content to be included in the privacy page.
- You May Also Like: Free and Best way to backup WordPress website
- Best 5 Top WordPress Security Plugins
I hope this tutorial helped you to understand WordPress settings. If yes please share it with your friends. Want more blogging tips and offers, follow BlogVwant on Facebook, Twitter, and YouTube.