Want to Create your own website? Want to Make a blog to earn money online? Creating a website or blog is one of the best methods to make money online. Do you know that you don’t need to learn any typical coding languages to create your own website? It is very easy to make a website.
If you want to learn complete web designing, I suggest you take this course on Udemy. But there is no need to learn complete web designing to create a website.
- Related: 5 Best places to learn Web design
- 5 Best free websites to learn Android app development
- 5 Best free online Web development courses
Earlier we have given the detailed guide about Essentials for creating a website, how to create a WordPress website using Bluehost (60% Discounted Link) and How you can make money using a website.
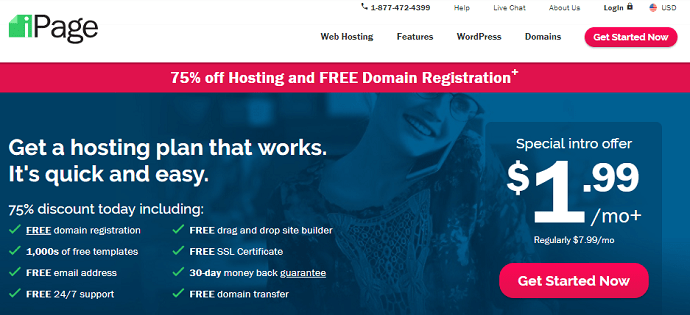
This time I am going to give you detailed How to article about creating your own website using iPage (75% Discounted Link).
Essentials to Create your own website
When you want complete control on our website, you must buy the hosting service. You can even create a free website using wordpress.com but that will not be your website. You will not be having the complete control over it.
There are only three essential things you need to create a website.
- Web Host: Which stores your website files. Here iPage (75% Discounted Link).
- Domain: which is the name of your website. for ex:- www.blogvwant.com. Usually, almost all web hosting services give you a free domain. If you want, you can buy a domain from Godaddy.
- Content Management System(CMS): which converts your normal text to HTML format which is understandable to the browsers. There are many CMSs are available. But WordPress is the best.
In this article, I am going to show you how to create your own website using iPage with WordPress CMS.
Why iPage?
iPage is one of the cheapest web hosting provider. It gives you almost all hosting features for very less price compared to other hosting services. Price is the main reason why I recommend it for new bloggers. You might not know whether you will continue blogging for life or not. You might be learning initially, so you need not go with other expensive services.
Features
- Free domain.
- Free SSL.
- Unlimited storage and bandwidth.
- 30-Day Money back guarantee.
- Free website builders.
- Free ad credit.
- etc.,
I have started my blogging carrier with iPage only because of its price.
Of course, the quality of the services, support and the speed of the website is not as good as Bluehost and HostGator. When you don’t mind about money and want the best quality service you can go with Bluehost which is the no.1 recommended hosting service for WordPress. You can skip this article and read How to Make a WordPress blog using Bluehost.
Our readers get special discounts on the hosting services.
Don’t want to spend too much money on learning, then just go with the iPage. And continue reading this article.
Guide To Create Your Own Website with iPage
Just Visit This iPage Discounted link. You will see a 75% discount on the shared web hosting. If you want, you can select WordPress essentials plan which cost you more but gives you better speed. But for starters, I sugget just go with this plan.
Select Get Started Now button shows that in below screenshot.
Type your domain name in the domain field. Select search. You will see whether your domain is available or not. You will also see the available domain extensions like .COM, .NET, etc.,
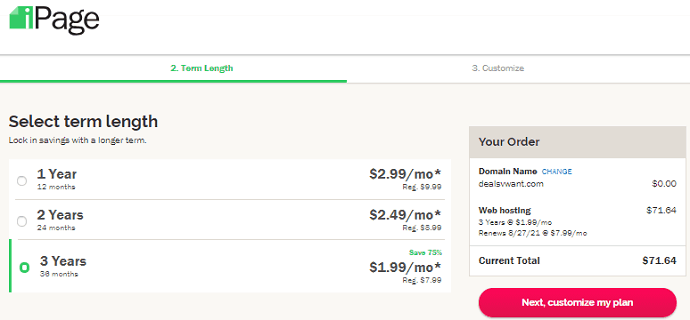
Select Next, choose my term button.

Now you need to select the number of years. If you select the three years plan, you will get the maximum discount. If you want to start the blog with less money, you can go with one year or two years plans.
Select Next, customize my plan button after choosing the term.
In the next page, you will be asked to select the extra features. If you are a starter, you need not go with the premium services for security, Backup, Domain privacy, and Website builder. Because you will have free alternatives to these premium services.
You can uncheck all of them and select Continue to Payment button.

Here are the free alternatives to the above premium services. You need to use below alternatives after installing the WordPress on your domain.
- There is no free alternative to Domain Privacy. If you want you can select that option. It just hides you Email and contact information on your domain. I don’t think it is necessary for the new bloggers.
- You can use WordFence security plugin for your WordPress website which is the free alternative to SiteLock security. Read Top security plugins for WordPress website.
- Updraftplus is the free plugin which will backup your website to the cloud storage. Read How to use Updraftplus to Backup WordPress website.
- WordPress is the free website builder.
Fill your details and card details at the payment page and pay the amount.
You will see a confirmation message. That will show that you need to check your Email.
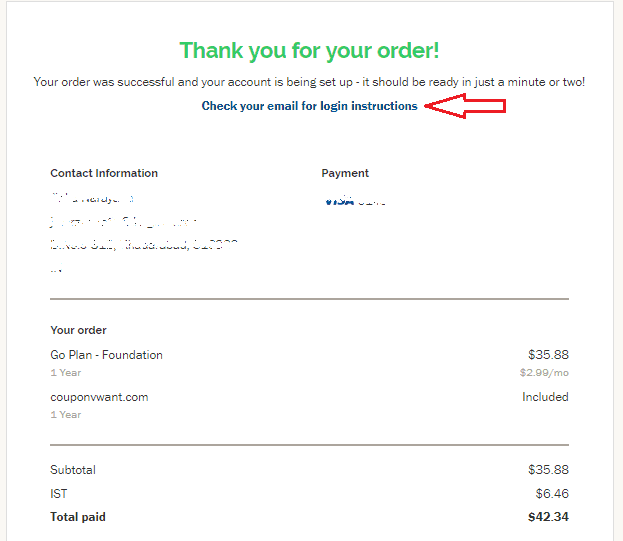
You must have received an Email with the subject Your iPage Order Confirmation & Login Info.
Open that Email. The first part of the Email contains your billing details. The second part contains your username. And they will give you the link to set the password. Just select that link. That link will be valid for 48 hours only. So it is better to set the password immediately.

It will ask you a security question and the referral information. You need to fill them, check the terms box and select Save&Continue option.

Now you will see the iPage control panel. You will also see some popups which ask for some details about your knowledge and experience in blogging. You can see the one in below screenshot.
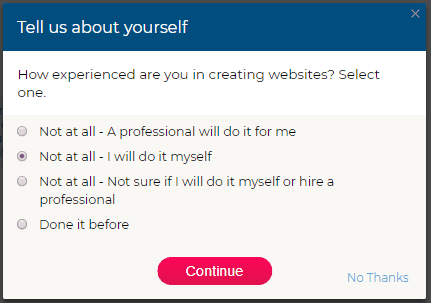
If you want to setup your website with a professional, you can select the first option. But they will charge extra. If you want to learn your self. Select the second option and follow our guide to learn your self. Select Continue option. I suggest you select WordPress as the site builder in the next popups.

After completing all questions, you will see a popup where you can select WordPress to install or you can go to ControlPanel.
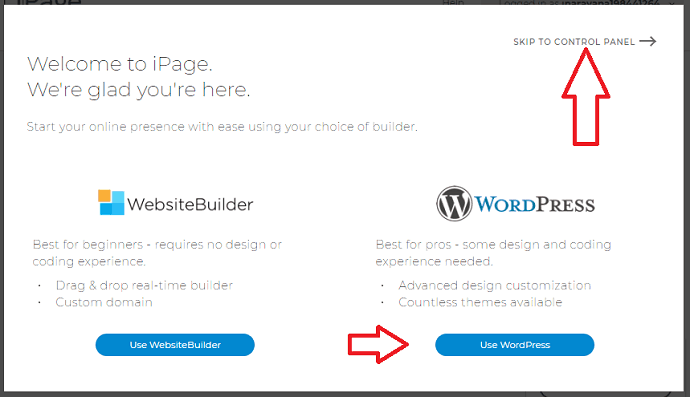
If you want to set the password to your Control Panel, you can click on SKIP TO CONTROL PANEL. You can also do it later.
For now, Just select on Use WordPress option.
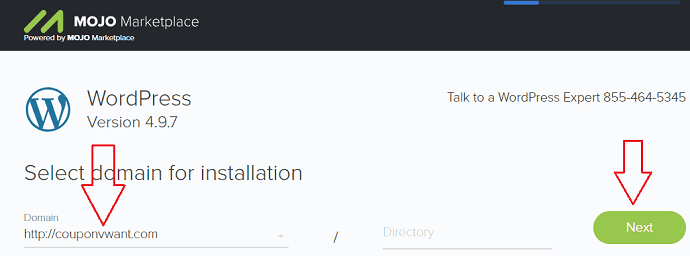
In the next window select your domain by clicking on the drop-down. You can select www version or non-www version. You can leave the Directory field empty. When you want to use your domain as the sub domain, then only you need to use the Directory. For now, leave it empty.
Click Next. If you scroll down the page, you will see the premium plans to setup the WordPress website. But you don’t need them. Just follow our guide to setup for free.
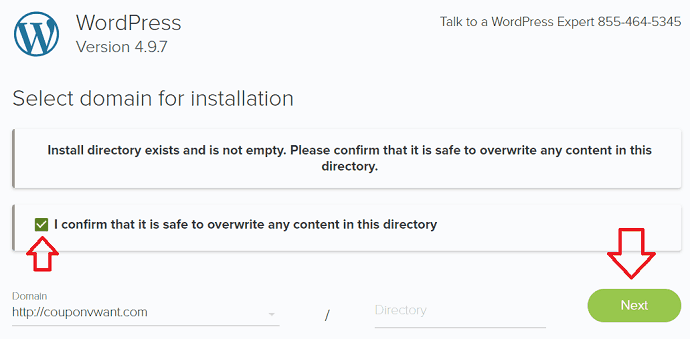
It will once again stay on the same page and will ask you to over right the content of the folder. You need not worry about any thing. Just check the confirm box and select Next.
Now you will see a page shown below. Enter your site title, your admin username, admin email, and password. By default, you will see some values in the fields. You can change them according to your need.
Make sure to select the complex username and password. Of course, it is tough to remember complex passwords. So you need to use Best password managers like Sticky password (70% discounted link). You can also read Our complete review of Stickypassword.

Make sure to check all three boxes and select Next. You need to remember that, these credentials for your WordPress website.
You will get separate credentials for your Control Panel. Both are different.
You will see Installation Complete message. Just Click on the given link at the end of the message.
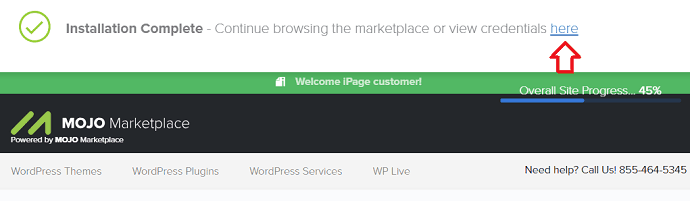
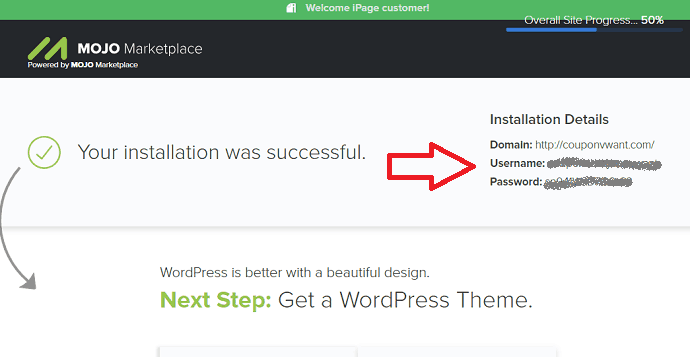
You will see your website domain and credentials. It will show that buying a premium theme is as your next step. But you need not go with that step.
When you open your website in a new tab you will see that the website is live now.
Now just click on Admin login button to login with your credentials. But I recommend you to open yourwebsite.com/wp-admin (Replace yourwebsite.com with your domain), you will see the login window shows that in below screenshot.

Log in with your username and password. You will see the WordPress dashboard. This is your website backend. Every day you need to login into WordPress dashboard to update your website.
Creating Password for the Control Panel
You must create the password to your control panel. Control panel is the place where your website files will stay. You can control your domain everything from the control panel.
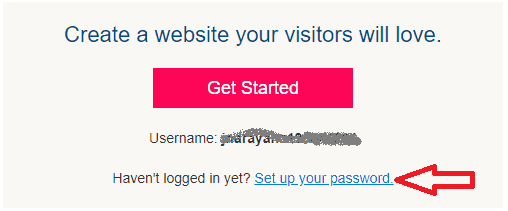
Check your Mail inbox. You must have received a mail with the subject Getting Started with iPage.
Click on Set up your password link near to your username.
Enter your domain or username in next window. It will send you a link to reset the password.
Now you can log in into your control panel at ipage.com.
You must have received another Email to verify the domain. You need to confirm the contact information to verify the domain.
What Should I do after creating a WordPress website?
Now you have created your own WordPress website. You need to learn about WordPress. When you want to save time, I suggest you learn WordPress from wp101 which gives you many video tutorials and saves your lot of time.
When you don’t want to spend little money to learn, you can read this guide which will give you complete information about maintaining the website, SEO and making money with the website.
I want to give you a brief idea about the next steps you need to follow after creating the WordPress website.
- Configure the WordPress settings
- Now you need to activate the theme. You can use the free theme. If you want the premium theme, I suggest you Genesis themes.
- Install the must-have WordPress plugins. Read What is a Plugin and 4 Methods to Install a WordPress plugin.
- Learn about the SEO in this section which will help you to promote your website and to improve the traffic.
- Read this Guide to Make Money with the blog using Adsense and Affiliate Marketing.
If you like this guide to Create your own website, don’t forget to share it with your friends. Want more blogging tips, follow BlogVwant on Facebook and Twitter.