
Do you want to collect PayPal payments on your WordPress site? Then you need to install and use WPForms’ PayPal Addon on your WordPress site. And WPForms makes it super easy to integrate PayPal into your forms for order form payments, donations, and more.
Now go through this article to learn how to install and use WPForms’ PayPal Addon on your WordPress site and to collect PayPal payments. And also learn how to view the status of payments of PayPal payment forms straight on your WordPress site.
What is WPForms?
- WPForms is the most powerful, beginner-friendly, and world’s best contact form plugin for WordPress.
- With its world’s no.01 drag & drop form builder, numerous pre-built standard templates, and add-ons, you can build any form in less than 2 minutes, without a need for a single line of code.
- With WPForms, you can easily build the following most popular forms.
- Contact Forms.
- Payment Forms.
- Newsletter Forms.
- Survey Forms.
- Registration Forms.
- And more.
- Further to extend the functionality of your forms, WPFroms permits you to integrate them with the most popular forms like:
- PayPal Standard.
- ActiveCampaign.
- Constant Contact.
- MailChimp.
- Stripe.
- Drip.
- GetResponse.
- And more.
What is PayPal and how it works?
PayPal Holdings, Inc. is an American company operating an online payment system worldwide, that permits people to accept, send, and pay money over the internet.
In brief, it’s an easier, faster, and safer way to pay online payments.
Whether you are shopping in your country or around the world, a PayPal account permits you to check out safer, faster, and easier.
That’s why PayPal is accepted in over 200 markets. And trusted by over 300 million active accounts.
To know how PayPal works, let’s view the below steps:
- Go to PayPal website and Signup. It’s free and just takes a few minutes.
- Next, you need to link credit/debit cards at once.
- Next, you can start paying with PayPal in online stores or anywhere.
- Then you can receive the email receipts of your purchases.
- Related: Top 6 PayPal alternatives that save your transaction fees
- 6 Best Payment gateways for international transactions
What is WPForms’ PayPal Addon?
WPForms’ PayPal Standard addon lets you to easily integrate your WordPress site with PayPal so that you can easily and quickly:
- create order forms for the physical products,
- sell digital downloads,
- collect pre-payments for services,
- add a simple donation form to your WordPress site,
- and much more.
WPForms discount
First time customers will get the 50% discount on all WPForms plans through This WPForms discounted pricing page.
- You Might Like: How To Create An Order form in WordPress With or Without Payment Option
- 5 Best Contact Form Plugins for WordPress
How To Collect Paypal Payments on Your WordPress Site using WPForms
WPForms’ PayPal Standard addon makes it easy for you to add PayPal into your order forms. And with this, you can start collecting payments on your WordPress site for your order forms, donation form, and more.

In this section, you can view the following 4 steps needed to collect Paypal payments straight on your WordPress site using WPForms.
1. Buy WPForms Pro Plan or Higher.
2. Install and Activate PayPal Addon.
3. Create A New Form or Edit An Existing Form.
4. Add PayPal Payments to Your Forms.
Total Time: 2 minutes
Step1: Buy WPForms Pro Plan or Higher

1. The primary step is you need to buy the WPForms Pro plan or higher(50% Discounted Link). Because PayPal addon is included in WPForms Pro and Elite plans.
2. The cost of the WPForms Pro plan is $199.50. But at this price, your WordPress site can, not only access PayPal Standard addon but also the other popular addons and features of WPForms like Stripe, Zapier Integration, Form Abandonment, Surveys and Polls, User Registration, Login Form, and more.
3. After you purchase, you need to install and activate the WPForms plugin on your WordPress site.
4. If you have already installed, continue to the next step. Otherwise, install and activate WPForms on your WordPress site. And then go to the next step.
Step2: Install and Activate PayPal Addon

1. On your WordPress site dashboard, go to WPForms >> Addons.
2. Next, scroll down the page to view PayPal Standard Addon.
3. Then click on the Install Addon button located below the PayPal Standard Addon.
4. Next, PayPal Standard Addon installs and activates on your WordPress site.
5. Once the installation completes, you can view Status: Active, just below the PayPal Standard Addon.
Step3: Create A New Form or Edit An Existing Form

1. Now you need to create a new form or edit an existing form.
2. If you don’t have any existing form, create a new form using Billing / Order Form. However, you can also use any form template to create a new form.
3. Here, by default, the Billing / Order Form consists of all fields that are needed for a payment form. Use those fields, customize, and create an order form in your way.
Step4: Add PayPal Payments to Your Forms
1. Now you have created an order form. The next step is to connect it to PayPal.
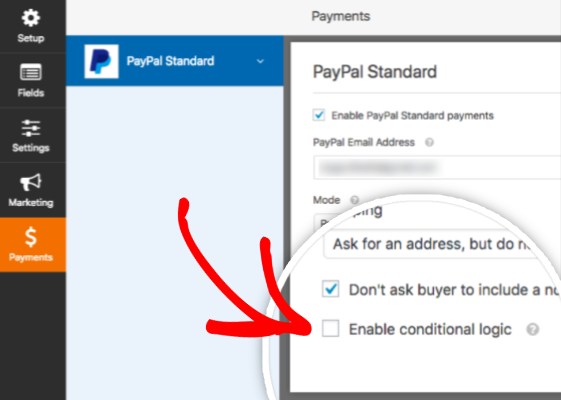
2. To do this, edit the order form which you have created just now. Then navigate to Payments >> PayPal Standard. And select the checkbox of Enable PayPal Standard payments.
3. Next, you need to fill the following fields:
PayPal Email Address: This is the email for your PayPal account, where payment will be sent.
Mode: Choose the options Production or Test / Sandbox.
Payment Type: Choose the options Products and Services or Donation.
Cancel URL: Enter the URL to send your users to when they don’t complete PayPal checkout.
Shipping: Choose one of the options, Don’t ask for an address, Ask for an address, but do not require it, or Ask for an address and require it.
Suppose you are shipping a product to your user, you can choose to Ask for an address and require it.
Next, you can view two checkbox options, at the bottom of these options.
Don’t ask buyer to include a note with payment: Select this box, if you don’t want users to add a note in the PayPal checkout.
Enable conditional logic: Select this box, if you want to set up conditional logic.
When you are ready, click on the Save button.
That’s it! You have now added the PayPal Payment to your order form.
Now whenever users submit this form on your WordPress site, then they will be taken to the PayPal website to complement the payment process.
How To Set Up Conditional Logic for PayPal Payments (Optional)
To set up conditional logic for PayPal payments, follow the below steps:
Step1: Edit the order form that you have created just now. However, you can edit any of your forms.
Step2: Next, navigate to Payments >> PayPal Standard. And at the bottom of the page, select the checkbox of Enable conditional logic.
Step3: Next, it displays additional settings that you need to configure.

Step4: Now consider an example to configure these additional settings. In this example, users will be taken to PayPal if they choose to sign up for our workshop. And this is the conditional logic rule.
Step5: Now in your order form add a Dropdown Items field which will be used in our conditional logic rule. Here, you are letting users choose whether they would like to signup for our workshop or not.

Step6: Next, navigate to Payments >> PayPal Standard. And scroll down to Enable conditional logic. And set the conditional logic to: “Process this charge if Would you like to sign up for our workshop? is Yes, sign me up!”

That’s it! You have now set up conditional logic for the PayPal payment form.
Now whenever users submit this form, then they will be taken to the PayPal website if they choose to signup for our workshop.
Final Thoughts On How to Collect PayPal Payments on Your WordPress Site using WPForms
You are now able to collect PayPal payments straight on your WordPress site using WPForms PayPal Addon. And WPForms’ prebuilt donation and billing order form templates, drag & drop builder, and PayPal Addon, make it really super easy for you to build any PayPal payment forms in less than 2 minutes, without a need for a single line of code.
Now you must say thanks to WPForms for making the complex task of creating PayPal payments forms on your WordPress site easy and fast.
At last, you can say that when two great forms WPForms and PayPal are combined on your WordPress site. Then you can directly and easily collect payments on your WordPress site.
- Read Next: 7 Great Sign Up Tools To Grow Your Email List In No Time
- An Epic List of 7 Best Free Email Newsletter Services
I confirm that this article How To Collect PayPal Payments On WordPress Using WPForms is a quick guide for you to learn how to install and use WPForms’ PayPal Standard addon on your WordPress site. Further, you can learn how to view the status of payments of PayPal Payment forms straight on your WordPress site. If you like this article, do a favor by sharing this article and follow BlogVwant on Facebook and Twitter for more tips.
WPForms’ PayPal Standard Addon: FAQs
How do I test PayPal payments in my forms?
The best and easy way to test out your PayPal forms is to submit an entry and then follow the same steps as your users.
To perform this task, you need to set up PayPal’s Test Mode, before adding your form to a live page. This allows you to test transactions before accepting actual payments.
What happens when a PayPal payment form is submitted?
Whenever users submit PayPal payment forms on your WordPress site, then they will be taken to the PayPal website to complete the payment process.
How do I know when the user completes their payment on PayPal’s site?
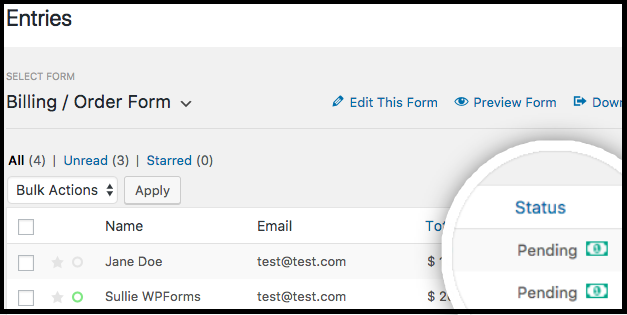
You can view the status of payments of PayPal payment forms straight on your WordPress site dashboard. To view, go to WPForrms >> Entries.
Until your user completes the PayPal payment, the Entries page displays a Pending status for that entry. Once the user completes the payment, this status changes to read Completed.