
Want to know how to create Popup Coupon easily that really boosts your sales? That too without touching a single line of code.Then you should install and use OptinMonster on your website.
OptinMonster aids you to create any popup coupon easily requiring no coding at all. And display them on your website to the right people at the right time to skyrocket your website conversions and sales.
In this article, we will show you how to create popup coupon easily using OptinMonster. And how to display them to your site visitors. Also, how to create a coupon code URL with WooCommerce and Shopify online stores.
Why use popup coupon?
Popup coupons really help you boost sales and conversion. If you are running a blog or eCommerce site, then you can attract your site visitors and increase your sales simply by displaying coupon codes using popup coupons to them. Besides this, popup coupons aid you to increase conversions, make your visitors to stay for longer time on your website and visit your site again, make your blog popular, and much more benefits they give to you.
Why OptinMonster for creating Popup coupons?

If you want to create popup coupons easily without touching no code. And want to display the perfect offer discount to the right people at the exact time to skyrocket your sales and website conversions. Then you need to install and use OptinMonster on your website. Though there are several plugins available in the market for business sites. OptinMonster is the #1 conversion optimization plugin. It really aids you in several ways.
- Create visually stunning offers with no code.
- Display the right offer to your visitors at exact time to convert them into sales.
- Reduces cart abandonments.
- And much more.
That’s why over 1 million website owners are now using OptinMonsters to turn their traffic into sales, leads, and subscribers.
It is the #1 most powerful conversion optimization toolkit in the world. You definitely need it, if you are monetizing your website in any way, whether it be it be lead generation, display ads, product sales, or affiliate marketing.
- You Might Like: OptinMonster Review: The Best Popup Plugin For WordPress
- 6 Best OptinMonster Alternatives OR Competitors
How to Create Popup Coupons that Boost Sales: OptinMonster Makes It Easy
OptinMonster is the best conversion optimization tool for business websites. With this, you can not only create popup coupon with no code. But also display the offer discounts to the right people at the exact time. Now go through the article to learn how to create a popup coupon and display it to your visitors using OptinMonster. You can also learn how to create a coupon code URL with WooCommerce and Shopify online stores.
How to create popup coupon with OptinMonster

In this section, you can view how to create a popup coupon with OptinMonster in just 5 steps without touching a single line of code.
Total Time: 5 minutes
Step1: Subscribe to any of OptinMonster premium plans
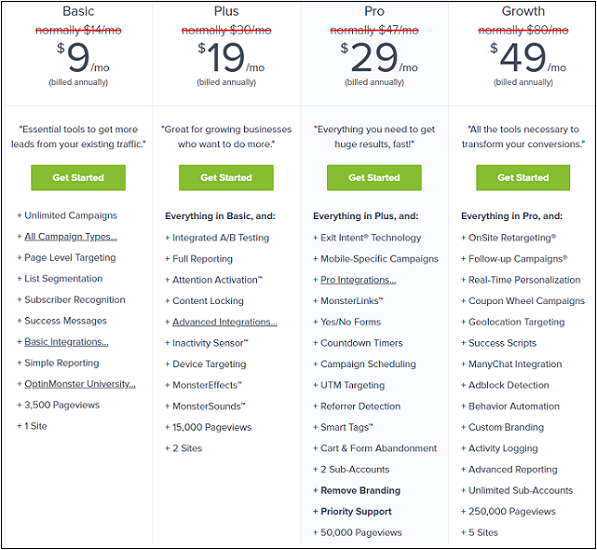
1. To get started, you will need to subscribe to any of the OptinMonster premium plans.
2. The premium plans include Basic, Plus, Pro, and Growth. You can subscribe to these plans annually or monthly.
3. So, visit OptinMonster website and subscribe to any of its premium plans.
Step2: Create your Campaign

1. Log in your OptinMonster dashboard. Then click on Create Campaign.
2. Next, choose a template for your popup. It provides over 30 professionally designed templates with different layouts and color schemes. So, you can choose the relevant one.
3. Here, we are using the Coupon theme. You can find it by scrolling via the themes. Or type Coupon in the search box to find it quickly.
4. Next, name your popup. Choose the website you will use the popup on. Then click the Start Building button. 
Step3: Customize and Design your Popup Coupon
1. All OptinMonster templates are fully customizable. If you want to design your own form in HTML, you can use OptinMonster’s Canvas technology to implement it.
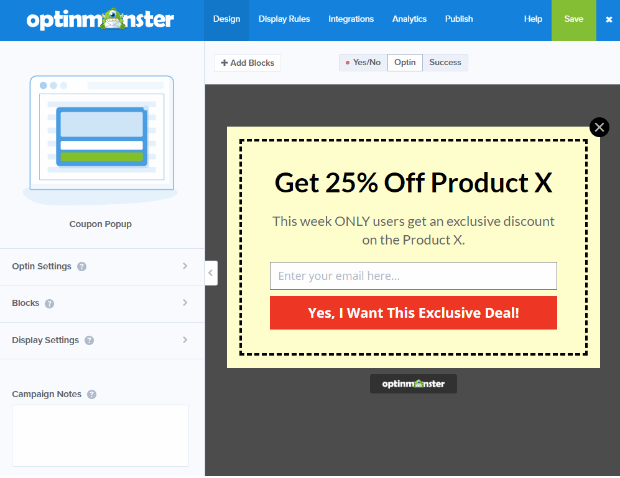
2. Once you click on Start Building button, you will be directed into OptinMonster’s amazing drag-and-drop campaign builder.
3. Here, you will see a live preview of the default coupon popup on the right and the editing tools on the left. Also, you will see the Save button on the top right corner of the builder. Use it often.
4. Click on the headline to bring up the element tools on the left. Then type your desired text in the text box. And format the text with the available tools. 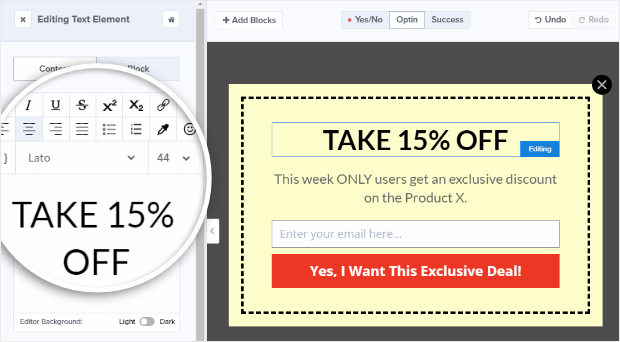
5. In the same way, edit the body copy as well. You can add more details of the offer and what visitors have to do to get it, such as enter their email address.
6. If you want to add image to your optin. Then click on +Add Blocks, then drag and drop the image element to the live preview.
7. Next to change the background color of your popup. First, click on the Home icon in the builder, or the Design tab. Then go to Optin Settings >> Optin View Styles. 
8. Here, you can not only change the background color but also do tons of other things like add an image, overlay color, or a border. 
9. Click on the Submit Button in the live preview to bring up the Editing Fields Element menu on the left. Here you can edit your optin fields, button formatting and actions.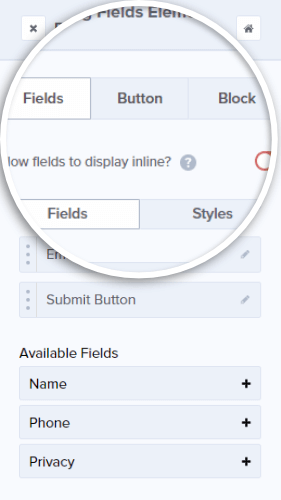
10. Next click on Button tab and type your desired text in the Button Text field. Here we are using Get Started Now. This is the call to action, which is the one thing you desire visitors to do to take the next step.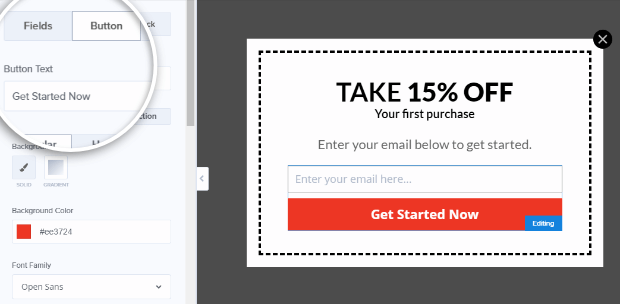
Step4: Set Delivery option

1. Once you have completed the basic design of your coupon. You will need to set the delivery options to deliver it to your customers after they hit the submit button.
2. OptinMonsters’ Success View lets you deliver it immediately. And you can also send it via email. But to send it via email, you will need to enable your email service provider integration.
3. You can use the Success View to:
• Type in the coupon code on the success view as shown above. You can edit this in the same way as the other parts of your campaign.
• Alternatively, redirect visitors to a new page where they can redeem the coupon.
4. The Success view is already set up as the default button action. This means you don’t need to change a thing in your button action. Then your optin will display visitors whatever Success message you design in your Success View.
If you want to change your button action to do something else, like forward visitors to a different page once they optin. then you will need to change the button action.
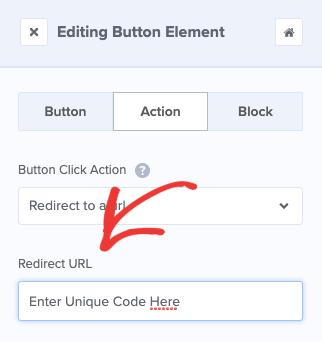
5. After you have edited your button text, click on the Action section. 
6. Click the drop-down under Form Success Action to view the actions available. Then choose Redirect to a URL and type your URL in the Redirect URL field. 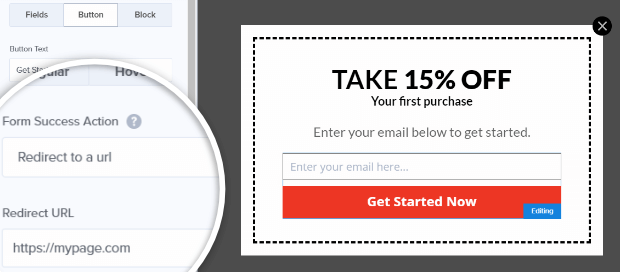
Step5: Publish your Coupon Popup

1. The last step is you need to save your changes and publish your campaign. To begin the publishing process, click over the Publish tab to view publishing options. And then toggle the status button to LIVE.
2. You will need to install OptinMonster plugin to get your popup coupon on your WordPress site. Once you have done that, go to the OptinMonster section of the WordPress dashboard, and click “Refresh optins”. Then you will see the name of your new campaign. And you will also be able to see if it is live.
3. At last, your final coupon will look like:
Estimated Cost: 9 USD
Supply:
- OptinMonster
Tools:
- Customer Acquisition and Lead Generation Software
Also Read: 6 Outstanding Mailchimp Competitors for Email Marketing
How to welcome new visitors or retaining exiting customers with a coupon popup
After you have published a coupon popup on your site, you need to set Display Rules to show your coupon popup immediately or after some time when your visitors visit your site. This is the best way to welcome your new visitors. And you can also set display rules to show your coupon popup when your existing customers leave your site. Now let’s look at how to do either or both.
To do this task, go to your campaign’s dashboard. And click on the Display Rules tab.

Here you can have the several options to display your popup coupon.
How to welcome guests with a popup coupon:
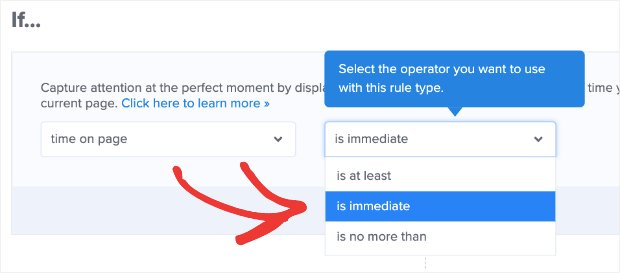
You can set display rules to show your popup coupon immediately or after some time when your new visitors come to your site. Because of default settings, your popup coupon will be displayed after x seconds when your visitors come to your site.
If you want to display it immediately, go to OptinMonster’s dashboard and click on Display Rules. Then click the option is immediate.
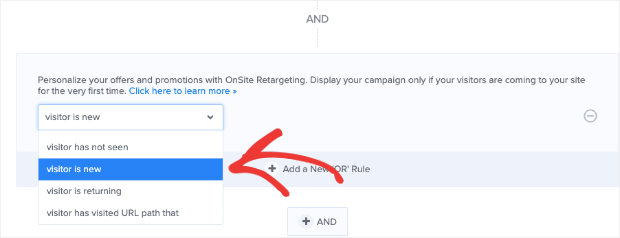
Next change your Onsite Retargeting rule to “is visitor new“. And don’t forget to save your changes.
How to capture customers who are leaving your site with a popup coupon:
OptinMonster’s exit-intent is one of the highest converting options. Using this option, you can show your popup coupon when visitors about to leave your site. And this is the best way to reduce abandonment.
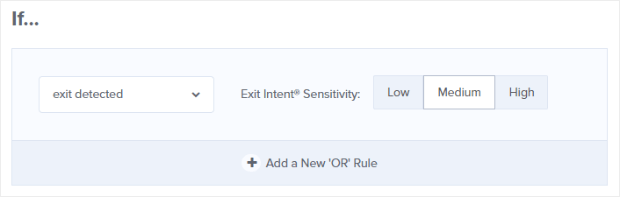
To do this, go back to your OptinMonster’s dashboard. Change the first setting to exit detected. Then select the Exit Intent Sensitivity as Medium.
Also Read: 6 Best WordPress Landing Page Builders or Plugins
How to create a coupon code URL with WooCommerce and Shopify online stores
OptinMonster works with tons of eCommerce platforms. However, here we want to show you how to create a coupon code with the two biggest players in the market: WooCommerce and Shopify.
Creating a coupon code URL with WooCommerce:
Step1: Sign up for WooCommerce with your WordPress account. Then install and activate WooCommerce plugin on your WordPress site.
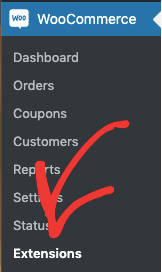
Step2: Go to your WordPress dashboard >> WooCommerce. And click on Extensions.
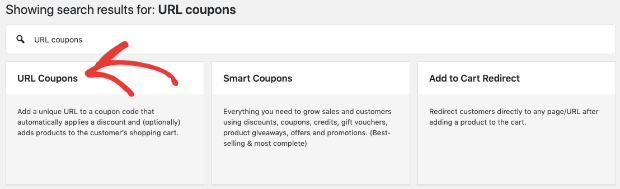
Step3: Next, search for URL Coupons.
Step4: Purchase this extension. Once you do it, you will able to create a unique URL.
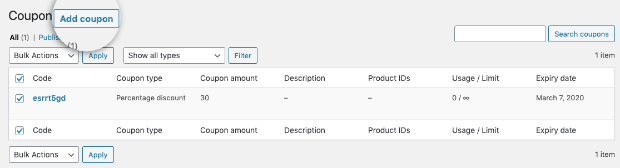
Next, go to your WordPress dashboard >> WooCommerce >> Coupons.
Then click on Add New Coupon.
Step5: Next in the general description fields, you can create your custom coupon URL:

Step6: This is the URL that you will need to put in your coupon popup.
To do this, go back to your campaign’s dashboard in OptinMonster and enter your coupon URL in the Redirect URL for your call to action.
That’s it! Suppose you are offering 30% off for a marketing course for first-time visitors. Then your campaign look like this:

When your users click your call to action button, Start Now. Then they will be redirected to the checkout with the coupon code automatically applied.
Creating a Coupon Code URL with Shopify:
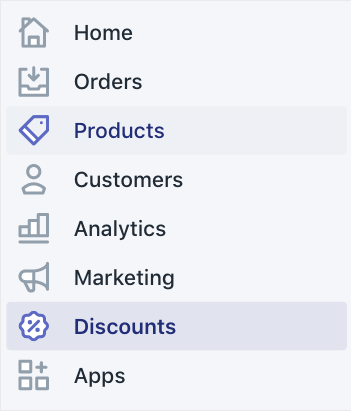
Shopify makes sharing your coupon URL codes incredibly simple. In fact, you don’t have to do anything with your WordPress site for this. Simply go to your Shopify store dashboard.
Click on Discounts.
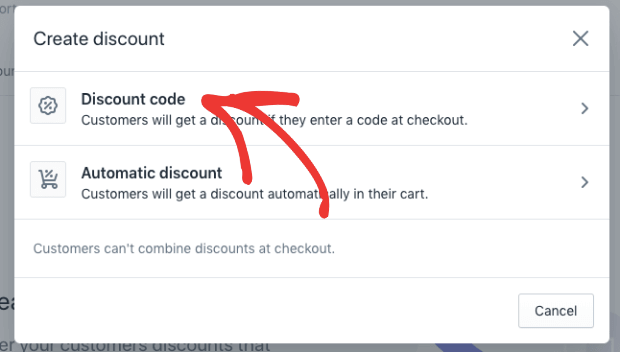
Next click on Create discount.

Next, click on Discount code.
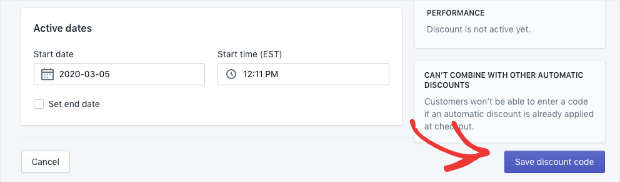
Next, you can change the conditions of your discount code.

Once you are finished, scroll down and click Save discount code:
Next, scroll back up to view your confirmation message. In that message, you will see an option to Get shareable link:

Next, click on that to see your new coupon popup code URL:
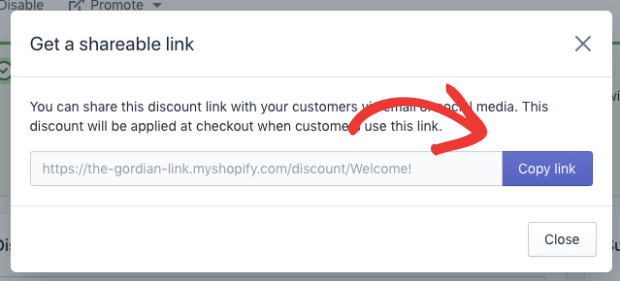
Now you can enter that link in your popup campaign in your OptinMonster dashboard just like we did earlier with WooCommerce:
Conclusion
Now you have seen how to create popup coupon easily without touching a single line of code using OptinMonster. Further, OptinMonster can work with tons of eCommerce plugins like WooCommerce and Shopify. So, with these you can easily create a coupon code URL. And insert it in your OptinMonster coupon popup. And when your users click your call to action button on your coupon popup like Start Now. Then it redirects them to the checkout page and automatically applies the coupon code.
I really believe that this tutorial, How to create Popup Coupons that Drive Sales, helped you to create popup coupons easily with no code and display them to your visitors on your site. If you want more blogging tips, follow BlogVwant on Facebook, Twitter, and YouTube.
How to create Popup Coupons using OptinMonster: FAQs
What is OptinMonster used for?
For creating coupon code with no code, converting website traffic into sales, leads, and subscribers.
Is OptinMonster free?
OptinMonster doesn’t offer any free trial. Or any free version. It is a premium plugin that offers both annual and monthly plans.
Can OptinMonster works with WooCommerce, Shopify?
Yes. It works with tons of eCommerce platforms like WooCommerce and Shopify.