
When you want to start a WordPress blog, you need to install WordPress. After that, you must Install WordPress plugins. In this article, I will show you possible methods to install the plugins on WordPress.
What is a WordPress Plugin?
Plugins will improve your WordPress website functionality like apps do on your Smartphone. There are thousands of free and premium plugins available. You must read complete details about WordPress Plugin.
If you are using a free WordPress.com website, you can not see the option to install plugins. You must use self-hosted WordPress.org website to add plugins.
How to Install WordPress plugins and Activate
Method1: Use Add New option
You can install the plugin from your WordPress dashboard itself. Installing and activating WordPress plugin is very simple.
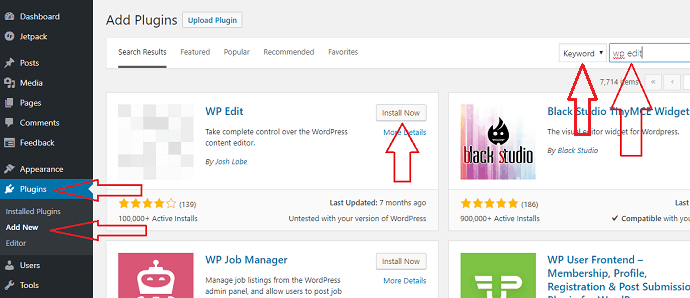
Log in to the dashboard. Go to Plugins -> Add New.
Search for your required plugin by typing the plugin name in the field at top right. You can search the Plugin by Keyword or Author or Tag by selecting the drop-down symbol shows that in below screenshot. It is better to use the default Keyword option.
Select Install Now option to install the plugin. WordPress will install the plugin immediately.
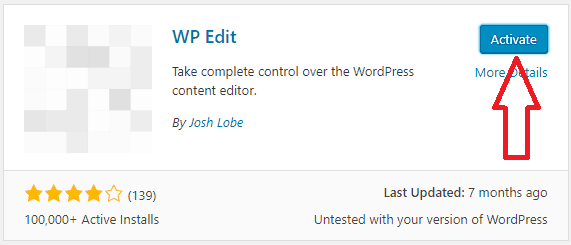
After installing, you will see the Activate option instead Install Now option. Click Activate Now to activate the plugin.
Method 2 Using Upload Plugin option
Some premium plugins might not be available on the WordPress Plugin Repository. You need to download the plugin in a ZIP file to your computer from the plugin developer website. After that, you need to upload the plugin to WordPress dashboard.
WordPress dashboard supports the feature to upload plugin in a ZIP file to your website. Follow the below procedure to upload the plugin.
Download the plugin from Plugin authors website.
Login to your WordPress dashboard.
Go to Plugins -> Add New -> Upload Plugin. You will see an option to select the file.
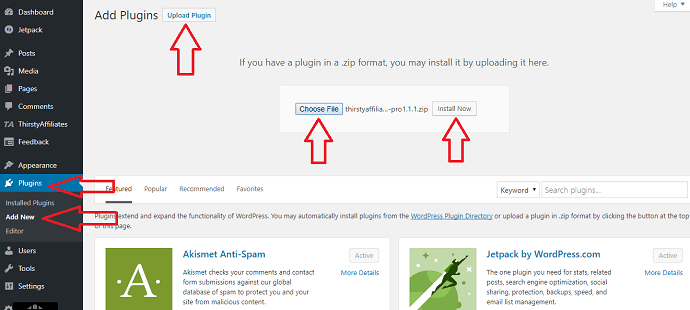
Select Choose File option. Browse your PC for the ZIP file. Select the file. Click Install Now option.
The plugin will be installed. Select Activate Plugin option shows that in below screenshot.
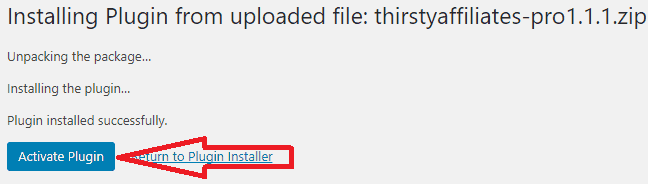
Now you have activated the plugin.
Method 3: Using cPanel
I think you don’t need this method. You always need to follow above two methods. You need to use this method only when above two methods failed to install your plugin.
cPanel is the place where you have the complete control over your website files. All web hosts will not give you cPanel. But top WordPress web hosts like Bluehost(60% Discounted Link) and Siteground(60% Discounted Link) will give you cPanel.
Download plugin ZIP file from the developers website. Login to cPanel. Go to File Manager. You will see a screen shows that in below screenshot.
Go to public_html – > wp-content -> plugins. Select Upload option to upload the ZIP file.
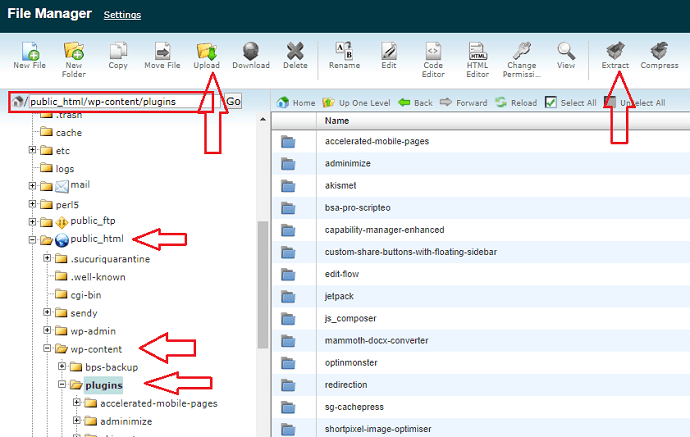
After uploading the file use Extract option to unzip the file. After unzipping, you will see a folder with plugin name in wp-content/plugins folder. If you want, you can delete the ZIP file.
Now login to WordPress dashboard. Go to Plugins. You will see the uploaded plugin in the deactivated state. You just need to click on Activate option which appears just below plugin name.

- Read: 10 Best Coupon Plugins for WordPress website
- How I compress images up to 80% for my WordPress website
Method4: Using FTP
Video Tutorial:
Watch a video tutorial to learn how to install a plugin using FTP. Or you can always skip the video, and continue with the steps mentioned after the video.
I don’t recommend new bloggers to try this method. Almost all web hosts provide you FTP details. If your server gives you cPanel, it is better to use cPanel directly instead of FTP. You need to use FTP only when the first two methods fail and your server does not give you cPanel.
Your hosting service will give you FTP credentials like Host, username, password, and port.
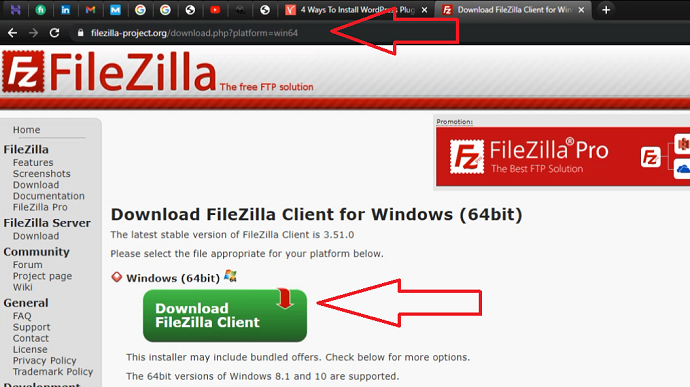
You need to install free FTP client like FileZilla on your PC.
Unzip plugin ZIP file on your PC. You will see the folder with the plugin name.
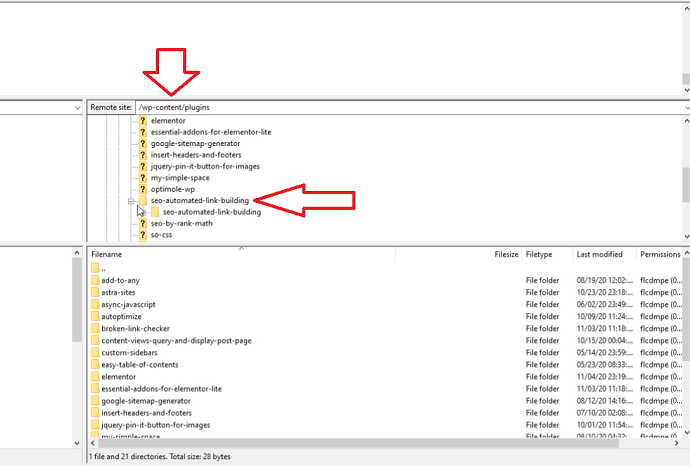
Open FTP client and login with your FTP credentials provided by the hosting provider. You can access your server files and your PC files on the same window. You can copy and past any folder.

Just copy the plugin folder from your PC and paste it on the server-side in the wp-content/plugins folder.
- You Might Like: How to Geo Target Ads in WordPress website
- How to auto link affiliate links to keywords in WordPress
How to Use the Plugin
The activated plugin will add the additional functionality to your WordPress website immediately. Some plugins work immediately without any setup. But most of the plugins need setup.
Each plugin has different setup and configuration. Settings are different for each plugin. So I am giving you the procedure up to getting settings option for the plugins.
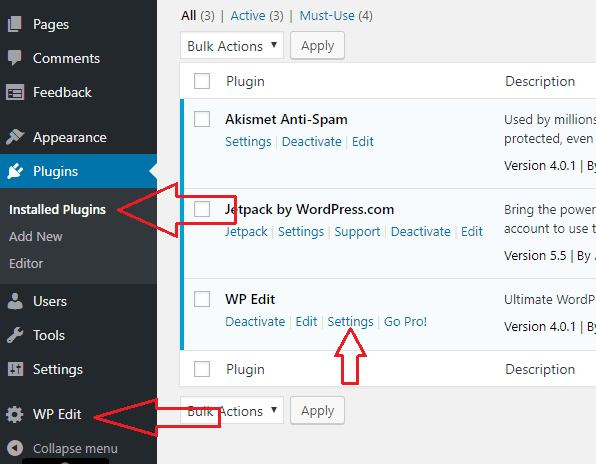
The installed plugin might add the additional option in your dashboard’s left menu or in Settings or Tools option. You can access plugin settings from that option. You can also go to Installed Plugins option. You can see Settings option just below your Plugin name.
Conclusion
If you are new to blogging and WordPress, you can just use the first two methods. When the first two methods fail, then only go with the next two methods. If you want to learn WordPress, I suggest you visit wp101 which provides you many video tutorials.
I hope you like this tutorial on How to Install WordPress plugins. If you like it, please share this article. Want more blogging tips, follow BlogVwant on Facebook and Twitter, and YouTube.
Thanks for the information.