Do you want to increase your email list with a simple email marketing hack? Do you want to capture leads coming to your website daily? Are you an existing Mailchimp user? Well, today we’re going to show you how you can use Mailchimp and WPForms to expand your email list to the next level. In this article, we will show you the process to add a Mailchimp Signup form on your website with the help of Mailchimp Addon available in WPForms.
What is Email Marketing?
Email marketing is advertising products and services through email. The major task in email marketing is to make a mailing list of potential customers and promote your business to the customers who have subscribed to your email list.
The Overview of Email Marketing Strategies to Increase Email List
Building an email list of potential customers is one of the key tasks of an email marketer in email marketing. But how do we grow our mailing list? What are the strategies for building a mailing list?
Well, there are tons of ways in which you can grow your email list with your website. For example:
- Collect emails by creating a sign-up form using MailChimp and WPForms and embed it on your website.
- Collecting emails by adding exit-intent pop-ups on your website
- Offer lead magnets for emails
- Offer discounts, coupons, and free trials
- By adding a newsletter sign-up landing page to the website.
- Much More…
The best and simple email marketing strategy that gives maximum results in a lesser effort and investment is to convert normal forms or add sign-up forms to your website and turn readers into subscribers. You can implement this strategy with the help of MailChimp and WPForms integration.
In the upcoming section, we will show you a live implementation of this strategy.
What is Mailchimp
Mailchimp is one of the leading email marketing web-based platforms operating since 2001 providing email marketing services all over the world. Mailchimp helps you to create sign-up forms which basically helps you to build your mailing list. Apart from this, Mailchimp can send thousands of emails stored in an email marketing list. With the help of Mailchimp’s pre-defined email templates, you can run attractive email marketing campaigns in minutes.
MailChimp Features at a Glance
- The free plan is available for a quick start
- Beautiful landing pages, and pop-up/Signup forms.
- 200+ apps and integrations, including WPForms, are available
- GDPR Compatible
- Merge tags are available to simplify complex tasks
- Advanced segmentation is available to target a specific audience from the mailing list
- Contact profiles are there to learn in-depth about each subscriber
- The mobile app is available for quick access
- Engaging surveys could be built and sent to the customers
- A lookalike audience finder is available for better utilization of marketing efforts.
- The feature of the website builder has been added recently.
- Free Mailchimp domain
- The existing domain could also be connected
- Emailing list data can be used to run effective targeted Facebook and Instagram ads
- Automated emails can be configured
- Testing and advanced reports are there.
- 24&7 Email Support, Phone Support, and chat support are available for customer queries.
- Pre-designed email templates and an inbuilt drag-and-drop email designer are available.
- Helps in increasing sales by recommending products to customers based on the customer’s data and movement.
- RELATED – Best Mailchimp Alternatives
What is WPForms
WPForms is the WordPress form builder plugin used to create any type of form on the website including newsletter signup forms, contact forms, multi-page forms, and whatnot. Over 4,000,000 websites have already been using this plugin for installing forms on their website pages. The number is itself proof of the plugin’s popularity and reliability. Further WPForms could easily be integrated with Mailchimp so you can quickly turn your form submission users into subscribers.
WPForms Features at a Glance:
- Mailchimp and other email marketing tools integrations are available
- Unlimited forms could be created and placed into various locations including posts, pages, sidebars, etc.
- GDPR Compatible forms
- Conditional logic is there which makes the dynamic forms that will act on the basis of user actions.
- With Captcha’s support, there would be no security concern
- Offline forms could also be created
- Automatic email confirmations or notifications can be configured
- Drag and drop-based form builder
- Custom signature
- File uploads support
- Payment services integration including PayPal, Stripe, etc
What is Mailchimp WPForms Addon
With the Mailchimp addon available in WPForms, the user could connect all the forms created by WPForms to Mailchimp. So whenever a user submits your signup form plugged into your site will be directly jumping into your Mailchimp email list. This way you can grow your email list dramatically.
Not only just subscribe, but the readers will also be able to unsubscribe, archive, or delete themselves with such signup forms. With the support of shortcodes, the signup form can be hooked up anywhere on your website.
What are the Advantages of Integrating MailChimp and WPForms?
Save time:
This is by far the most important reason to integrate these tools together. Suppose you are using Mailchimp for email marketing and you want to capture leads/readers that come to your site daily. You can create signup forms with the WPForms and enable Mailchimp integration on it so that all form submissions will be captured and added to your Mailchimp email list. This way you can avoid the manual work of transferring all form leads to the Mailchimp email list. Hence it will save you a lot of time.
Easy Setup:
Now you may have embedded Mailchimp signup forms on your site and collected the leads, However, we have found that the process of embedding Mailchimp signup forms on your site requires prior coding knowledge and you won’t get advanced features available in WPForms signup forms. That’s why we preferred WPForms to create forms on the website.
Multiple Types of Signup Forms
By integrating Mailchimp into WPForms, you can create customized forms and configure different actions on each of them. For example one form for adding users to the mailing list, one for removing them from your emailing list, etc. This way users have full freedom and they can opt in/out from your email list whenever they want.
No GDPR Concern
As per the GDPR act, the website owner must take user consent before collecting or using their data for advertisement. Well, the signup forms you created with Mailchimp and WPForms are totally GDPR-compatible.
Email List/Audience Configuration
Do you have multiple email lists exited on your Mailchimp account? Well, with Mailchimp and WPForms signup forms, you have full control to decide the email list the reader should be added to.
In the next section, we are going to create Mailchimp-enabled signup forms with the help of WPForms and upload them on our website.
How to Create an Email Marketing Sign-up Form with Mailchimp and WPForms in WordPress
In this section, we will show you the procedure of creating a subscription or signup form with the help of MailChimp and WPForms integration.
Total Time: 10 minutes
Step 1: Purchase WPForms

As we all know that WPForms plugin can be downloaded from the WordPress plugin repository directly, however, the Mailchimp add-on is only available in WPForms plus or higher plans. So consider subscribing or upgrading to any WPForms paid plans (excluding basic) according to your need.
After purchasing, download the plugin and upload it to the WordPress website. Install it and activate it.
Step 2: Enable the Mailchimp Addon

Before integrating Mailchimp and WPForms together, first, you have to enable the Mailchimp Addon. For this open up the WordPress dashboard and navigate to the WPForms > Addons. Here, search Mailchimp and activate it.
Step 3: Copy the Mailchimp API key

To connect both tools, we require a Mailchimp API key. This key can be found on the Mailchimp website. So, open up the Mailchimp site and sign in. If you do not have a Mailchimp account, create a free account or consider its paid plans according to your requirements.
After signing in, navigate to your profile > extras > API keys. If you are a new user you won’t find any API key here. First, you have to generate it by tapping on the “create a key button”. Copy it and makes sure the API key is set to on.
Note: Create a new email list in Mailchimp if you are a new user. There should be at least one email list available in Mailchimp before you implement this method.
Step 4: Paste the API key into Mailchimp Addon

Go back to WordPress and again open up the WPForms addons dashboard. Find Mailchimp add-on and tap on it. Then click on add a new account button. This will open up the 2 additional fields: Mailchimp API key and account nickname. Paste the API key and insert your Mailchimp account nickname then hit the “connect to Mailchimp” button.
Note: You can add an unlimited number of Mailchimp accounts by tapping on the “add new button”.
If everything goes fine, you will see the green button that says connected. At this stage, the connection between Mailchimp and WPForms has been built successfully.
Step 5: Create a Mailchimp Enabled Signup Form

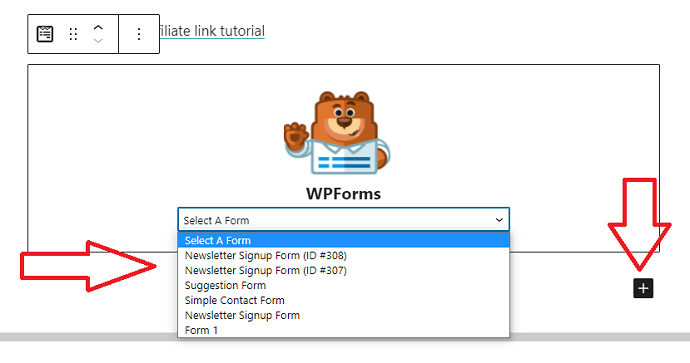
After activating the Mailchimp addon, it’s time to create a signup form. For this navigate to WPForms > Add new. Or if you want to edit existing WPForm, go to WPForms > All forms. For this tutorial, I am choosing a new form. So when you click on the add new, WPForms will ask you to choose a template form.
Now you have full freedom to either start with a blank form or go with predefined forms templates. Remember the Mailchimp integration can be applied to all WPForms regardless of their type.
Most users go with Newsletter forms because they can attract readers and convert into subscribers easily. By adding users to your newsletter list, you can let users know about new products, discounts, news, and much more.
For this tutorial, I am considering a Newsletter signup form template. So first give a form name (just for the label) and then tap on the desired template.
Step 6: Add or Edit the Form Template Fields
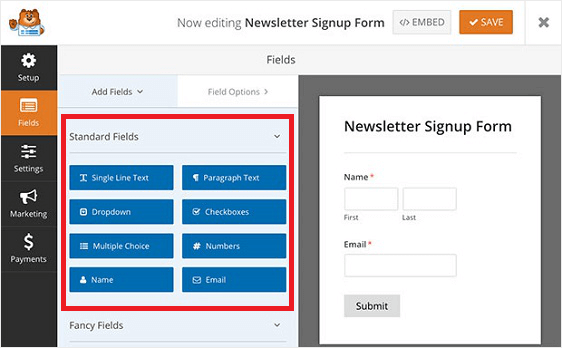
After choosing the Newsletter Signup form template, you can modify your form entries if you want. Different types of fields are available in the left panel. To add any additional form entry into the form template, simply drag it and drop it into the form. Similarly, you can also change the order of the form entries.
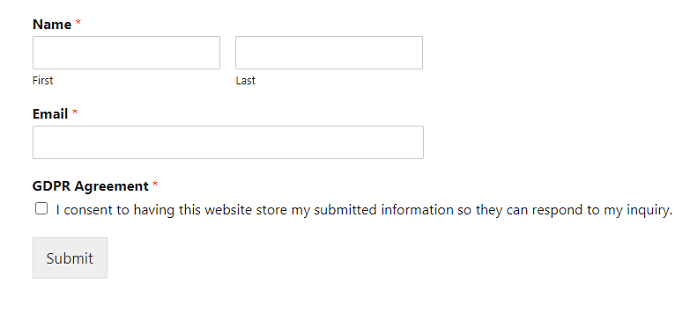
Step 7: Add GDPR Agreement Field

One entry you should add into your Mailchimp signup form is the GDPR Agreement field. By attaching this field to the form you can protect you or your website from the GDPR legal troubles. Basically, GDPR is the European data collection act that requires website owners to explicitly take user consent before collecting any personal data like email.
With WPForms you can create GDPR compliance forms easily. Before adding a GDPR agreement field to the form, first, you have to enable the GDPR module by navigating to the WPForms > Settings > GDPR. Here check on the GDPR enhancements option. You can also check on the disable user cookies and disable user details option. Finally, save the settings.
Then navigate to the Mailchimp signup form we are editing earlier. Just drag and drop the GDPR agreement field to the form area and you are good to go. If you want to customize the GDPR agreement text simply tap on the field and edit it. And finally, save the form.
Don’t close this page yet.
Step 8: Enable Mailchimp Connection on Your Form

Now the last step is remaining to enable Mailchimp integration on our Mailchimp signup form. For this first, navigate to the Marketing tab and choose Mailchimp. Then tap on the add new connection. After that, a popup will appear asking you to enter a nickname for this connection. You can enter anything here, but we recommend entering the same name as available on the Mailchimp email list that you want to link with this form. Nickname will help you when you’re willing to connect this form to more than one mailing list. Finally hit the OK button.
Step 9: Configure Signup Form Additional Connection Settings
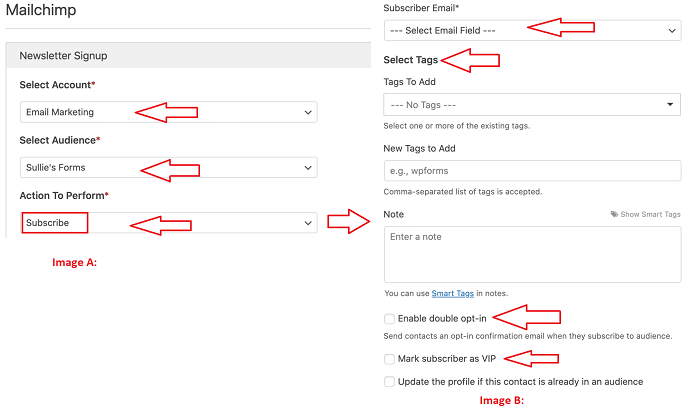
After creating a connection, you need to configure few important fields:
Select Account: In this field, you have to select a Mailchimp account we have that you configured in step 3
Select Audience: Select the mailing list available in the selected Mailchimp account.
Action to perform: In this field, you have to specify the action which is going to happen when someone completes your signup form.
Now there are 5 actions available to choose from: (Image A)
Subscribe: Allows users to subscribe or add to your list
Unsubscribe: Allows users to unsubscribe from the list
Archive: Existing contact will be archived from your audience list
Permanently Delete: Remove an existing contact permanently from the audience list.
Record Event: Record an event for a particular contact after form completion
But as per our tutorial, we are creating a signup or subscription form and we are selecting “Subscribe” in this field.
As soon as you choose the “Subscribe” option in the action to perform field, few more options will appear. Let’s configure them (Image B):
Subscriber Email: Here select the email field where the user enters its email address on your form.
Select Tags: Apply any existed or add new tags to the incoming form submission (optional)
Note: Optional
Double Opt-in: Check this option when you want to ask the users to confirm their subscription through confirmation mail before finally adding them to the mailing list
Mark Subscriber as VIP: All form submissions will be marked as VIP in Mailchimp
Update the profile if this contact is already in an audience: Enable this option so that the existing subscriber profile will be updated in Mailchimp automatically.
These are the main settings you need to configure for the Mailchimp and WPForms connection.
Few more additional settings are available like custom field mapping and conditional logic.
The custom field mapping option is useful when you want to send any additional entry in Mailchimp. For this, you need to map your form field to the Mailchimp available fields.
Enable conditional logic when you want to set rules based on the user actions.
After configuring the settings, save the form. Now your Mailchimp enabled signup form has been fully configured.
Step 10: Configure Signup Form Notification Settings

After configuring the Mailchimp and WPForms connection settings, it’s time for setting up notifications. With WPForms notification settings you can enable an automated email that will be sent to you, your team members, or the site visitors each time the form submission will occur.
To configure form notifications, simply navigate to Settings (inside form) and tap on the notifications tab.
You can use smart tags to configure the recipient of the Email. We are not going to explain the WPForms notifications configuration for the sake of tutorial length.
Step 11 Configure Signup Form Confirmations Settings

Just below the notifications settings, you will find the Confirmation settings. With this, you can show users a confirmation message as soon as they complete the form submission.
There are 3 types of confirmations available:
Message: This allows you to set your own custom message
Show Page: This allows you to choose a custom confirmation page available on your website
Go to URL: This allows you to redirect users to a custom URL
Step 12: Add Mailchimp and WPForms Integrated Signup Form to the WordPress
Finally, the signup form configuration part has been done. It’s time to implement or add this form on the WordPress site. WPForms allows you to place your form in multiple locations including website post/pages, sidebar widget, etc.
To place the signup form, 3 methods are there:
By manually copy paste a WPForm shortcode to the preferred location in your website
Use an Embed button located at the top right of the form editor.
By “WPForms button” available in the WordPress post editor.
In the first method, navigate to WPForms > All forms. Here you will find shortcodes of all the available forms. Copy the shortcode of the signup form and paste it into your website.
In the second method click on the embed button located inside the form editor. When you click the embed button, it will give you 2 options: either place your signup form to the existing page/post of your site or create a new page.
The third method is simplest, navigate to the post/page (edit mode) where you want to place your signup form. I believe you are using the Gutenberg editor. Simply tap on the add button and search WPForms. Click on it and you will be asked to embed any WPForm. Select your Mailchimp signup form and finally publish the page to make your signup form live on your website.
So this is how you can create a signup form with Mailchimp and WPForms to grow your mailing list.
Estimated Cost: 99.50 USD
Supply:
- WPForms Plugin
- Mailchimp Account
Tools:
- WPForms Plugin
- Mailchimp Account
Materials: WPForms Plugin Mailchimp Account
Conclusion
So what are you waiting for? It’s time to capture your website readers and turn them into subscribers. Go now install the WPForms and enable the Mailchimp addon. In the end, take this tip as a bonus, offer users a lead magnet like eBook, free guide, course, etc in exchange for emails. This trick will definitely boost your signup form submissions.
- Also Read: How to Connect WPForms and Brevo(Formerly SendInblue) together
- Why WPForms is the best form builder?
I hope that this article, Simple Email Marketing [Mailchimp and WPForms], helps you to integrate both tools together. If you like this article, then do a favor by sharing this article and follow BlogVwant on YouTube, Facebook, and Twitter for more tips.
Simple Email Marketing [Mailchimp and WPForms] – FAQs
How much WPForms plugin cost me?
WPForms plugin plans start from $39.50/year, however, the Mailchimp addon is not available in this plan. Other than this plan, 3 plans are available to choose from starting from $99.50/year
Is there any free trial available in WPForms?
No.
Is there any free plan available on Mailchimp?
Yes. Mailchimp offers you a free plan which you can use forever. Under the free plan, you can create one audience or email list and up to 2,000 subscribers. Beyond that, you need to upgrade to the paid plans starting from just $10/month.
How to test if Mailchimp and WPForms integration are working or not?
First, connect both tools with the steps mentioned in this article. Then fill up and submit the WPForm on which you integrate Mailchimp. Then check your Mailchimp email list. If you find the form entry here, then it means the Mailchimp and WPForms has been configured successfully.
What happens when someone submits the signup form?
As soon as someone complete your website form, the data will directly send to the email list that you have created in the Mailchimp account.
Can you use the WPForm Lite Version to integrate Mailchimp and WPForms?
No, you can’t because this Mailchimp addon is only available in WPForms paid plans.