
Want to Start a blog? Want to know how to make a blog? You don’t need to learn HTML to make a blog. It is really very easy to start a website. If you read this article, you can create a blog within 5 minutes. I suggest you to bookmark this page because this article is a complete guide to make a blog, manage a blog and earning money with the blog.
1.Essentials for Making a Blog
You just need three things to make a blog.
1.1.WebHost server(Bluehost):
The Server is the place where you host your website files. You must buy the Server plan from any one of the Top Web hosting services. I recommend you to go with Bluehost (Discounted link – Around 60% discount + Free domain). Because it is officially recommended hosting service by WordPress. Bluehost offers free SSL, unlimited bandwidth, unlimited domains, backup, security and many more features that are needed for the blog. It is the best Webhost in the world for the starters.
If you don’t want to buy the server initially, you can create a free website using wordpress.com. But I don’t recommend you to go with a free website because you will have limited features and you can not control your website.
If you want the cheapest web host, I suggest an iPage(75% discounted link) for starters. It provides all features for very less price compared to Bluehost. Of course, Its quality, support, and speed of the website is not as good as Bluehost. But still, iPage is the good hosting for the new bloggers. It saves a lot of your money.
If you want the Bluehost alternatives, we suggest DreamHost which also another best hosting service recommended by WordPress.
1.2.Domain Name:
The Domain name is nothing but your website name. This blog’s domain name is blogvwant. You can choose any name for your website. While choosing a blog name, consider your website content. It is better to have a name related to your website content. For example, this website talks about blogging, so I have chosen blogvwant as my website name. Usually, you need to buy a domain. Bluehost will give you a domain name for free for the first year.
1.3.Content Management System(WordPress)
Content Manage system is a software that converts your normal language into HTML. Any website must be created using HTML language because web browsers understand HTML only. It is not needed to learn HTML language. Just use any one of the Content Management System.
There many CMS available. WordPress is the best software among them. Because
- WordPress is free software. Even if you change your web host in the future you need not worry because WordPress is available in every web host.
- Highly customizable.
- You can add any feature using plugins.
- It gives a fast loading website.
Now you know about the essential tools for any website. Now let us see about creating a website.
2.How to Make A Blog
There are only two main steps to make a blog.
2.1.SignUp to Webhost (Bluehost), Chose a domain name and create Bluehost cPanel account credentials.
2.2. Install WordPress on your Domain name and create WordPress dashboard account credentials.
Let us see the complete details.
2.1.SignUp to Bluehost and Create cPanel account
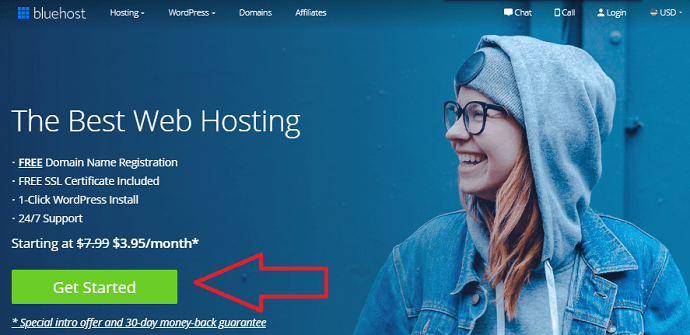
Visit Bluehost website Home page(60% discounted link with a free domain). Click on Get Started Now.
Bluehost has three plans on shared hosting. Select any one of the plans according to your needs.

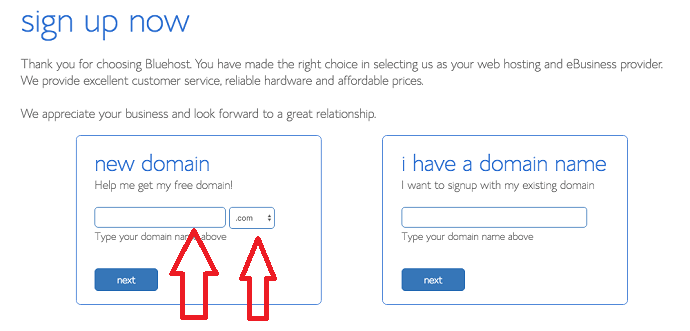
Just enter your required domain name in the New domain name field. You can also select extension like .com or .in or .us or .uk anything. It is better to select .com. Click Next.
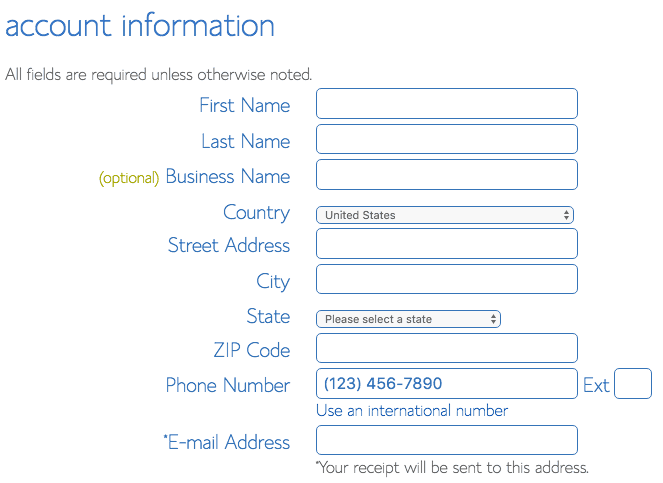
Enter your account information like your name and address.
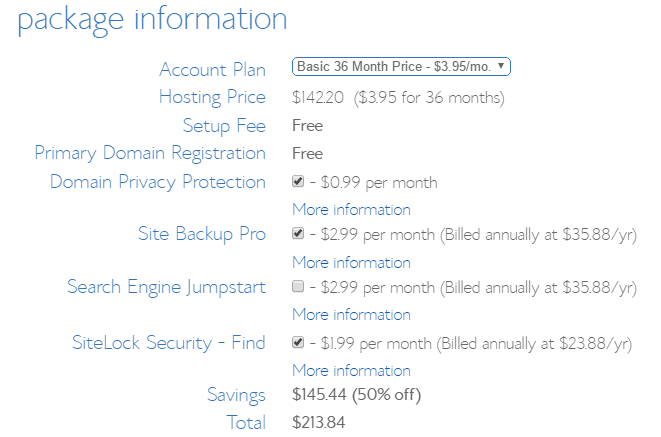
Select Package under Package information. If you take the longer plan, you will get more discount. You can also select extras like backup, domain privacy. Security and backup are musts. I prefer to use Sucuri than SiteLock. You can also select them later.
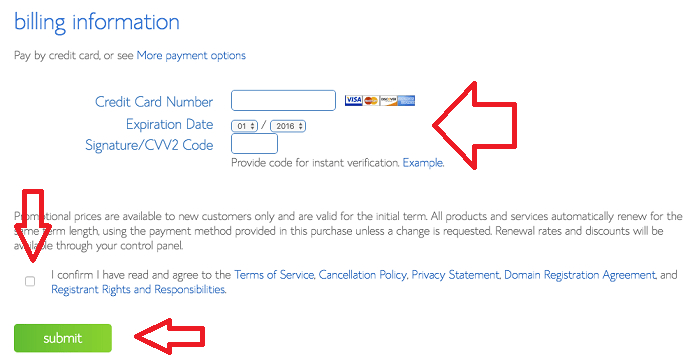
Enter your Billing information. Check the terms box. Click Submit.
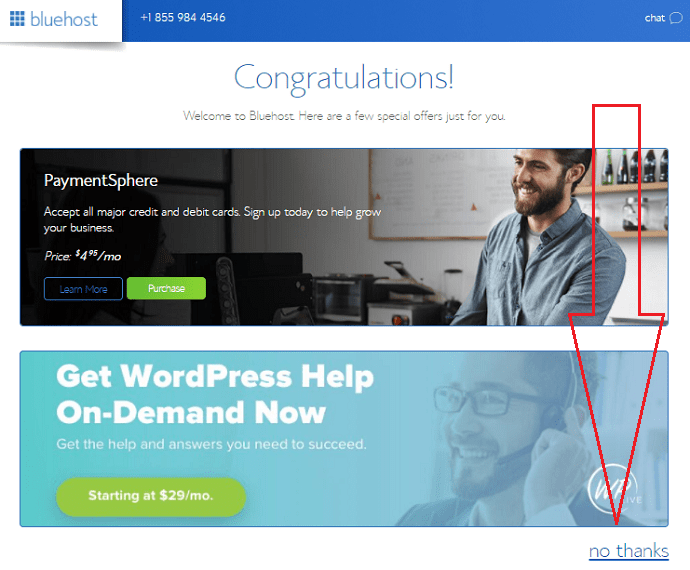
You will see a Congratulations window shows that in the below screenshot. You might see some offers. If you want, you can select any one of them. Otherwise, just click on No Thanks at the bottom right.
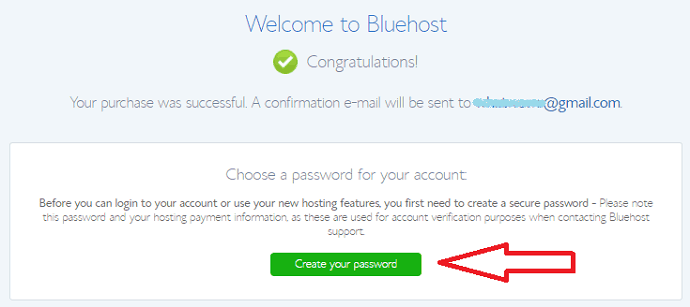
You will get emails regarding your account and FTP details. You will also see a screen where you can create a password for your hosting account.
Just click Create Your Password in the confirmation window.
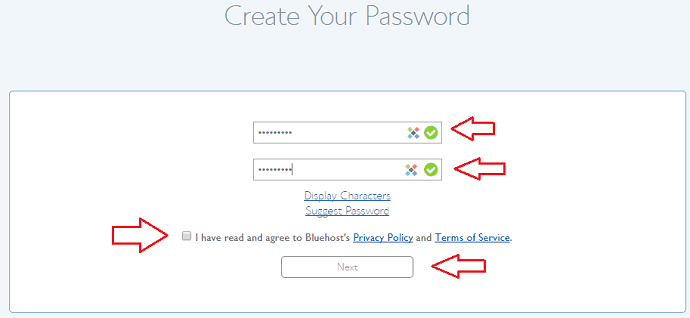
Enter your required password. Reenter the password. Check the agreement box. Click the Next Button. You can also use the Suggest Password option to generate a complex password.
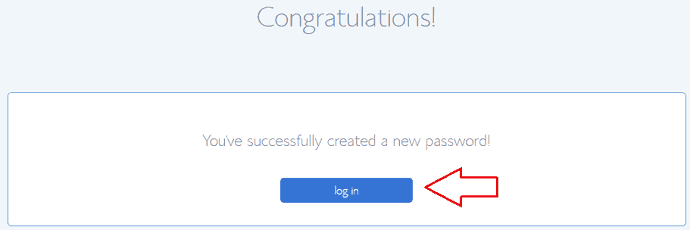
Now you have successfully created a Bluehost account. You will see the Congratulations window shows that in the below screenshot. Just click on the login.
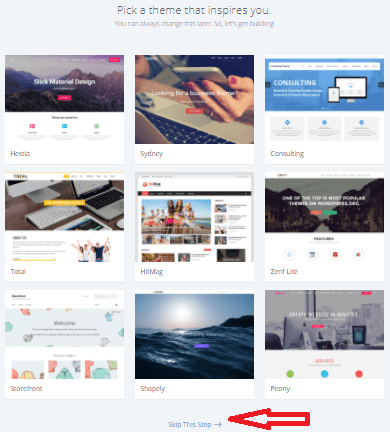
You will see a screen where you can select a theme for your website. I don’t prefer to select a theme here. You can also install a theme after installing WordPress. If you want you can select any one of the themes. Or Just Select Skip This Step at the bottom.
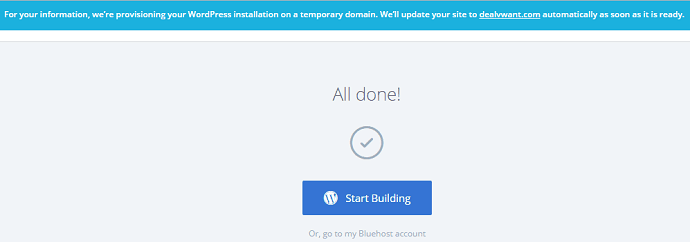
You will see All done messages where you can see a message about your WordPress website getting build by Bluehost.
Initially, they will install WordPress in a temporary folder. Just wait for some time. They will install WordPress on your domain. It may take one or two days to get your domain ready.
Check your website URL (for ex:- dealvwant.com), it should be live. You must also check your WordPress URL (For Ex:- dealvwant.com/wp-admin). These two should work. Otherwise, you need to contact their support team to shift the URL from temporary URLs to live URLs.
Now you have created your hosting account.
2.2.Install WordPress & create WordPress dashboard Credentials
You need not install WordPress on your domain. Bluehost does everything. You need to create your login credentials.
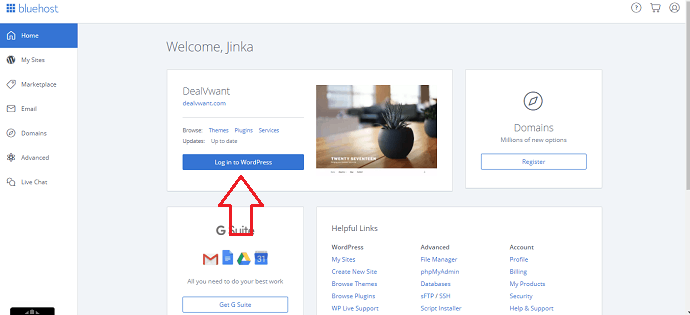
Just see the last screenshot in the above section. If you click on Start Building, you will directly go to the WordPress dashboard. If you click on go to my Bluehost account, you can go to your Bluehost cPanel account.
I will explain from the base, you need not click on anyone on that screen. You can leave that section.
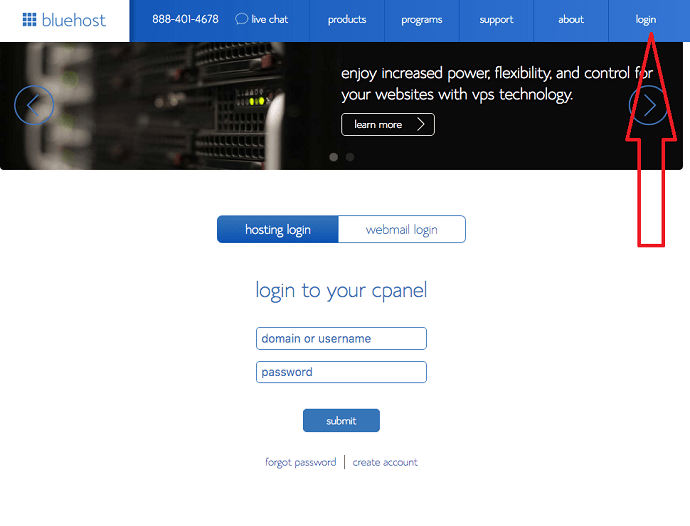
Go to the Bluehost website. Click the login option at the top right corner. Enter your username and password created in the above steps. Select Submit.
Now you will see cPanel. cPanel is a place where you can control your website files, databases and much more. You can also control more than one website from cPanel. Click Login to WordPress shows that in the below screenshot.
You will see the WordPress dashboard. It will ask you to do some tasks. You need not worry about them. You can do them later.
You must create login credentials for your WordPress dashboard.
Go to User -> All Users from the left menu. You will see a user with an Admin username. It is not recommended to run the admin account with the Admin username. If you keep that there is a huge chance to get your website hacked.
Go to Users -> Add New. You will see below screen. Fill all the fields to with your required Username and other details. Click on Show Password option to set the password. Make sure you have selected Administrator as Role.

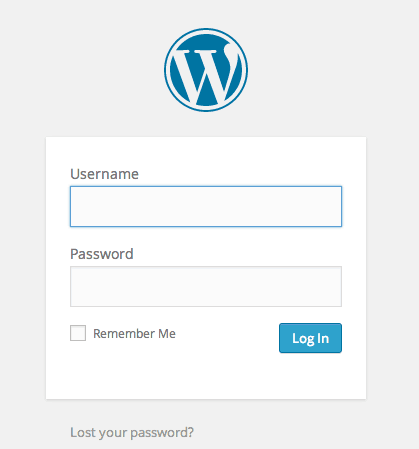
Now you have created WordPress login credentials. You need to remember the WordPress login URL(Ex:- dealvwant.com/wp-admin)
Open Admin URL, you will see below screen. Enter your Username and password. Select Login.
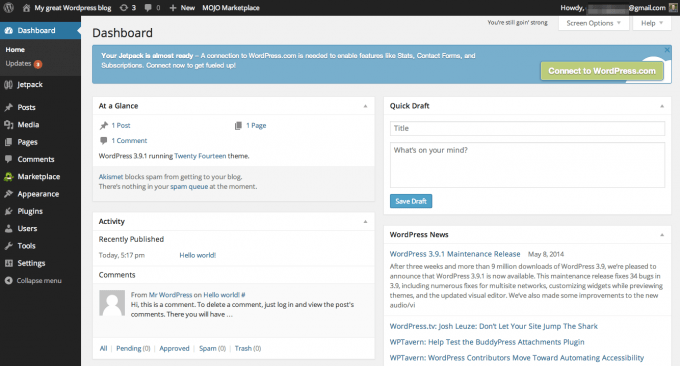
You will see the WordPress dashboard shows that in the below screen. This is the place where you can create posts, pages and manage your website.
You can go to the Users section and delete the existing Admin account.
Now you have created a WordPress website.
At this point, you have two login credentials. One is for Bluehost cPanel where you can control your website files.
- Bluehost cPanel credentials where you can control your website files.
- WordPress dashboard credentials through which you can maintain your website.
You regularly need to login to the WordPress dashboard. You may rarely need to login into cPanel.
3.Learning WordPress
After creating a WordPress website, you can start writing posts. Before that, you need to learn completely about WordPress and its features. I can recommend you to take this WordPress learning course from Udemy.
If you don’t want to spend money, you can learn from YouTube, but that will take time. Taking a Udemy course will save you a lot of time. Still, I am going to give you some must do things after creating the website. You can also hire a freelance WordPress developer to setup from any one of the top freelance websites like Fiverr or Freeup.
Change Settings:
You need to change your website settings according to your needs. Don’t publish any post without configuring WordPress settings. Just log in to WordPress dashboard and go to Settings from the left menu. You will see options to change General, Reading, Writing, Media, Discussion, and Permalink settings.
Install Free SSL
SSL will convert your URL from HTTP to HTTPS. Today installing SSL is mandatory. It will make your website more secure. It is also one of the factors for search engine ranking. It is better to install SSL prior writing any posts on your blog. You can install it later, but that will consume more time. We have separate articles about SSL and to install free SSL on Bluehost and Siteground.
- Must Read: What is an SSL certificate? How a blog gets to benefit from it
- How to Install Free Bluehost SSL on A New Blog
- How to Install Free SSL on Siteground server
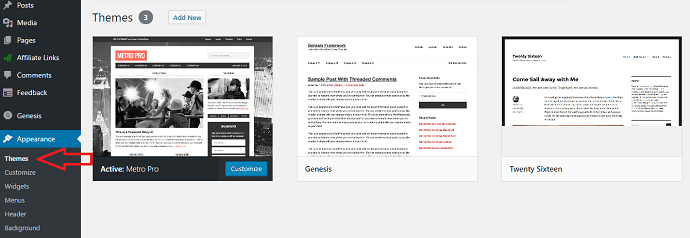
Activate Theme:
You can use a free theme that comes with WordPress. I can recommend you to use any one of the child themes from Genesis FrameWork. Genesis is the premium and most used theme framework in the world. It comes with a lifetime license. I am using the Genesis framework.
Go to appearance -> Themes and Activate the theme. You can use the Add New option to upload your premium or any other free themes.
Design Logo and favicon
Almost every theme gives you the option to upload a logo and favicon. Logo and favicon will improve your brand awareness. If you could, you can create a logo and favicon using Photoshop or online designing services like DesignEvo. Or you can hire a freelancer from any one of the freelance websites like Fiverr.
You need to design a logo according to your website concept. You can choose the dimensions according to your theme.
Favicon is the small size logo that appears in the browser tab. You can resize your logo up to 16 X 16 PX. Or you can create a new image for that size.
Install required Plugins:
You can improve your website functionality using plugins. The Plugin is just like an app on your android or ios phone. There are many free and premium plugins available. There are some plugins pre-installed with WordPress. You need to add some more plugins.
Go to Plugins -> Add New to install a new plugin.
Irrespective of your need, every website must need some plugins. I have listed the essential plugins that I am using in a separate article.
- Related: What is a Plugin in WordPress? Why Should I use it?
- 4 Ways to Install WordPress plugin And How to Activate & Use the Plugin
- 10 Essential WordPress Plugins List Every WordPress must have
Create Categories:
You need to create categories. Go to Posts -> Categories to create categories.
Create pages:
You need to create pages like Contact Us, About Us, Privacy Policy, Disclaimer. Go to Pages -> Add New to create a new page.
I will show you how to create a Contact Us page with the contact form included.
How to create a Contact page with Contact form
Video Tutorial:
For your convenience, we always try to explain the process in a video. Watch it, or just continue with the steps mentioned after the video.
You need to use the plugins to create a contact form. There are many premium and free plugins available to create a simple contact form. Since you are a starter, you can go with the free plugins. You can use the free Jetpack plugin which gives you an option to create a simple contact form. But it does not provide you other required features.
So I suggest you WPForms Lite plugin which is a free version to the number one contact form plugin WPForms.
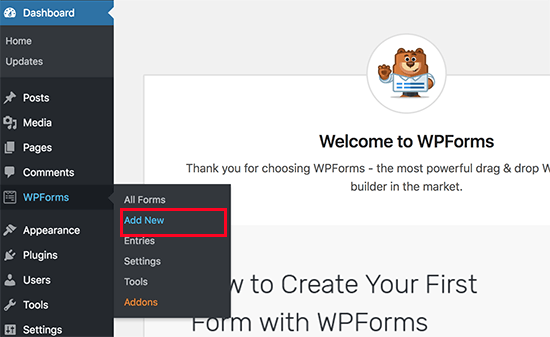
Install the plugin by going to Plugins -> Add New and typing WPFroms in the search box. Install and Activate the plugin.
Go to WPForms -> Add New to create the new form.
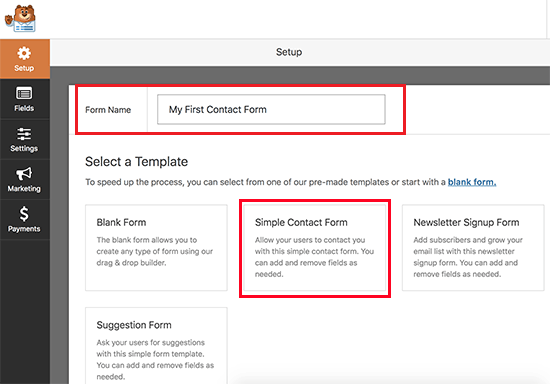
You will see the WPForms interface. Type your form name and select the Simple Contact Form template.
Now you will see a contact form with the required fields. You can click on any field to edit. You can drop the new fields from the left.

Just click on the Save button at the top right corner to save the form. Exit the form builder.
Go to Pages -> Add New to create a new page. Click on the + symbol to add the new block. Search for WPForms block and use the drop-down symbol to select your created form. Publish the page.
Create Posts:
After basic things, you can start creating posts and publishing them. Go to Posts -> Add New to create a new post.
4.SEO and Promote Your Website
Now you can create posts regularly. When you just write posts, they will not appear in search results. You need to follow some important steps to appear in your posts in the search results. That is called Search Engine Optimization. You must read our article What is Search Engine Optimization? I am giving just the overview. You need to spend the time to learn about the below things.
- Use Google Keyword Planner to search for the highest performing focus keyword.
- Use WordPress SEO by Yoast plugin for on-page SEO.
- Create Account in Google Webmaster tools using your Email ID, submit your website and Verify your website. Do the same thing in Bing and Yahoo webmaster tools. Read 2 Ways to do Google Webmaster Tools verification for your website and 2 Ways to Add website to Bing Webmaster tools.
- Create an XML sitemap and submit to Google Webmaster tools. Yoast SEO plugin gives an option to create a sitemap. If you don’t do this step, Google will never show your website in search results. Submit XML sitemap to Bing and Yahoo webmaster tools. You must read How to create an XML sitemap and submit to search engines.
- Create a Google Analytics account. Add your website and paste tracking code in your website header. It is a must to track your website traffic. Read 5 Steps to Setup Google Analytics account.
- Create Robots.txt file with your requirements.
- Use any one of the Top Email Marketing Services like Constant Contact or Get Response to collect and manage Emails.
- You need to use any one of the Top Lead Capture plugins like Optinmonster or ConvertPlus to capture Emails.
- Create Facebook, Google Plus and LinkedIn pages for your website. You can also create a separate Twitter account for your website.
- Share your posts on social media, social media pages, Facebook groups and google plus communities. Read 4 Methods to add social media follow buttons to WordPress website.
- Get backlinks to your posts by using Yahoo answers, Quora, WikiHow and comments in other websites. Read 6 must use Places to build backlinks to your website.
Related: 7 Best SEO Techniques to Boost Your Website Traffic
5. Make Money With a Blog
After creating a blog and getting traffic, you must make money with your blog. I am going to tell you two main ways to make money with the blog.
5.1.Google Adsense:
Google Adsense is an ad network from Google. It is the highest paying ad network in the world. Getting approval from Adsense is a tough task. You can read the 12 Point Guide to get approval from Google Adsense. Still, new blogs may not get approval from Adsense. In that case, you can use Adsense alternatives like Infolinks, Chitika, Media net, and Bidvertiser. They pay good and approve even new blogs.
- Related: 12 Point Guide to get approval from Google Adsense
- Adsense alternatives for small and low traffic blogs
5.2.Affiliate marketing:
If you know how to do affiliate marketing properly, you don’t need to use ads on your blog. You may observe that this blog has no ads. I don’t even use ads in my tech blog. Learning about affiliate marketing may take time but it will give you huge money. Remember, you must use ThirstyAffiliates plugin to cloak and manage affiliate links. The first time customers get a $50 discount on ThirstyAffiliates Pro.
- Related: What is Affiliate Marketing? How to Start it?
- 4 Must have affiliate marketing tools
- 10 Best Affiliate Networks that I use on My blogs
6.Some Important things or Tools or Plugins
In this section, I am going to give you some important things and blogging tools which will help your blogging career. Every blogger may not need the below things. Just they will add additional features and functionality to your website.
6.1.CSS Hero Plugin will help you to customize your website theme CSS. Editing website appearance is not an easy task for a new blogger. This plugin can edit any part of your website theme CSS.
6.2.ADSPRO is one of the best Ad management plugins for WordPress which will help you to manage and sell ads on your website. Don’t want to spend money, You can use WP QUADS Free version to insert Adsense ads within content. You can also check WP QUADS premium features.
- Related: What is AMP? Pros, Cons, and Details about Google AMP
- How to Setup Google AMP for WordPress within 1 Minute
6.3. Clipper theme will help you to create the Coupon website. If you want to create a coupon website, you need to use this theme. If you want to create a usual blog and want to add a coupon section, you can use the WP Coupons plugin. You may also read Best Coupon Plugins for WordPress website.
6.4. Create PayPal account to receive international payments. PayPal charges 5% as a fee so you must also create an account in any one of the PayPal alternatives. I prefer Payoneer as the best PayPal alternative. Payoneer will give you bank account in the US, UK, Europe, Japan, and China.
6.5. You need to use free graphic designing tool Canva or premium tools like Photoshop or DesignEvo, PicMonkey or Stencil. These will help you to create beautiful featured images for your posts. Youzign will give you many templates for creating ads, infographics, social media cover pages and much more.
6.6. You should not use images downloaded from any other website. If you want to use images, download from Pixabay. It will give you a huge collection of royalty-free vector graphics and images. If you want, you can also try premium stock image websites like Shutterstock.
6.7.WP Review plugin will help you to give star ratings to your reviews. It is available as a free and premium version. Even the free version works great.
6.8.G Suite will give you professional Gmail like admin@blogvwant.com or jinka@blogvwant.com.
I hope you like this tutorial about How to make a blog and complete details. If you like it, please share this article with your friends. Want more blogging tips, follow BlogVwant on Facebook, Twitter, and YouTube.
Make A Blog – FAQ
-
Can I make a blog for free?
Yes. You can make a free WordPress blog with wordpress.com. But that is not recommended.
-
Is it worth it to start a blog?
Yes. It is definitely worth it to start a blog. Make sure to select the unique niche or the niche in which you have good knowledge.
-
Which CMS should I use to make a blog?
WordPress is widely used than any other CMS. Because it is an open source software and have thousands of plugins to add additional features.
-
Which Web Host should I select?
If you want the best one in offerdable price, we suggest either Bluehost or Dreamhost. If you want to spend less money, then you can go with iPage.
-
How do beginner bloggers make money?
Affiliate marketing is the best way to make quick and handsome money. You can use Google Adsense ads or Adsense alternative ad networks to make decent income.
“Great share!” very Usefull information for new bloggers.
informative article, thanks for sharing.
Hello…I am Nigerian…How can I sign up please?
I think anyone can signup to Bluehost irrespective of your country.
This article is of paramount important to me, with this information i think i can take a step in creating my own blog
Good information. Thanks so much.
knowledgeable and interesting information.this is what i need.i’m very interested in blogging.i start some weeks ,but my skill is low to give awareness.now i follow your guides.
Wow… This is awesome and so knowledgeable. Thanks a million for this, This is exactly what I need. I am planning to start a blog in the next few weeks.
very useful information for new bloggers. very clear and specific.I have searched about blog in google but i failed to understand it clearly. But after reading this i have understand it clearly.
super Information about Blog