Do you want to learn how to easily set up Google Analytics custom events tracking in WordPress without tricky and any code? That too in mere minutes! Then you need to install and use World’s No.01 Google Analytics plugin, MonsterInsights.
Now go through the article to learn how to add custom events tracking to your links in WordPress with MonsterInsights Custom Link Attribution. And how to set up custom link categories, labels, and actions for your link clicks with MonsterInsights. Further, you can learn how to view the generated reports straight in your WordPress site dashboard.
What is MonsterInsights?
MonsterInsights is the World’s No.01 WordPress Google Analytics plugin. It aids you to use Google Analytics with WordPress in the most simple way possible.
With this, you can set up custom events tracking in your WordPress in mere minutes. Exactly saying in less than 5minutes. That too without a need of any code. And you can view the comprehensive Google Analytics reports straight from your WordPress site. That’s really great!
In brief, MonsterInsights makes easy to track users’ interactions on your WordPress site with Google Analytics.
MonsterInsights Discount
First-time customers will get the 50% discount on all MonsterInsights plans through This MonsterInsights discounted pricing page.
What are Google Analytics Custom Events?
Events are user interactions on your website with content such as downloads, video plays, mobile ad clicks, button clicks, flash elements, gadgets, AJAX embedded elements, and more.
Events can be tracked independently from a webpage load or screen page load or pageview hit.
What is Event Tracking in Google Analytics?
Event tracking permits you to track user-interactions on your site content. Tracking your events is a great way for you to know how your users are behaving on your site. And you can know your most important content and measure conversions. Once, you know your users’ behavior, you can then act accordingly to build a strong strategy to add content that boosts your conversions.
For example, you have added a sidebar call-to-action button on your site which is a link to your pricing page like https://www.example.com/pricing. And now you want to know how users are interacting with it. Then you need to add custom event tracking to this sidebar call-to-action button.
An event has the following main components:
- Event Category:
- It is typically the name of the object allocated to the group of similar events that you want to track.
- For example “CTA” for call-to-action buttons.
- Event Action:
- It is typically used to name the type of interaction or event that you want to track for a particular web object.
- For example: “Click” for clicking on the buttons.
- Event Label:
- With labels, you can give additional information about the events that you want to measure.
- For example: “Buy Button” for your sidebar button
- Event Value:
- It is the numerical value allocated to the event you need to track. For example, an event value may be download time, length of the video played, or some numerical value.
- Event Non-Interaction:
- It is used if you want to designate an event as interactive or non-interactive. This field object consists of true or false. Here, in this field, the default value is false, that means an event is considered interactive. And it impacts the bounce rate calculations.
- If you desire to make an event non-interactive, you need to set the non-Interaction value to true. And in this case, it doesn’t impact the bounce rate calculations.
Now if you want to add custom event tracking to your sidebar call-to-action button link. Then you need to add event conditions like the following:
- Category: “CTA”
- Action: “Click”
- Label: “Buy Button”
Once you have set up custom event tracking to your sidebar call-to-action button link. Then Google Analytics starts recording your call-to-action button clicks as custom events with the above values.
- You Might Like: How To Set Up Author Tracking On WordPress Site by MonsterInsights
- 3 Steps To Track Google Analytics Scroll Depth With MonsterInsights
How To Set Up Google Analytics Custom Events Tracking in WordPress
Do you know this? By default, Google Analytics tracks only pageview hits. And gives you only important metrics related to page views like the location, bounce rate, time on page, and more.
But is this information really enough? No. You need to know all other activities on your website that your users do with content such as downloads, video plays, mobile ad clicks, button clicks, flash elements, and more. Then you need to set up event tracking in your WordPress.
Now you can set up Google Analytics custom events tracking for your links in WordPress using the following two methods:
- Using MonsterInsights Custom Link Attribution (EASIEST method)
- Adding the onclick Parameter on your Link Manually.
Here, the first method is the easiest method. Because MonsterInsights simplifies the whole process of setting up event tracking in WordPress. And with MonsterInsights you can set up event tracking for your links in your WordPress in mere minutes. Exactly saying in less than 5 minutes! And you don’t need any coding knowledge.
Whereas the second method is cumbersome and you should have knowledge of Javascript skills.
Now, let’s view the two methods in detail.
1. How To Set Up Google Analytics Custom Events Tracking in WordPress Using MonsterInsights
MonsterInsights is the World’s No.01 WordPress Google Analytics plugin. It aids you to use Google Analytics with WordPress in the most simple way possible.
MonsterInsights has introduced a new Custom Link Attribution feature that lets you easily add custom event tracking to your custom links.
With this new Custom Link Attribution feature, you can easily track your call-to-action (CTA) buttons and come to know how relevant they are for your site’s conversions.
Likewise, you can add event tracking to other important links such as your subdomains and view how users interact with those links.
In this section, you can view the step by step guide to set up Google Analytics Custom Events Tracking in your WordPress by using MonsterInsights.
In brief, the following steps are involved here.
1. Purchase MonsterInsights Pro plugin.
2. Install And Activate MonsterInsights Pro plugin on your WordPress site.
3. Connect your MonsterInsights to your Google Analytics.
4. Ensure MonsterInsights is up-to-date. (MonsterInsights version 7.30 or higher is required.)
5. Set up Google Analytics custom events tracking in WordPress using MonsterInsights Custom Link Attribution
Total Time: 5 minutes
Step1: Purchase MonsterInsights Pro plugin

1. To access MonsterInsights’ new feature Custom Link Attribution, you need the MonsterInsights Pro plugin.
2. So, purchase the MonsterInsights Pro plugin from its website.
3. The cost of the MonsterInsights Pro plugin is $199.50 per year.
4. But here you don’t think that its cost is a little bit high. Because, at this price, MonsterInsights provides not only the Custom Link Attribution feature but also the other great features like:
Ecommerce Report, Form Conversions, Custom Dimensions, Author Tracking, Category / Tags Tracking, and more.
5. Further, with a single license, you can access it on five of your WordPress sites.
Step2: Install And Activate MonsterInsights Pro plugin on your WordPress site

1. Go to the MonsterInsights website and log in.
2. Click the Downloads tab present on the top of the page.
3. Click the Download link beside your MonsterInsights Pro plugin.
4. A zip file is downloaded.
5. Go to your WordPress site dashboard.
6. Navigate to Plugins >> Add New >> Upload Plugin.
7. Click Choose File button and upload the downloaded zip file.
8. Click the Install Now button. And then the Activate Plugin.
9. Move to your My Account page on MonsterInsights site. And copy your License Key.
10. Come back to your WordPress site dashboard.
11. Go to Insights >> Settings.
12. Click the General tab. And paste the copied license key.
13. Click the Verify button.
That’s it! You have now successfully installed and activated the MonsterInsights Pro plugin on your WordPress site.
Step3: Connect your MonsterInsights to your Google Analytics

1. On your WordPress site dashboard, go to Insights >> Settings.
2. Click the General tab.
3. Click the Connect MonsterInsights button.
4. Choose your Google Account and click the Allow button.
5. Select your right website profile. And click I’m not a robot option.
6. Click the Complete Authentication button.
That’s it! You have now successfully set up Google Analytics in your WordPress site using Monster Insights.
Step4: Ensure MonsterInsights is up-to-date (MonsterInsights version 7.30 or higher is required)
To access the MonsterInsights’ new feature Custom Link Attribution, your MonsterInsights version must be 7.30 or later. So, make sure that your MonsterInsights is up-to-date.
Step5: Set up custom events tracking in WordPress using MonsterInsights Custom Link Attribution
1. With MonsterInsights’ new feature, Custom Link Attribute, you can easily add custom event tracking to your custom links.
2. With this new Custom Link Attribute, you can add custom event tracking to call-to-action (CTA), and to other important links such as your subdomains.
3. Now what you have to do is, you need to add the following data-variable tags to the HTML of your custom link:![]()
4. Once you add the tags, MonsterInsights starts tracking your WordPress links and provides you with comprehensive reports.
5. For example, let’s see how to add custom event tracking on a sidebar call-to-action button. Assume the sidebar call-to-action button is a link to your pricing page: https://www.example.com/pricing
Here, you need to use the following event conditions:
Category: “cta”
Action: “click”
Label: “Buy button”
Now, you need to replace the event category, action, and label with your event conditions. Then your custom event tracking link looks like the one below:![]()
That’s it! You have now learned how to add custom event tracking to your links in your WordPress with MonsterInsights. And how to set up custom link categories, labels, and actions for your link clicks with MonsterInsights.
1.1 View The Comprehensive Reports Straight In Your WordPress Site Dashboard Using MonsterInsights Plugin
Just now you set up custom events tracking for your links in your WordPress site. Next, you can view the data from your custom event tracking link, straight from your WordPress site dashboard.
For this, navigate to Insights >> Reports >> Publisher. Next, scroll down and view the Top Outbound Links report if you have created a custom link similar to the one for pricing seen in our previous example.

And suppose you have created a custom affiliate link, you can view the Top Affiliate Links report also to see the number of clicks.
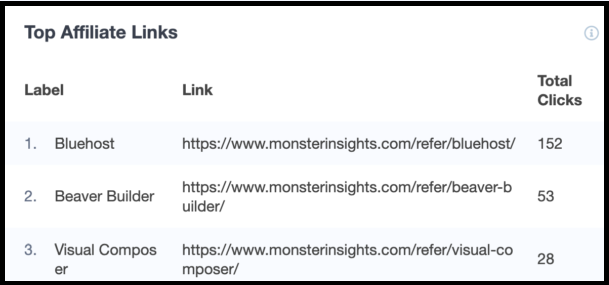
Further, the Custom Link Attribution feature supports Google AMP pages also. So you can exactly track your AMP optimized custom links.
Consider This: 4 Steps to Using Google Analytics to Track File Downloads In WordPress
2. How to Set Up Google Analytics Custom Events Tracking in WordPress Using onclick Method
You can also set up custom events tracking in your WordPress using the onclick parameter. But to do this, you need knowledge of Java skills. If you are a beginner and have no technical skills, this method might be very difficult for you. So, better you choose the first method.
Before set up custom events tracking in your WordPress, you need to install and set up Google Analytics on your WordPress site. In the previous method, you have easily connected your Google Analytics to your WordPress site using the World’s No.01 Google Analytics plugin, MonsterInsights. But in this method, you are not using MonsterInsights. Then how to do this?
Anyhow you can do this if you have profound knowledge of coding skills. To do this, you need to get a Google Analytics tracking code from your Google Analytics account. And add the tracking code to the header.php file in your WordPress.
After connecting Google Analytics to your WordPress site, you can add the onclick parameter to your links. To get started, let you know how the onclick parameter format looks.
Once you add the onclick parameter, Google Analytics starts tracking your WordPress links.
For example, let’s see how to add the onclick parameter on a sidebar call-to-action button. Assume the sidebar call-to-action button is a link to your pricing page: https://www.example.com/pricing
Here, you need to use the following event conditions:
Category: “cta”
Action: “click”
Label: “Buy button”
Now, you need to replace the event category, action, and label with your event conditions. Then the call-to-action button link looks like the one below:

That’s it! Now Google Analytics tracks your custom events when your site users click or view on the button.
Final Thoughts On Setting Up Google Analytics Custom Events Tracking In WordPress Using MonsterInsights
Now you can easily set up Google Analytics Custom Events Tracking in your WordPress site in less than 5 minutes using World’s No.01 Google Analytics Plugin, MonsterInsights. With the MonsterInsights Custom Link Attribution feature, you can easily add custom event tracking to your links in your WordPress. And you can easily set up custom link categories, labels, and actions for your link clicks. Further, you can also view the comprehensive reports of Top Outbound links and Affiliate links straight in your WordPress dashboard.
Finally, you must say thanks to MonsterInsights for simplifying the whole process of setting up event tracking in WordPress. Otherwise, this process might be tricky for beginners. Moreover, by this method, you don’t need any coding skills.
- Read Next: 6 Best Google Analytics Plugins for WordPress
- Do You Know The Keywords People Use To Find Your Website?
I hope that this article How To Set Up Google Analytics Custom Events Tracking in WordPress is a quick guide for you to easily add custom events tracking to your links in your WordPress using MonsterInsights. And easily set up custom link categories, labels, and actions for your link clicks. If you like this article, do a favor by sharing this article and follow BlogVwant on Facebook and Twitter for more tips.
Google Analytics Custom Events Tracking in WordPress Using MonsterInsights: FAQs
What does event mean in Google Analytics?
Events are user interactions on your website with content such as downloads, video plays, mobile ad clicks, button clicks, flash elements, gadgets, AJAX embedded elements, and more.
Events can be tracked independently from a webpage load or screen page load or pageview hit.
What is event category?
It is typically the name of the object allocated to the group of similar events you want to track. For example “CTA” for call-to-action buttons.
For example: If you want to add custom event tracking on a sidebar call-to-action button, which is a link to your pricing page: https://www.example.com/pricing: Then you need to use the following event conditions:
Category: “CTA”
Action: “Click”
Label: “Buy Button”
What is event action?
It is typically used to name the type of interaction or event you want to track for a particular web object. For example: “Click” for clicking on the buttons.
What is event label?
With labels, you can give additional information about the events you want to measure.
For example: “Buy Button” for your sidebar button
What is event value?
It is the numerical value allocated to the event that you need to track. For example, an event value may be
download time, length of the video played, or some numerical value.
What is non-interaction event?
It is used if you want to designate an event as interactive or non-interactive. This field object consists of true or false. Here, in this field, the default value is false, that means an event is considered interactive. And it impacts the bounce rate calculations.
If you desire to make an event non-interactive, set the non-Interaction value to true. And in this case, it doesn’t impact the bounce rate calculations.
What is MonsterInsights Custom Link Attribution?
MonsterInsights has introduced a new Custom Link Attribution feature in its 7.30 version to let you easily add custom event tracking to your custom links in your WordPress.
How to access MonsterInsights Custom Link Attribution?
To access MonsterInsights Custom Link Attribution, you need to purchase the MonsterInsights Pro plugin. And you have to make sure that your MonsterInsights version is 7.30 or higher.