
So are you interested in free Popup forms? Do you want to set up Popup forms with a free tool? Do you want to do it without coding and installing any plugin? Then you came to the right place.
Today, I am going to introduce you to the EmailOctopus – A free Popup form maker + email marketing tool which you can use to generate attractive Popup forms and grow your mailing list.
Well, it is great to hear that you are moving to the email marketing best technique. Yes, Popup forms would give you great conversion if used smartly. So without any delay, let’s roll in.
Note: For users who are curious and couldn’t wait, just skip the whole tutorial and directly jump to the last: EmailOctopus – How to Create a Popup form section. The practical steps along with a video tutorial are waiting for you.
What are Popup Forms?
Popup Forms are one of the effective result-driven email marketing strategies popular among bloggers and email marketers. Whether the goal is to collect leads or subscribers or reader’s feedbacks, Popup forms based campaigns could give you maximum engagements if used smartly. The main advantage of Popup Forms is that admin can control their appearance easily. Popup Forms can be appeared on a user screen based on various factors such as exit timing, number of seconds, scroll percentage, etc.
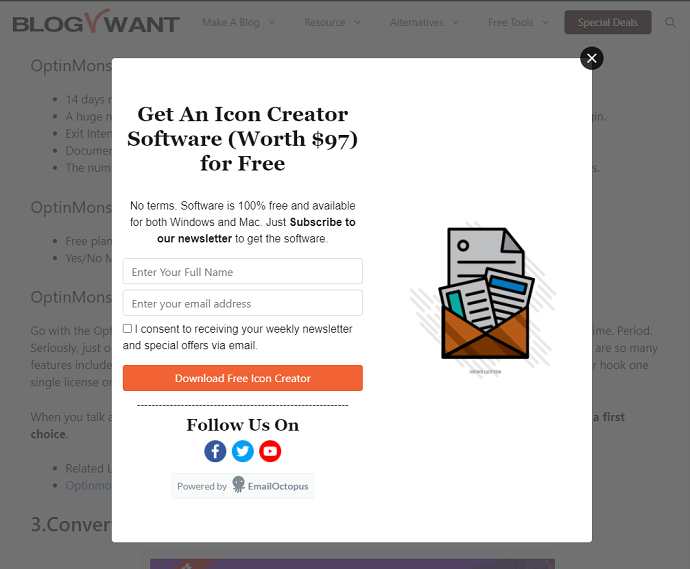
See the below image. This is the popup form we have set up on our website. Just try to hover on the closing (X) icon of the browser, you will see an engaging popup form we have set up with the help of a free tool: EmailOctoups.
Why Should you Create Popup Forms? Are they Worth it?
Before jump to the Popup forms setup and configuration section, let’s have a glimpse of their benefits in real life. These are some of the major reasons you should consider enabling Popup forms on your website:
Popup Forms + Exit Intent Trigger = More Engagement and Conversions:
As I said in the above section that Popup forms conversion rate and engagement rate are higher than any other email marketing strategy, the reason behind its support for Exit intent trigger. When a reader goes through your website page, there might be a chance that he/she ignores your form embedded on a webpage.
But when a user tries to close his page and your exit intent-based popup form appears, there are much higher chances of grabbing user attention. If your popup copy engages them well, then congrats user will be converted for sure or take the action you have configured with your popup form.
By creating exit intent-based popup forms, you will see a downfall in cart abandonment rates.
Hint: EmailOctopus lets you create exit intent-based popup forms free of cost.
Gather Quick Feedback or Generate Announcements:
Have you recently introduced a new product on your website? Do you want to let your customers be notified and up-to-date? Do you want to gather customers’ or reader’s feedback about your service or products?
Well, if yes then Popup forms got you covered. With the help of Popup forms, you can instantly notify your readers about your discount offers, promo codes, upcoming products, and whatnot. Even you can create survey-based popup forms and collect your customer feedback about anything.
Capture Email Leads and Increase Subscribers List
Yes, you can collect email and grow your list with Popup forms too. Not just email you can collect more information like contact details, personal info, etc easily.
EmailOctopus has amazing customizable newsletter Popup form-based templates which help you to grow your subscribers in no time.
Retargeting and Popup forms Now Work Together:
Do you know the Facebook pixel retargeting strategy? There are chances that you already know or tried out. Well, you can establish the same retargeting strategy with Popup forms. Modern Popup form maker tools like EmailOctopus come with tremendous data collection and tracking capabilities.
Based on that you can create personalized email campaigns for a different audience and convert them easily. For example, creating an email campaign to target users who come on your website live in London aged 20.
With EmailOctopus, The great thing is that you don’t have to manually insert any code on your website for building retargeting enabled popup forms.
What are the Best Ways to Create Free Popup Forms on WordPress Website?
So the wait is over. In this section, we are going to discuss the 2 best approaches for a WordPress website for building Popup forms.
After our research, we have found that there are 2 possible ways for achieving this:
- Create a popup with a free WordPress Plugin. Example Popup Maker. OR
- Add popup forms in WordPress without plugins using a free tool: EmailOctopus (Highly Recommended – No Coding Required)
Let’s discuss both approaches first. It will help you to learn why we would recommend EmailOctopus: A non-plugin approach.
1.Create a Free Popup Forms Using Popup Maker – Plugin Approach
Popup Maker is the free WordPress plugin that comes on the top of the list when you search a “Popup forms” over a WordPress plugin repository page. Well regardless of its popularity, this plugin has some serious flaws:
- First, it is not actually a Popup form maker. Basically, it shows your website forms created with other plugins as a Popup. So in other words, you have to install 2 plugins: The first is for creating forms and the second is this plugin to show your forms as a Popup. This might increase your website load and impact the website speed.
- Popup Forms is a good plugin for those who aren’t serious about email marketing. This just shows a Popup. Features like reporting, sending emails, pre-built forms templates, demographics-based retargeting & segmentation are not available. All these essential features are available in EmailOctopus free tool.
- Next, In a free version, Popup Maker doesn’t provide 2 important triggers: Exit Intent and Scroll percentage. Well, let me tell you a thing if you want a higher rate of conversion results, then your Popup form should support exit intent trigger. This will engage your visitors as soon as they try to close your webpage. Gladly EmailOctopus support both triggers in its free version.
- You cannot build your audience or grow your mailing list with this plugin. Even Google Analytics and other important integrations are not supported.
- Popup Maker doesn’t have a device-based trigger in its free version which means your Popup form will be shown to all devices.
To create a Popup with the Popup Maker these are the overview of steps:
- First, install a Popup Maker plugin
- Next, install any form-based plugin. Popup Maker supports lots of popular form plugins including WPForms, Ninja Forms, etc.
- Then create any form you want to show as a Popup.
- After that, Navigate to Popup Maker > Create Popup
- Tap on the add form button and select your form.
- Finally, scroll down and configure Popup settings. This includes settings related to Popup form trigger, display location, etc. After that publish your Popup and test it.
- Related: How To Create Engaging Multi-Page Forms In WordPress
- Related: How To Create Online Donation Forms For Nonprofits Right in WordPress
2.Create Free Popup Forms using EmailOctopus without any Plugin – (Recommended)
What is EmailOctopus
EmailOctopus is the trending Email Marketing + Form maker tool that is growing faster than ever before. The reason people move to EmailOctopus from their existed email marketing service is their advanced features and free plan. Literally, just ask yourself which email marketing tool provides you the paid plan features in a free version? None, right? But EmailOctopus is different, they truly care about their customers and believe in transparency.
Why EmailOctopus is the Best Option to Add Popup Forms in WordPress
Apart from sending emails, EmailOctopus allows you to create forms (both Inline and Popup) with their web-based drag and drop builder. The major plus point here is that to add Popup forms you don’t need to install any plugin.
Unlike Popup Maker, EmailOctopus lets you create complete email marketing-rich-based Popup forms within their web-based form builder which helps you to collect leads or grow your mailing list. With EmailOctopus there is no need for the secondary plugin to generate forms.
EmailOctopus free Popup forms have inbuilt advanced features including exit intent trigger, scroll percentage trigger, hidden form entries (used for data collection, source tracking, and segmentation), device-based display options, prebuilt templates, social buttons, custom thank you page redirection, User consent field, Custom form entries, Invisible reCaptcha support and much more.
With EmailOctopus you can create various Popup forms including Email Opt-in forms, Newsletter Forms, Lead Generation Forms, eCommerce forms, Contact forms, Announcement-based forms, and whatnot.
How Does EmailOctopus Popup Form Works?
You may wonder, how can I add the EmailOctopus popup form without a plugin? Well, you just need to insert 2 lines of HTML <script> code in your WordPress post and you are good to go. Don’t worry you don’t need to learn any coding and change your existing website code. The process of embedding a Popup form is as simple as embedding a YouTube video in a WordPress post.
The complete step-by-step process along with a video tutorial is available in the next section.
EmailOctopus discount
Offer: Our readers get a special 30% discount on all EmailOctopus Pro and EmailOctopus Connect plans through This EmailOctopus discount coupon page.
How to Create Free Popup Forms on WordPress
Video Tutorial:
For the reader’s convenience, we always create a video tutorial. Either you can watch and learn or simply skip the video and continue with the steps mentioned afterward.
In this section, we are demonstrating the 14 steps procedure for adding a Popup form on a WordPress website without any plugin. We are using an EmailOctopus web-based Popup Form maker tool.
Total Time: 10 minutes
Step 1: Signup to EmailOctopus Popup Maker Free Plan and Activate it
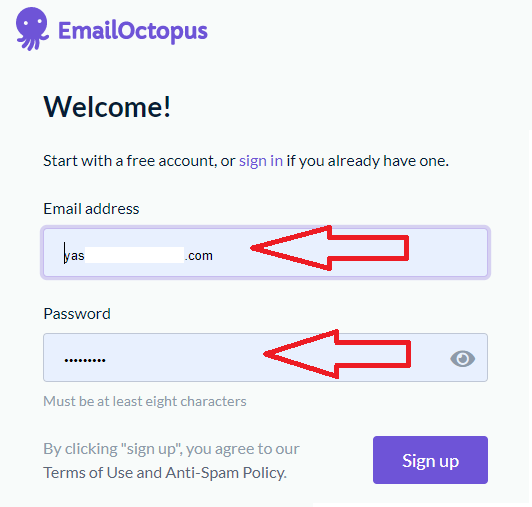
Initially, EmailOctopus free plan is enough. In a free plan, you can build an email list of up to 2,500 contacts and send 10,000 emails per month. There is no restriction on the Popup Form impression count. So signup for the free plan and test out whether EmailOctopus would be a great choice for you or not. You can always upgrade your plan later.
After inserting an email, you will be required to verify your account. So open up your inbox and open up the verification email received from EmailOctopus and tap on the activate account.
Once you activate your account, you will be redirected to the EmailOctopus setup details page. Here just fill the form with basic details like website URL, First name, etc.
Step 2: Navigate to the Landing Pages & Forms Dashboard
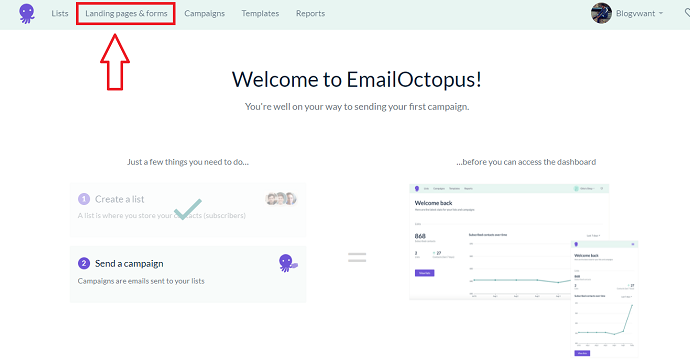
This is the dashboard you would first interact with. Here you can set up your first list and also send emails in the future to your contacts with “Create a list” and “Send campaign” options.
Tap on the create a list button and create at least one list for storing your emails. After that navigate to the landing pages & forms page from the top menu bar.
Step 3: Create a Popup Forms
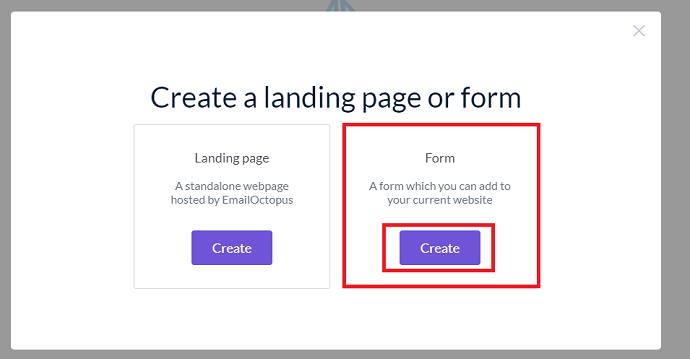
Under the “landing pages & forms page” tap on the create button. Then EmailOctopus would ask you your choice between landing page and form. Choose a Form option.
Step 4: Choose a Form Style and List
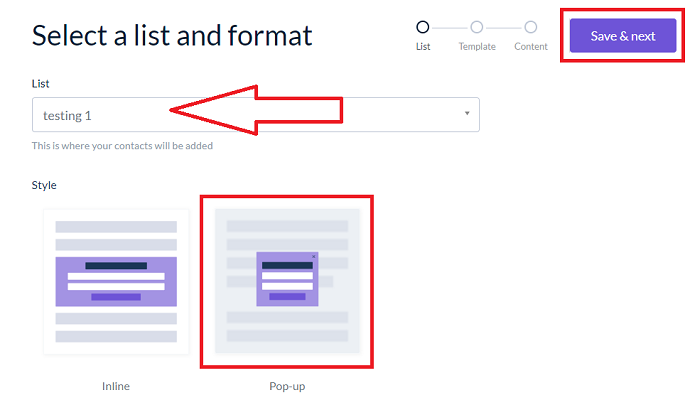
Now the actual popup form creation begins. First, you have to select an email list. The list is required to save your future contacts. I have already created it. You can create a list from the dashboard.
After choosing a list, choose a Pop-up form style and tap on the save and next button. EmailOctopus also supports Inline forms and the process is almost identical.
Step 5: Choose a Popup Form Template
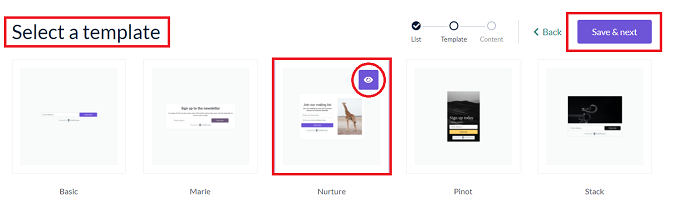
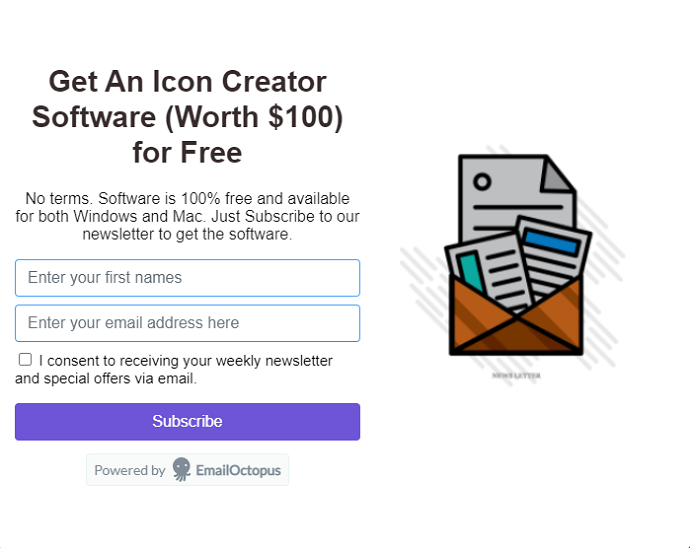
In a free plan, you only find few templates. But you can edit them completely. We are using the EmailOctopus premium plan and I must say templates in a premium plan are incredible and well categorized.
For this example, I am choosing a “Nurture” template to collect email leads. I will customize it at the later steps. To preview any template just hover on it and tap on the eye icon. After finalizing the template, tap on the “save and next button”.
Step 6: Customize the Popup Form Template
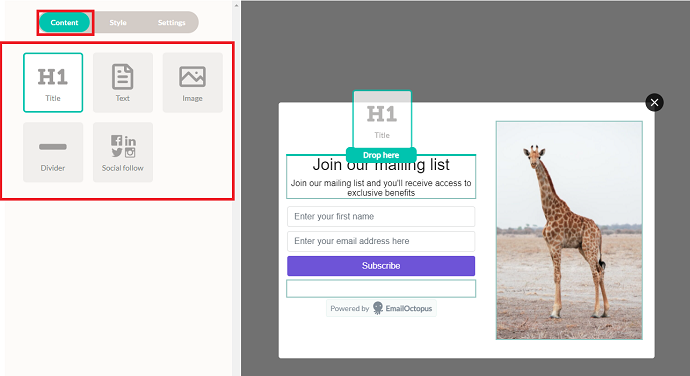
Here is the most important part and that is editing the template. It’s a complete drag and drop form editor where you don’t have to write a single line of code. In the editor, you can see 3 options: Content, Style, and Settings.
Let’s first focus on the content tab. Under the content tab, these elements are available: Title (H1), text, image, divider, social follow.
To add any additional element from the content tab. Just select it and drop it to the editor.
Step 7: Change Existing Form Elements
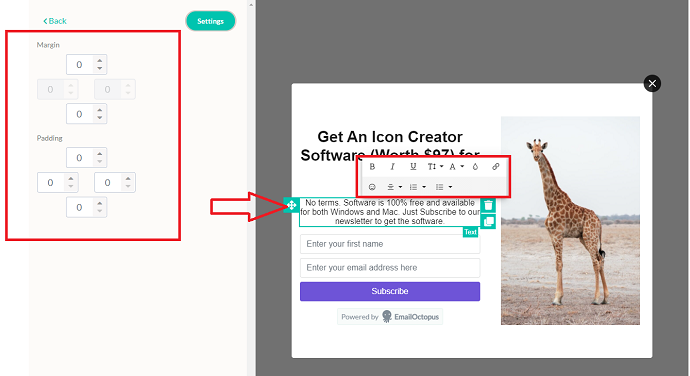
When you choose a form template, few fields from the content tab are already there. To edit them just click on it and you will see additional editing options. For example, I am clicking on a text element and insert my customizable text. You can see that lot of editing options related to the text field are available including Text type, font, text color, link, emoticons, alignment, etc. Further on the left, padding and margin options are also available.
Step 8: Add New Image
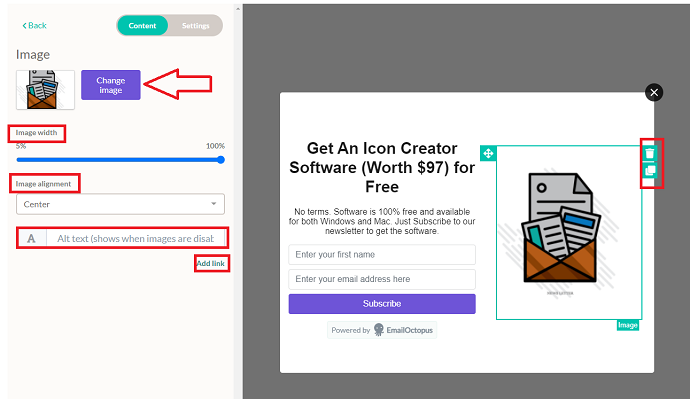
If your popup form has an image element, you can delete or replace it with your image in seconds. Just select the image as we did with the text field and from the left click on the change image button. Image width, alignment, alt text, and link can be configured accordingly.
Step 9: Adding Additional Form Fields
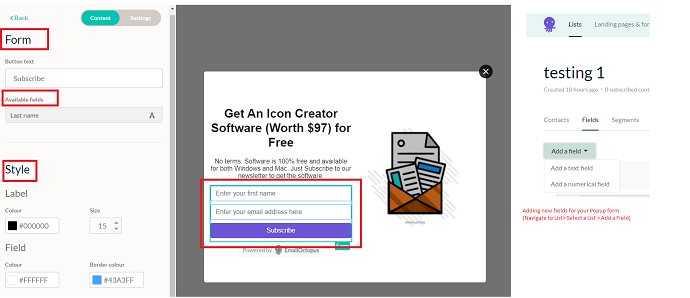
Till previous steps, we have seen how you can add new content fields into your form. Now let’s focus on the form existing fields. Each EmailOctopus popup form template comes with default fields. In my template, they are the first name, email address, and button.
To add new form fields, first, select the form fields entire bounding box. As soon as you press it you will see the available fields at the left tab. In my Popup form currently, one field is available: The last name.
But you can add more or create custom fields. For this, you have to navigate to lists from the top menu > select your list > fields > add a field. When you add new fields to your list, they will automatically be associated or comes under the available fields tab to all the popup forms associated with that list.
So back to the form tab. To add a new form field from the available ones. Just drag and drop and you are done. Just below the available fields option, few global form styling options are available including label color, field color, button color, border color, etc. Play around accordingly.
Step 10: Editing the Individual Form Entries
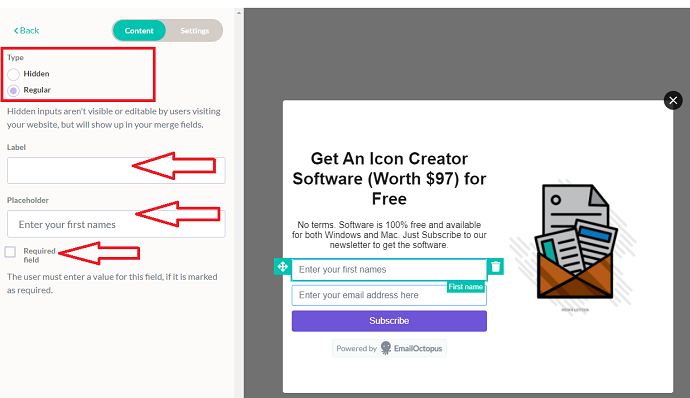
Now let’s talk about editing an individual form entry. When you select an individual form entry (example: First Name) you will see few options on the left.
Under the type 2 options are there: Hidden or Regular. Regular form fields are visible and editable to the user. But hidden forms fields aren’t. Hidden fields are used to segment your contacts (subscribers) which can later be used for tracking and retargeting purposes. You can learn about segmentation from the EmailOctopus website.
From the Label option, you can give a label to your selected form field. The label would appear just above the field. The placeholder field is also important. Use it to place a default text into your form field. Lastly, checkmark on the required field box to make a selected field mandatory to fill.
Step 11: Review the Global Styling Options
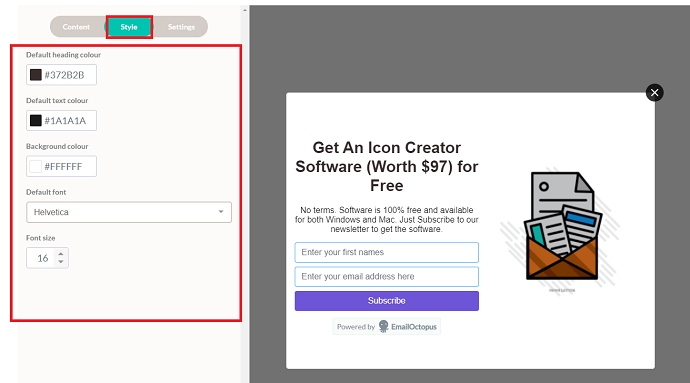
Just beside the Content tab, the Style tab is there. This tab provides you global styling options for a few form elements including heading color, text color, background color, default font, etc. Just remember before tweaking any of them that these are the global settings that applied to your whole Popup form.
Step 12: Configure Popup Form Settings
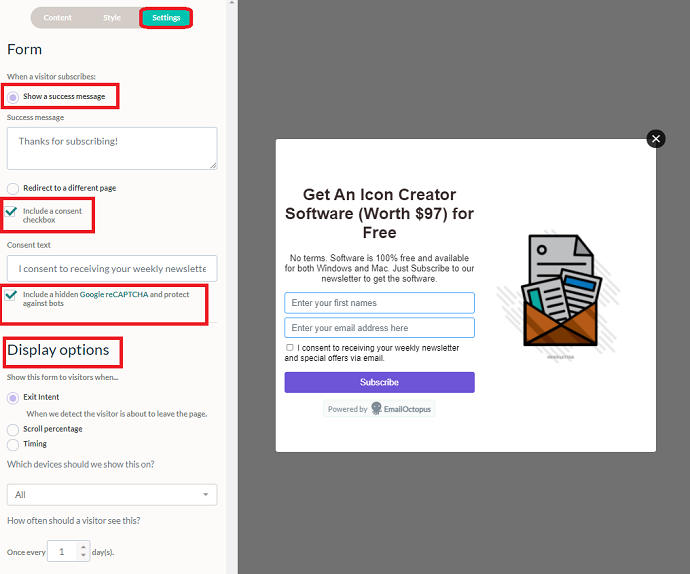
We are almost done, just need to configure few important things under the settings tab. Under the settings tab:
First, you can customize your thank you page. Thank you page is the page users will see when they submit/subscribe or complete the form. You have the option to either just show a custom message or redirect them to the particular landing page.
With EmailOctopus you can also create attractive landing pages and integrate them with your Popup forms later.
Next, you will see 2 checkboxes: First for taking the user’s consent to send weekly/daily emails. Next to enable Google invisible reCaptcha for making Popup forms secure. It is highly recommended to mark a tick on both checkboxes before moving further.
The last thing left is to configure is display options. The display options are only available for Popup forms.
For Popup forms, EmailOctopus gives you 3 triggers that you can use to control the appearance of Popup Forms on a website. The first one is Exit intent which triggers when someone is about to leave your page. This trigger works great and gives you maximum conversion results. The second is Scroll Percentage (Popup form appears when a reader scroll the page up to a certain point) and the third one is timing (Popup form appear based on the visitors spending time on your page)
You also configure the device trigger. And lastly, you can control how often your visitors can see your Popup form.
Play around with triggers and test what will work best for you.
So when you are done with the designing part, simply preview it, and if you are happy to proceed then tap on the Save button.
Step 13: Add Popup Form to WordPress (Individual Page/Post)

This is a final step. You neither have to install any plugin nor making a change in a website code to add an EmailOctopus Popup form on your WordPress website.
First, Tap on the “add to your website button”. This will pop up a window where you see an HTML code. Copy it. With the help of javascript, EmailOctopus will show a Popup form on your WordPress website.
Note: This method does not affect your website speed at any cost. We have tested it several times.
Now there could be 2 possible ways to show a Popup form on your WordPress website.
The first way is to copy the above Popup form HTML code and paste it into a single post/page using Gutenberg editor. This method is best when you just want to show a Popup form on an individual or a few selected posts and pages.
For this just open up your website in an edit mode. Scroll to the bottom add a new block called “custom HTML block” and paste the copied Popup form code and save it. This is how you can add a Popup form code to your WordPress individual pages without a plugin.
Initially, if you haven’t started collecting any emails or your mailing list is empty you can create different Popup forms and add them individually on posts with which they are related. This will boost conversion by 100%. For example, if users coming on your Pinterest-related tutorials, then adding a Pinterest-related free ebook Popup form would be a great approach.
Step 14: Add Popup Form to WordPress – (Whole Website)
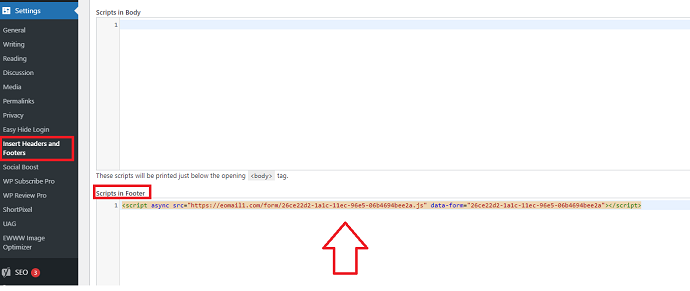
The second way is preferred in case you want to apply the Popup form on your whole website, as per the EmailOctopus instructions, you need to put your Popup form code before the closing tag of your website </body> tag.
I recommend don’t interfere with your website code unless you have good hands-on PHP and HTML language. The great alternate for this manual approach is to use a plugin like “Insert headers and footers”. This plugin is used by millions and there are chances that you are already using it. This plugin allows you to insert code in your website header, footer, and body. The plus point is you can remove your Popup form script anytime without tweaking your website’s existing code.
So to add a Popup form code to a whole website, Install the “Insert headers and footers plugin” from the WordPress plugin repository. Then Activate it. Then from the WordPress dashboard, navigate to Settings > Insert headers and footers.
Now you will need to paste your copied Popup form script under the “Scripts in the footer” box. Save it.
Now open any of your website pages, you will see a nice popup form created by a free tool called EmailOctopus.
In case you want to remove the Popup form, just delete the code from the above “Scripts in the footer” box and you are good to go.
Supply:
- EmailOctopus Free Account
- WordPress website
Tools:
- EmailOctopus Free Account
- WordPress website
Materials: EmailOctopus Free Account WordPress website
Conclusion: How to make Free Popup Forms on WordPress
So have you created a first Popup form with EmailOctopus free tool? If you faced any issues, don’t forget to ask in the comment section.
Before wrapping up, let me tell you a thing. Regardless of the tool, you choose to create a Popup form for your WordPress website, your mailing list or conversion rates would only increase if your form copy is good and catch the user’s attention. Otherwise, users just close your Popup form within microseconds.
Some of the few tips we have been following while creating Popup forms are:
- Use Call to Actions
- Clear about your intentions why are you demanding user emails.
- Include the benefit of joining your newsletter services
- Use Conversational tone
- Try to write a simple readable message that paints a picture in the user’s mind in a second. Avoid lengthy texts.
- Use exit-intent trigger
- Experiment with Mobile and desktop display triggers
- Don’t add more than 2 input fields
- If you offer downloads in exchange of email then make sure to give it right away.
- Use brand-related typography and colors
- Always try to provide a lead magnet in exchange of emails.
- Next Read: An Epic List of 10 Best Free Email Newsletter Services
- 8 Outstanding Mailchimp Competitors for Email Marketing
I wish this article, How to Create Free Popup Forms, helps you to add Popup form in WordPress without any plugin. If you like this article, please share it with your friends. If you want more blogging tips, follow BlogVwant on Facebook, Twitter, and YouTube.
FAQ: How to Create Free Popup Forms on WordPress?
Does EmailOctopus based Popup form GPPR friendly?
Yes. EmalOctopus allows you to add a user consent checkbox on all forms where data collection is enabled.
Does EmailOctopus is absolutely free?
EmailOctopus do have paid plans. But their free plan is enough for most of the users. In a free plan, all paid plans features are available. Apart from this, you get monthly 10,000 emails and have an option to store a list of 2,500 subscribers. In case, your requirements increased you can check its paid plans on a website.
How to create a custom popup in WordPress using Javascript?
EmailOctopus allows you to first create popup forms which you can embed later on your WordPress website with the help of the javascript code provided by them.
Do Popup forms affect SEO and website speed?
When we talk about SEO, not at all. But as far as we know, EmailOctopus doesn’t make any bad impact on your website. We have tested it and using its popup forms for a quite long time.
Is there any limit on Popup forms count to be displayed?
There is no limit on the count. But you can control how frequently a reader/visitor can see your popup form.
How to remove EmailOctopus branding from Popup Forms?
You cannot remove the EmailOctopus branding in a free version. To remove it you have to upgrade your plan.
Is it possible to add an EmailOctopus popup form on a Non-WordPress website?
Yes. The EmailOctopus popup form could hook up to any website because EmailOctopus uses a Javascript code to host Popup forms on the user website. The process is completely the same. After designing a popup form, you only need to put the given popup form code just before the closing tag.
This is a great article that covers every nook and corner of setting up a pop-up form of email octopus. Me too, as an affiliate of EmailOctopus, I really love email octopus as the features are quite awesome.