Have you created a new WordPress website from Bluehost? You must install free Bluehost SSL certificate on your new blog prior to writing any post. When you have an existing blog with some posts, you need to follow some additional steps after this procedure which I am not going to cover in this article. This article will work better for new blogs which are created on Bluehost. We are assuming that you have created a new WordPress blog on Bluehost. Not created a blog, you can read our guide How to Make a blog in 5 Minutes on Bluehost.
What is SSL?
SSL(Secured Sockets Layer) gives more security to your visitor. After installing SSL, your website URL converts to HTTPS from HTTP.
Now when any visitor opens your website, your website encrypts their data and transmits encrypted data instead original data to your server. So no one can hack your visitor information.
SSL gives confidence and belief to your visitors on your blog. HTTPS is also one of the factors for search engine rankings. You can read our Earlier article What is an SSL certificate? How a blog gets benefit from it for complete details on SSL.
You can use free SSL from Let’s Encrypt as well as premium SSL certificates like Comodo SSL, GeoTrust, and Symantec. If your website is a blog, you can use the free SSL without any doubt. When you are making any direct sales through your website or your website is an eCommerce website, you must use the premium SSL.
How to Install/Use Free Bluehost SSL Certificate
Bluehost (60% Discounted link) is officially recommended hosting service by WordPress. When you are using Bluehost for your WordPress website, you need not install the free SSL from lets Encrypt. Because Bluehost cPanel has the option use Free SSL from Comodo. Comodo has the premium SSL plans and free plan as well for Bluehost users.
Now let us see the procedure to install a free Bluehost SSL certificate on a new blog.
Login into Bluehost cPanel.
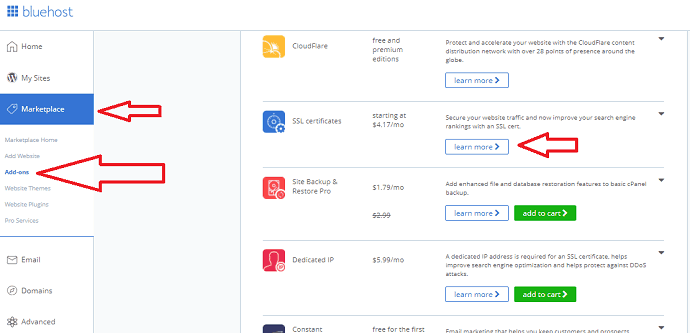
Go to Marketplace -> Add-ons -> SSL certificates. You will see the price. Don’t worry, you will get it for free. Select Learn More.
Now you will see WordPress FREE SSL box along with the premium plans.
Select your domain from the drop-down. Click Get Started under Free SSL.

Select Install on the next screen.
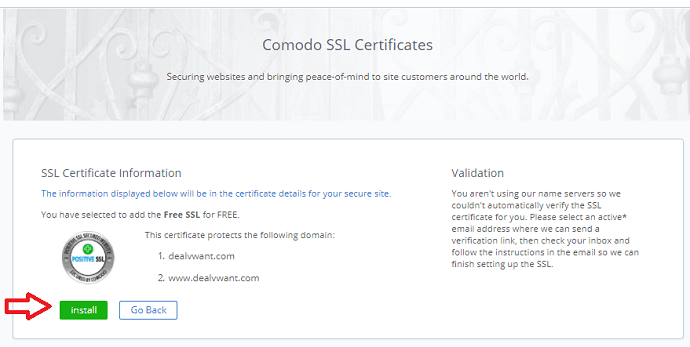
You will receive a mail with the order details for zero amount. It will also show the validity of three months. You need not worry about the validity. Bluehost will update it automatically before expiring.
If they see any issues, you will get the Email with the instructions. They take 4 to 12 hours to verify your domain. After some hours open your website with HTTPS instead of HTTP. Your live website will open if the validation process is over otherwise your website might not work with HTTPS. You need to wait some more hours.
In my case, I did not see any errors. I have tried my website http://dealvwant.com after one day with https://dealvwant.com it worked.
What should I don’t see Secure symbol?

Now you must see the Secure word in green color before the URL shows that in above screenshot. Sometimes you can load your website with HTTPS, but it will not show the Secure word before the URL. That means your website has some mixed content.
All your website URLs, other external URLs on your website must have SSL. Every external or internal link generated by plugins or themes must have SSL. If anyone URL did not have the SSL, you will see the mixed content error.
To solve this problem, you can just install the free version of Really Simple SSL plugin. And activate it. It will solve the issue automatically. Though it has settings, default settings will work for you. Now you can uninstall the plugin.
That’s it now you have installed SSL certificate successfully. If you have a new blog, your work is over, you can continue with your regular work. If you have an existing blog, you need to follow some procedures to convert all existing URLs to HTTPS. I did not try that procedure in Bluehost, so I am not going to cover that method. But you can check below article for the procedure which I have used in Siteground(60% discounted link) server.
- You May Also Like: 4 Simple steps to setup Siteground SSL certificate
I hope you like this tutorial on How to install free Bluehost SSL certificate. If you like this article, please don’t forget to share it with your friends. Want more blogging tips, follow BlogVwant on Facebook and Twitter.
Hi very nice article keep it up the good work Wonderful!! Thank you for posting informative blog. Your posts are more interesting and informative
You are a lifesaver! I have been trying to follow everyone else’s instruction on finding this free SSL but it’s using Bluehost’s old design so I didn’t know where to access it. Thank you!!!