Want to know how to add a sticky menu or sticky header to a WordPress site? So as to stick them to the top of the screen and display all your important content like Deals, Products Search, Offers, Cart, etc all the time as your visitors scroll your website pages. Then you can do it using WordPress sticky menu plugins, and with the Themes having inbuilt functionality to make the navigation menu sticky, and manually adding CSS code to the theme.
If you are running an online store, then your top navigation menu must include links to Add To Cart, Product Categories, Product Search, Today’s Deals, etc. And this navigation menu with these links must always appear to your visitors when they scroll your site pages down or up. Because this way can definitely reduce cart abandonment and increase your sales as well.
In this article, we will show you the 2 simple and best methods to easily add a sticky menu or sticky header on your WordPress site.
What is a sticky menu?
A sticky menu is one that sticks to the top of the screen as your user scrolls down or up the pages on your WordPress site. It is also called a fixed menu or a fixed navigation menu.
What is a sticky header?
A sticky header is the one that sticks to the top of the screen as your user scrolls down or up the pages on your WordPress site. It is also called a fixed header.
Why and when sticky menus can be useful?
- If the menu on your website contains most of the important links. Then that menu must be always visible to your visitors when they scroll down or up your pages. In such a case, you definitely need to stick your menu to the top of the screen.
- For example, if you are running an online store, then your top navigation menu likely links to include Add To Cart, Product Categories, Product Search, Today’s Deals, etc. Suppose you make this menu sticky, then it can not only reduce the cart abandonment but also increase sales as well.
- It also aids bloggers in reducing the bounce rate which is essential for SEO purposes.
- And bloggers can easily make advertisements or offers or products sticky. And visible to their users all the time, when they scroll pages.
What are the best ways to add Sticky Menu or Header In WordPress?
You can add sticky menu or header in WordPress site in 2 ways:
- Using WordPress themes that have inbuilt functionality to make the navigation menu of your WordPress site sticky. Example: GeneratePress or Astra.
- Using WordPress sticky menu plugin like WP Sticky plugin.
Out of the two methods, the second method is simple and best. And that is recommended for beginners. And in these ways, a lot of your time is saved. Suppose you have intense knowledge of coding, then you can go for the first method.
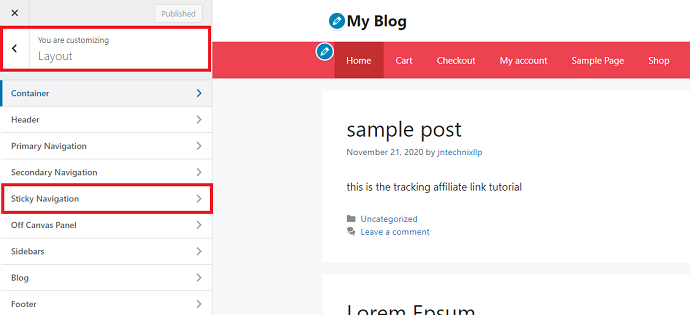
Suppose you are already using any theme for your WordPress, then check if it has the in-built inbuilt functionality to make the navigation menu sticky. To check, just go to your WordPress dashboard and navigate to Appearance >> Customize >> Layout.
How to add Sticky Menu or Sticky Header in WordPress: 2 Best Ways
In this article, I have explained the 2 simple and best ways to easily add a sticky menu or sticky header on your WordPress site.
1. Using GeneratePress Theme
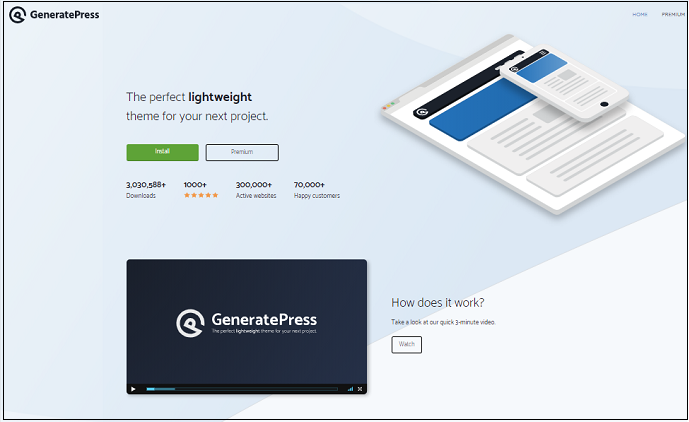
GeneratePress is the perfect lightweight and most trending WordPress theme, trusted by lakhs of WordPress users all over the world. The main reason behind its popularity is its speed, lesser size, and tons of modules which automatically reduce the extra plugins requirement. GeneratePress also supports sticky navigation which allows users to make their floating navigation menu in a single click.
The GeneratePress sticky menu module provides the best features that are more than enough for your WordPress site like the option to apply a sticky menu for both mobile and desktop sites or can select only 1 option, transition effects, menu item height, responsiveness, and sticky navigation logo support.
How to Add Sticky Menu or Sticky Header In WordPress using GeneratePress Theme
In this section, you can view the step by step procedure on how to add Sticky Menu on your WordPress site using the GeneratePress theme.
In brief, the following steps are involved here:
1. Install a GeneratePress Child Theme
2. Purchase GeneratePress Theme
3. Activate the Menu Plus Module
4. Navigate to Sticky Navigation in a Theme customizer
5. Configure Sticky Navigation settings
Total Time: 5 minutes
Step 1: Install GeneratePress Free Theme
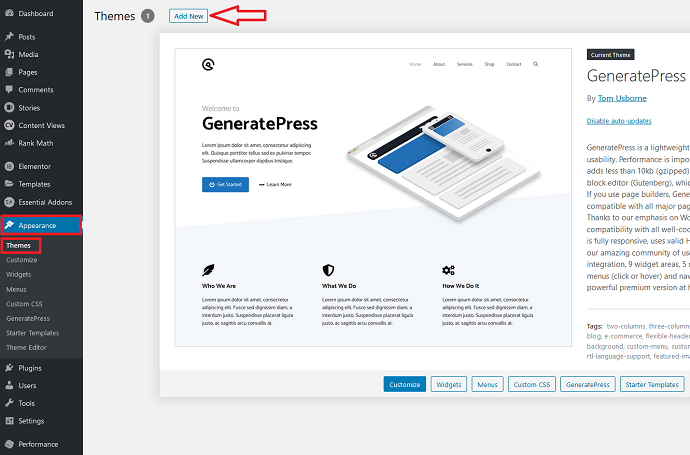
1. Go to your WordPress site dashboard.
2. Navigate to Appearance >> Themes and click on Add new.
3. Next, search for GeneratePress
4. Then install and activate it.
Step 2: Subscribe and Install GeneratePress Premium Version
1. Actually, the sticky navigation module is included in the GeneratePress premium version.
2. So, upgrade to GeneratePress premium version.
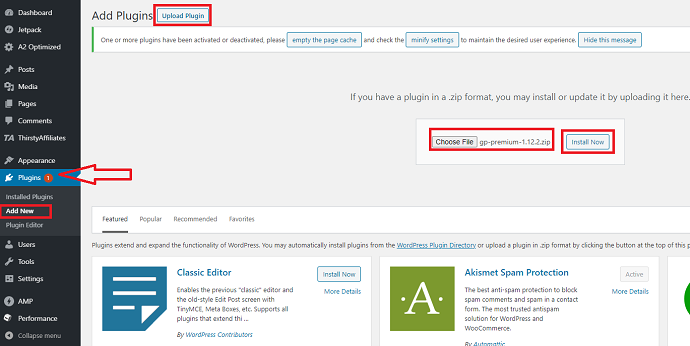
3. Download the GeneratePress premium zip file.
4. Go back to your WordPress dashboard. And navigate to Plugins >> Add new >> Upload Plugin.
5. Click on the Choose File button to the just downloaded GeneratePress premium zip file.
6. Install it and then activate it from the plugin section.
Step 3: Activate the Menu Plus Module
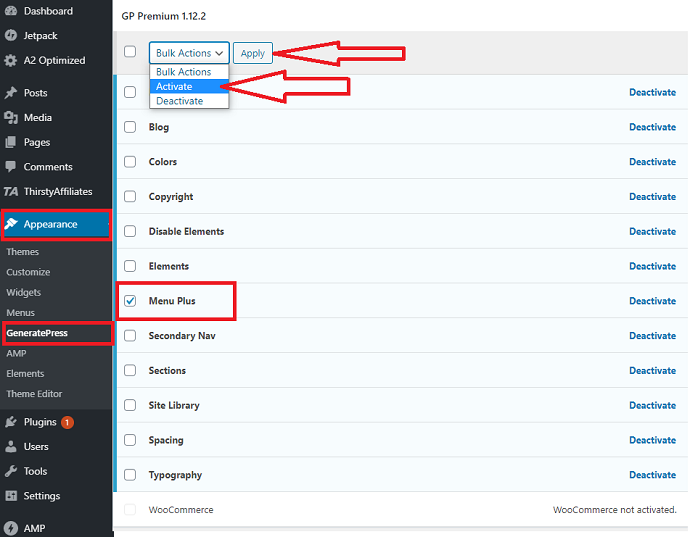
To use the sticky navigation feature, you first need to activate its Menu Plus module.
To do this, navigate to Appearance >> GeneratePress. And check the Menu Plus box. Then activate it.
Step 4: Navigate to Sticky Navigation in a Theme customizer
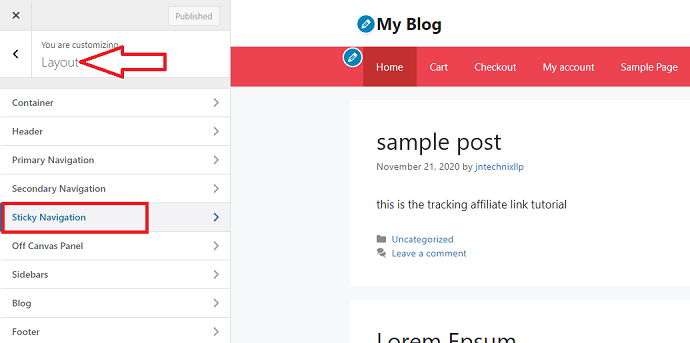
Navigate to Appearance >> Customize >> LayOut. And click on the Sticky Navigation.
Step 5: Configure Sticky Navigation settings

Here, you need to configure the settings of sticky navigation. So that you can set the sticky menu on your WordPress according to your requirement.
1. Turn On the sticky navigations.
2. Set the Transition as Fade, Slide, or None.
3. Check the box of “Hide when scrolling down”, if you want to view the sticky menu only when scrolling up pages on your WordPress site.
4. Select and set an image for your navigation menu if you desire it.
5. Set the Menu Item Height.
6. Click on the Publish button.
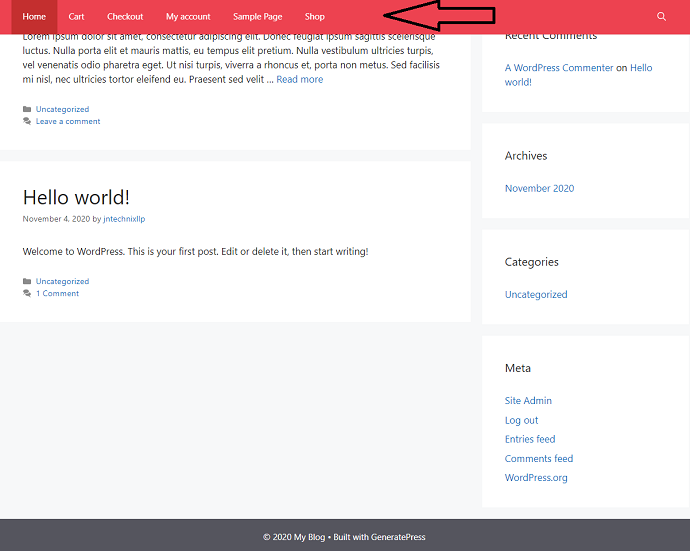
Then your WordPress site navigation menu stick to the top of the screen as your users scroll down or up.
Estimated Cost: 49.95 USD
Supply:
- GeneratePress Theme
Tools:
- GeneratePress Theme
Materials: Software
GeneratePress Sticky Navigation Pros:
- Easy to implement.
- No need to install additional plugins.
- The users have the option to use a different logo for a Sticky Menu.
- Support both mobile and desktop devices.
How do I get rid of sticky header in WordPress?
Suppose you want to get rid of the sticky header in your WordPress site, then go through the following steps:
- Go to your WordPress dashboard.
- Navigate to Appearance >> Customize >> LayOut.
- Click on Sticky Navigation. And turn it off.
The above steps are valid if you are using the GeneratePress theme. Suppose you are using the other themes, then follow the same steps as above and disable the Sticky Header/Menu.
Related: How to add back to top button in WordPress
2. Using WP Sticky Free Plugin
WP Sticky is the most popularly used plugin to make any element sticky on a WordPress website. And the average rating of this plugin on the official site of WordPress.org is 5 out of 5 stars. This is really marvelous. And it has more than 100,000 active installations worldwide. The main reason for its popularity is that it allows users to stick any element to the top like menu, header, widget, logo, and call to action menu.
WP Sticky Free Plugin Features:
- Multiple Elements Support:
- The user has full freedom to stick any element to the top including Header, Navigation bar or menu, Widget, Banner ads, logo, etc. And every element can be configured individually as well.
- Flexibility:
- You can add the sticky menu, sticky header, etc to any page or post. You can also even exclude or include category pages,
- Space control:
- You can define how much space should be included between the sticky element and the top of the page.
- Screen Size control:
- It provides a separate option to define the maximum and minimum screen size (pixels). This is a very essential feature and you can easily disable the sticky feature on small screen devices.
- Other Features:
- Opacity control, transition effects, Z-index will make sure that the existed sticky element will never overlap with the WP Sticky element.
- And debug mode checks for any error and problems that arises in the WP Sticky Plugin.
How to Create Sticky Menu or Header on WordPress Site using WP Sticky Free Plugin
Video Tutorial:
For the reader’s convenience, we always create a video tutorial. Either you can watch and learn or simply skip the video and continue with the steps mentioned afterward.
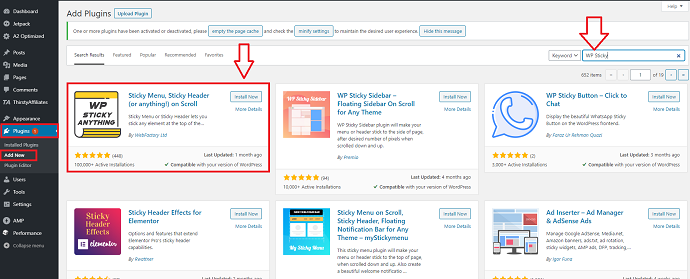
Step 1: Install WP Sticky Plugin:
Go to your WordPress dashboard and navigate to Plugins >> Add New. And search for WP Sticky. Then install and activate it.
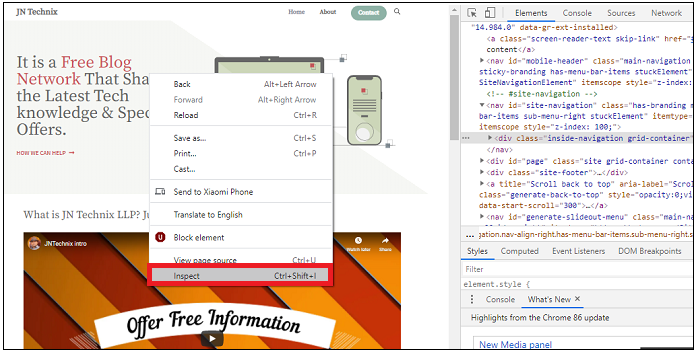
Step 2: Inspect your page to find CSS ID of your Sticky Element (Menu or Header)
- Now to make your menu or header sticky. First, you need to find its CSS ID.
- To find this, open any page of your website. Then right-click on your site navigation menu and select Inspect.
- Then you can see the source code for your navigation menu.
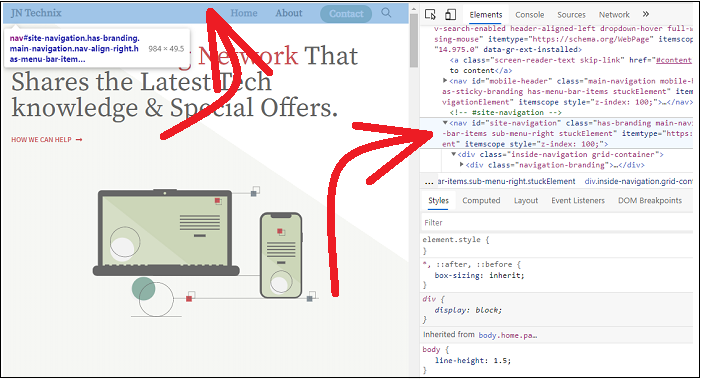
Step3: Find the CSS ID of your site navigation menu
Now you need to find a line code that relates to your site navigation menu or header. In general, it looks like this:

Suppose you are struggling to find it, then simply bring your mouse cursor over to the different lines of source code in the Inspect pane. And starts moving it down from the top until the navigation menu of your site highlights fully. Whenever your mouse cursor points to the right line code, the navigation menu of your site highlights fully.
Step 4: Open WP Sticky Plugin settings:
After determining the CSS ID for your navigation menu, navigate to WP Sticky settings. Under the settings menu, you can view “Sticky Menu (or Anything!)”. Click on it.

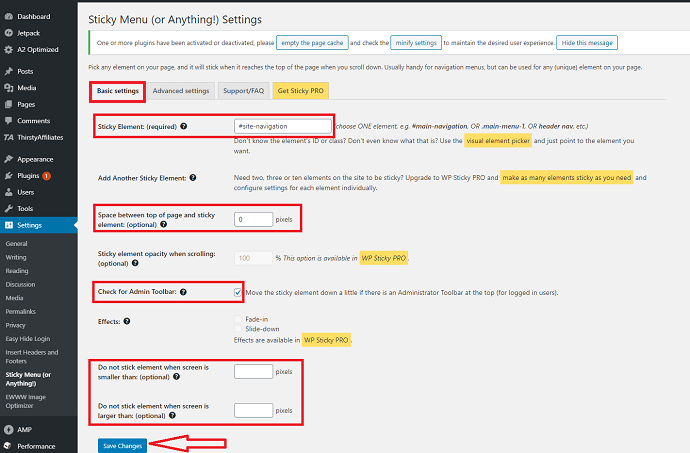
Step 5: Configure WP Sticky Plugin Basic Settings:
- Enter the CSS ID of your navigation menu that you have found in the step3 with # at the start in the Sticky Element field.
- Define Space between top of page and sticky element. This is optional.
- Make sure that the box of Check for Admin Toolbar is checked.
- Next, define a maximum and the minimum number of screen pixels for smaller and bigger screens. This is also optional.
- Finally, click on the Save Changes button.
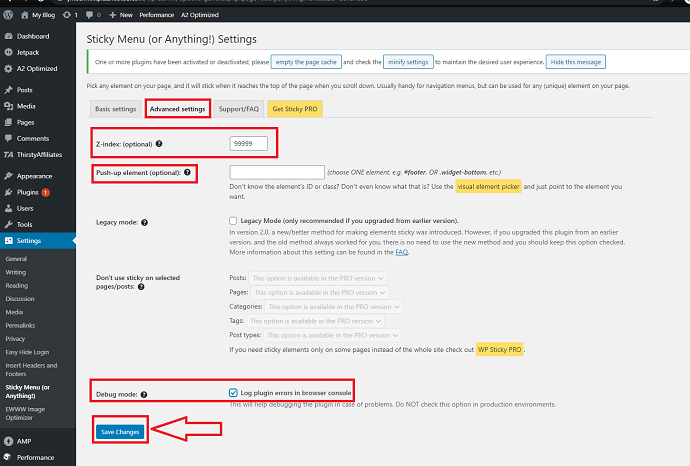
Step 6: Configure WP Sticky Plugin Advanced Settings
- Enter a value in the Z-index field to avoid overlapping between the existed sticky element and WP sticky element. If you don’t know the exact value of the Z-index, then enter the default value 99999.
- If you want that your sticky element to be pushed up by another element lower on the webpage for example footer. Then enter that element ID in the “Push-up element” box. This is also optional.
- Enable the Debug mode to find out any possible errors.
- Finally, click on the Save Changes button.
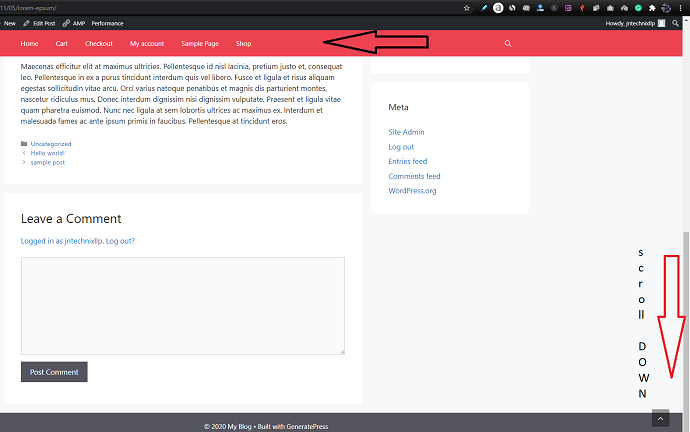
Step 7: Refresh your website:
After configuring settings, just open any webpage of your site and scroll down. Then your navigation menu will definitely stick at top of the screen.
WP Sticky Free Plugin Pros:
- It allows you to make any element to stick at top of the screen like the menu, header, widget, logo, etc.
- Debugging mode is available to find out the errors and problems.
WP Sticky Free Plugin Cons:
- Difficult to use as compared to the GeneratePress theme. The user must have basic HTML & CSS knowledge.
- The transition effect is not available in its free version.
- Exclude Sticky element from any specific page feature is not found in its free version.
Conclusion
Now you know how to easily and quickly make the navigation menu or header sticky on your WordPress site. Here, I would recommend the GeneratePress theme definitely. Because it is easier to use and make the navigation menu of your WordPress sticky. You can not only add a sticky menu but also add a search bar, back to top button, etc on your WordPress site. Further, it is the perfect light-weight theme having mindblowing features like the fastest loading speed, usability, excellent customer support, and more. And its free version is more than sufficient for you to do many things on your WordPress like add a search bar, add back to top button, etc.
So, go for the GeneratePress theme method, if you just want to make your navigation bar sticky and doesn’t want to involve in the CSS and HTML mess.
Suppose you want to make any element to stick at top of the screen like the menu, header, widget, logo, banner ads, etc. for free And want to apply this sticky element to the specific pages only. Then you can prefer WP Sticky plugin.
- Read Next: How to add a Search bar in WordPress
- Kinsta Vs Rocket.net: A Big Fight Between The Two Best Managed WordPress Hosting Companies
I hope this article, How to add Sticky Menu or Sticky Header in WordPress, helped you to easily and quickly add the sticky menu on your WordPress site. If you like this article, please share it with your friends. If you want more blogging tips, follow BlogVwant on Facebook, Twitter, and YouTube.
How to Add Sticky Menu or Sticky Header In WordPress: FAQs
What should I do if the sticky element created by WP Sticky Plugin doesn’t work?
1. Check if you have correctly entered the selector name in a sticky element textbox with proper syntax. The ID name must be preceded by the dot symbol and the class name by the # symbol.
2. Next, make sure the sticky element ID or class name is unique. In other words, if your theme has multiple selectors with the same name, then the sticky feature won’t work.
First, perform the above. Still problem exits? Then you need to contact the plugin customer support team.
Can I apply additional CSS styles to the Sticky menu created by the WP Sticky plugin?
Yes, it is possible. Use class name: “.element-is-not-sticky” when your element is not sticky. Use class name: “.element-is-sticky” when your element is getting sticky or after the sticky feature is in action.
Can I make a Header Sticky with the GeneratePress?
Yes. You need to manually add additional CSS code.
How much would a WP Sticky Pro Plugin costs?
It provides three-lifetime premium plans like SINGLE, TEAM, and AGENCY. The cost of its SINGLE plan is $39. And its TEAM is $59. And its AGENCY is $99.
What is sticky navbar?
It is the navigation menu that always sticks to the top of the screen as your user scrolls down or up the pages on your WordPress site.
Should I use a sticky header?
If you want to display your top navigation menu at all times to your visitors when they scroll your site pages. And want to reduce cart abandonment and increase sales. Then you should definitely make your menu or header sticky.
Is sticky header good for user navigation?
Yes. If you want to display your top navigation menu at all times to your visitors when they scroll your site pages. Then it is good.
Nice tutorial
Generatepress method is the best.