
Do you want to create an online calculator for your WordPress website in less than 10 minutes? That too for free and without any special programming skills.
Then you must use uCalc to make an online calculator for your WordPress website in less than 10 minutes. Go through this article to learn how to create an online calculator using uCalc. And how to embed the designed calculator on your WordPress site.
Why does a business need a calculator and what advantages does it give to the market?
Any business needs an online calculator for the following marketing benefits:
Acts as a marketer, salesman, and consultant:
- It gives the accurate pricing list of all products to the customers. And calculates the cost of the products selected by the customers. And suggests the most trending products. Quickly collects the customer leads like email and phone number to send the price quote to the customers.
- Here it performs the tasks of a marketer, salesman, and consultant. So you can run your business with limited staff.
Best Way To Attract Customers:
- Suppose, if too many fields are to be embedded in a calculator and all fields are important. Then you can design a step-by-step online calculator to attract the customers.
- Further, step-by-step fields are more intuitive to interface to customers.
- That’s why at present many Cleaning Services and Restaurants are using step-by-step online calculators to display their too many items.

Further, an online calculator:
- Saves time.
- Accepts payments.
- Attracts targeted customers.
- Improves SEO and increases search engine traffic.
- Can be used in any field like:
- Construction and Repair.
- Automative.
- Real Estate.
- Restaurants and Cafes.
- Furniture and Interior.
- And more.
- Can be shared with Social Media to attract the target customers to your website. In this way, it collects leads quickly.
- You Might Like: 5 Top Social Networking Sites Or Best Social Media Platforms for Business
- 7 Best Amazon SES Email Marketing Software Or Services to Send Emails For Very Low price
What is uCalc?
uCalc is a universal, easy-to- easy use and greatly intuitive builder of calculators and forms. With this, you can build your own online calculator for your website in less than 10 minutes by using its ready-made templates or little modifying them. So in this way, you won’t need to write any complex code to build an online calculator.
And uCalc is a universal builder of calculator for all websites running on any platform. Because once you have designed your own calculator, then it generates a universal code that can be embedded into any website running on any platform like:
- WordPress
- UCOZ.
- Joomla.
- ukit.
- Drupal.
- And more.
Further, for WordPress sites, no code is needed to embed. Just you need to connect your uCalc account to your WordPress site and choose an already designed calculator. Then your designed calculator will be embedded on your WordPress site.
What are the uCalc Pricing and Plans?
- uCalc offers 3 plans for its customers to buy. Besides these plans, it can also provide a free plan too.
- Again you can buy any of these 3 plans for a Month or 6Months or 1Year or Forever.
| Free Plan | BASIC Plan | STANDARD Plan | PRO Plan | |
|---|---|---|---|---|
| Month | —– | $4 | $10 | $24 |
| 6 Months | —– | $3.60 per month | $9 per month | S21.60 per month |
| 1 Year | —– | $3.20 per month | $8 per month | $19.20 per month |
| Forever | —– | $90 | $190 | $390 |
| Number of Projects | 3 | 5 | 15 | Unlimited |
| Email Notifications | 100 | 300+ | 1000+ | 3000+ |
| SMS Notifications | 0 | 0+ | 10+ | 30+ |
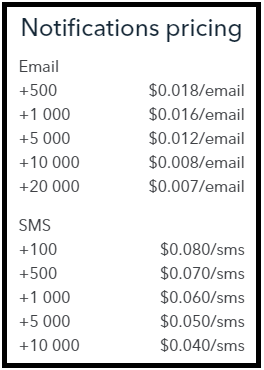
uCalc Pricing for Email and SMS Notifications:
1. How to create an online calculator in a few minutes using uCalc
Video Tutorial:
The below video lets you know about the creation of an online calculator form using uCalc as well as the process to embed the calculator into the WordPress website. If you like to watch a video, then go for it. Or simply skip the video and continue with the steps mentioned afterward.
uCalc is a great plugin for WordPress to build and embed a calculator in just minutes. First, I will explain how to make your own calculator using uCalc. Next, I will explain how to embed your designed calculator on your WordPress site or blog.
Step1: Go to the uCalc website and free sign up to create your account.
Step2: Next, click on the plus button to create a new project.
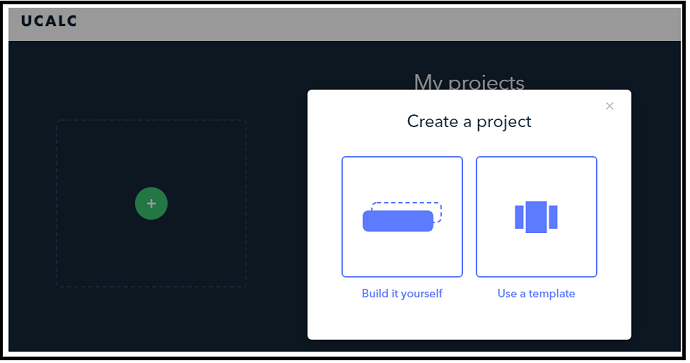
Step3: Next, you can see two options to create a new project. Those are.
- Build it yourself:
- Use this option to build your own calculator from scratch.
- Use a template (Recommended):
- I highly recommend this option. Because, if you choose this option, then ready-made templates are available. So, with little modifications, you can build your own calculator in just minutes.
- So, click on the ‘Use a template‘ option.
Step4: Next, you can view ready-made templates for various businesses like:
- Real Estate.
- Construction and Repair.
- Delivery Service.
- Restaurants and Cafes.
- Home Appliances.
- And more.

Step5: Next, choose any template. Suppose, here I have chosen Real Estate Then you can view ready-made templates under this section like:
- Rent Calculator.
- Calculating house building cost.
- And Mortgage calculation.
Here, select anyone. Suppose I have selected the second one by clicking the Choose button.
Step5: Next, you can view the various options in this template. Next, click on the Create a calculator on the top right of the page.

Step6: Next, you can view and edit all fields. Suppose, if you want to view and edit a formula in any field, simply click on the Formula button on the top of the page. If you want to design a calculator, then click on the Design button on the top of the page.
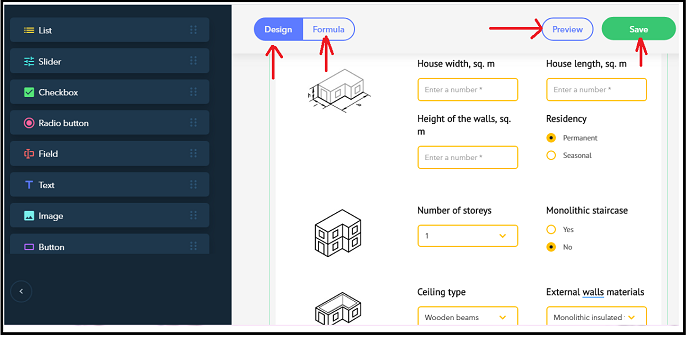
Step7: Next, you can view various widgets or elements to design your calculator like:
- List.
- Slider.
- Checkbox.
- Radio button.
- Field.
- Text.
- Image.
- And Button.
All elements are drag and drop. Suppose if you want to add a Checkbox to this calculator. Then simply drag the Checkbox present on the left side of the page and drop it where it is required in your calculator.
Likewise, you can drag and drop remaining elements too based on your requirement.
Step8: Next, to check all the fields once, click on the Preview button visible on the top of the page.
Step9: Next, click on the Save button visible on the top right of the page.
- Then the HTML code is displayed.
- Here, you don’t want to copy the HTML code for WordPress sites. So, simply click the Close button. Then your project is saved.
- Suppose, if you want to embed this designed calculator on non-WordPress sites, then you have to copy the displayed HTML code.
- Because this code is to be pasted on the desired webpage to embed this designed calculator on that webpage.
Likewise, you can create any calculator as you want in just minutes using ready-made templates of uCalc. Further, if you want, you can edit and modify the designed calculator in the future.
That’s it! You have now created your own calculator using uCalc.
The next step is how to embed this designed calculator on your website?
Go through the following step, to perform this task.
2. How to embed a calculator on WordPress in less than one minute using uCalc
It involves the following steps to embed a calculator on your WordPress site.
- Download, Install and Activate the uCalc Plugin on your WordPress site.
- Connect your uCalc account to your WordPress site.
- Add your designed calculator to the page of your WordPress site.
2.1 Download, Install and Activate the uCalc Plugin on your WordPress site
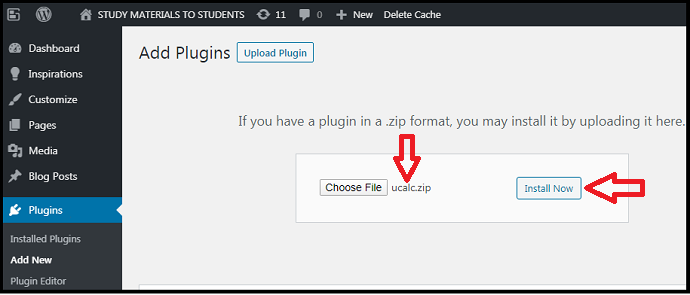
Step1: Click here to download the uCalc plugin. Then a ucalc.zip file is downloaded. Next, save it on your computer.
Step2: Next, go to your WordPress site. And log in.
Step3: Next, go to your WordPress control panel. And then go to Plugins >> Add New.
Step4: Next, click on the Upload Plugin. Then click on the Choose File button to upload the downloaded ucalc.zip file on to your WordPress site.

Step5: Next, click on the Install Now button to install the uCalc plugin on your WordPress site.
Step6: Click on the Activate Plugin button.
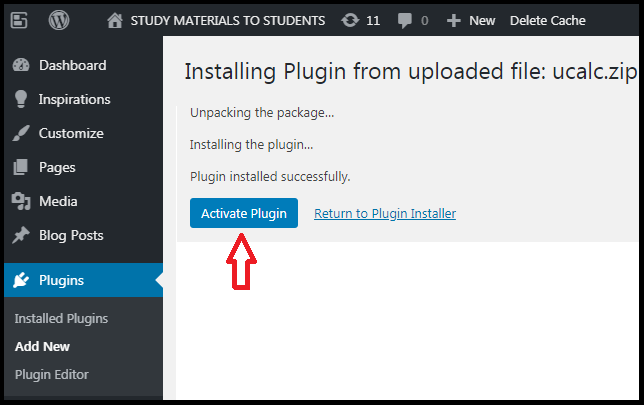
That’s it! You have now activated the uCalc plugin on your WordPress site.
Next, What to do? The next step is you have to connect your uCalc account to your WordPress site.
2.2 Connect your uCalc account to your WordPress site
Step1: Go to your WordPress site admin Dashboard. And then click on the Settings tab. And choose uCalc.
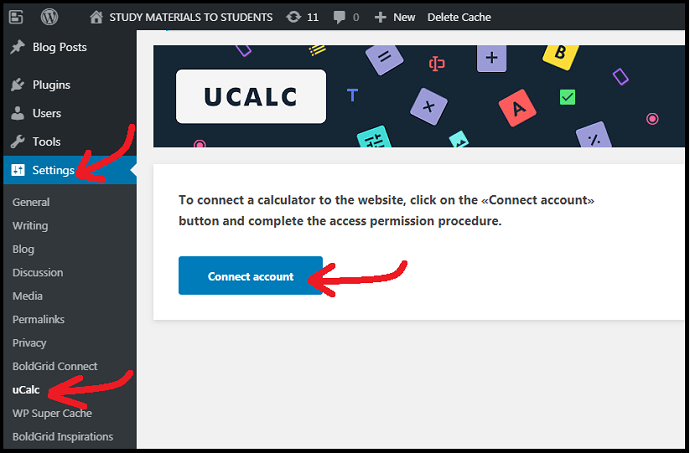
Step2: Next, click on the ‘Connect account‘ button. Then a new page opens to log in to your uCalc account. Then log in to your uCalc account using your email and password.

Step3: Next, it will ask, Connect your account to WordPress? Then click on the Connect button.
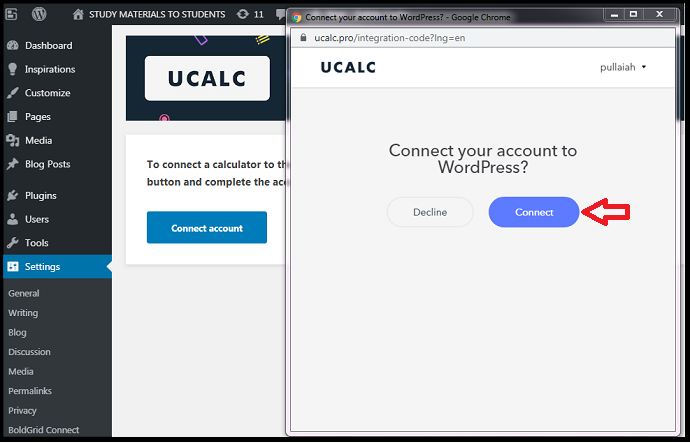
Step4: Since you have already created an account on the uCalc website, your uCalc account automatically connected to your WordPress site.
That’s it! You have now connected your uCalc account to your WordPress site.
2.3 Add your designed calculator to the page of your WordPress site
Now it is time for you to embed the calculator on your WordPress site that you have designed on the uCalc website. Follow the below steps to perform this task.
Step1: Go to the webpage of your WordPress site where you want to add your designed calculator. Then, select the ucalc button on the editor’s toolbar.

Step2: Next, choose the project that you have designed on the uCalc website. Then click on the Embed button.
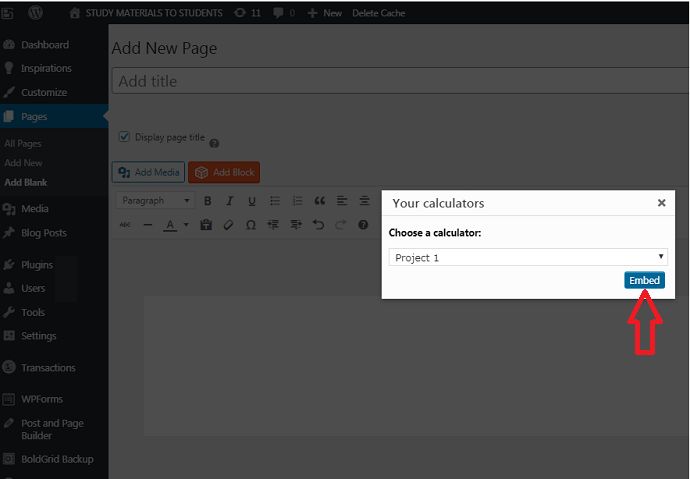
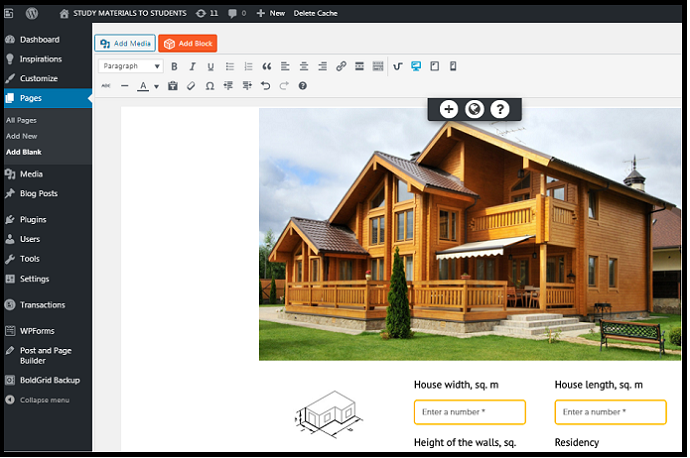
Step3: Next, your designed calculator with all its fields displays on the webpage of your WordPress site.
That’s it! You have now added your own designed calculator on the specific webpage of your WordPress website using the uCalc plugin.
Read It: 6 Outstanding Mailchimp Competitors for Email Marketing
3. What are the Pros and Cons of uCalc?
uCalc Pros:
- You can design your own calculators in less than 10 minutes by little modifying the ready-made templates of uCalc.
- No programming skills are needed.
- You can design calculators for any website that is running on any platform like:
- WordPress.
- UCOZ.
- ukit.
- Joomla.
- Drupal.
- And more.
- It provides various widgets or elements like:
- Slider.
- Field.
- Radio Buton.
- Text.
- Checkbox.
- List.
- And more.
- Here, all elements are drag and drop.
- Its premium version is mobile-friendly. So, this application can also run effectively on mobile devices.
uCalc Cons:
- With the uCalc free version, you can build just 3 projects (Calculators).
- Further, its free version:
- doesn’t collect payments.
- doesn’t provide SMS notifications.
- doesn’t allow images to embed in designing a calculator.
- doesn’t allow to embed links.
- doesn’t allow you to clone projects.
Conclusion
Without a doubt, you can build online calculators for your websites using uCalc in less than 10 minutes to attract the target customers to your website.
Further, an online calculator performs the action of a marketer, salesman, consultant, and leads collector by:
- providing accurate pricing of the products,
- suggesting the most trending products,
- estimating the price of the products selected by customers,
- collecting the payments from the customers, and
- quickly collecting the email and SMS from the customers to send the price quote to them.
Last but not least, an online calculator saves a lot of time. And you can share its link via social media to attract the target customers to your site. And it quickly collects more leads.
So, every business unit must use this tool to achieve a significant boost in terms of marketing a business.
- Read Next: 6 Best WordPress Landing Page Builders or Plugins
- 6 Best Google Analytics Plugins for WordPress
I surely believe that this article can definitely aid you to design your own calculator using uCalc in less than 10 minutes. If you like this article, do a favor by sharing this article and follow BlogVwant on Facebook, Twitter, and YouTube for more tips.
uCalc FAQs
How many plans does uCalc offer?
uCalc offers 4 plans like Free, Basic, Standard, and Pro. For pricing details, go through this article.
Does uCalc works on non WordPress sites?
Yes. uCalc is a universal builder of a calculator for all websites running on any platform. Because once you have designed your own calculator on uCalc website, then it generates a universal code (HTML Code) that can be embedded into any website running on any platform like UCOZ, ukit, Joomla, Drupal, and more.
Does uCalc offers any trial period?
Yes. uCalc offers a 14-days trial period for its customers to test it.