
Do you want to create great-looking and engaging Multi-Page Forms right in your WordPress site in a snap to not only engage your site visitors but also to convert them well? That too without code? Now go through this article to learn how to create engaging Multi-Page Forms right in your WordPress site in no time.
What is a multi-step or multi-page form?
Splitting or breaking of your form into multiple pages or steps or parts so that it is not a single page long-form is called a Multi-Step Form (also known as Multi-Page Form or Multi-Part Form).
Why Use Multi-Page Forms?
1. Reduce Form Abandonment:
Most of the people don’t show interest to fill out single-page lengthy forms. Due to this, Form abandonment increases.
But whenever you replace lengthy forms with Multi-Page Forms, then form abandonment drastically decreases.
2. Conversion Rate Increases:
Most of the people show more interest to fill out the Multi-Page Forms instead of lengthy forms. Due to this conversion rate increases.
3. A more engaging and interactive experience for your users:
With WPForms, you can create great-looking and engaging Multi-Page Forms with a progress bar indicator. So that users can know how many pages are there in your form and where they are currently at and how much they have left to fill out before clicking Submit. So, this is a great way, to not only engage your site visitors but also give an interactive experience to them.
- You Might Like: How To Create Online Donation Forms For Nonprofits Right in WordPress In A Snap Using WPForms
- How To Collect PayPal Payments on Your WordPress Site using WPForms
How To Create Engaging Multi-Page Forms In WordPress In A Snap Using WPForms (Step-by-Step)
WPForms permits you to split or break into any single long-form into multiple pages. Or using WPForms, you can directly create great-looking Multi-Page Forms right in your WordPress site to not only engage your website visitors but also convert them well.
In this section, you can view the following 8 steps to create a Multi-Page Form or Multi-Part Form right in your WordPress site using WPForms, world’s No.01 WordPress Contact Form Plugin.
1. Purchase WPForms Basic or Higher Plans
2. Create Your Desired Form With Necessary Fields Right In Your WordPress
3. Split Your Form into Multiple Pages or Parts
4. Customize the Progress Bar And Page Break Settings
5. Configure Your Multi-Part Form General Settings
6. Configure Notifications for Your Multi-Part Form To Get and Send Email Notifications
7. Configure Your Multi-Page Form’s Confirmation
8. Add Your Multi-Part Form to Your WordPress site
Total Time: 3 minutes
Step1: Purchase WPForms Basic or Higher Plans
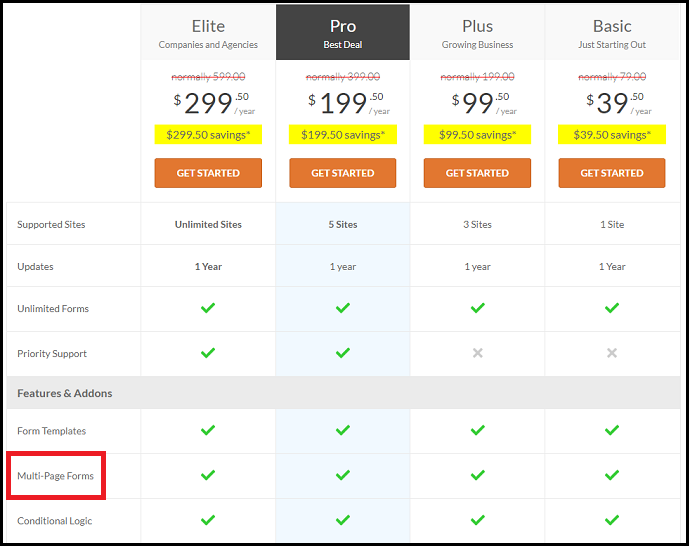
1. The primary step is you need to purchase WPForms Basic or Higher plan to create Multi-Page Forms on your WordPress using WPForms.
2. The cost of its Basic plan is $39.50 per year.
3. Next, you need to install and activate the WPForms plugin on your WordPress site.
4. If you have already installed, move to the next step.
Step2: Create Your Desired Form With Necessary Fields Right In Your WordPress
1. Go to your WordPress site dashboard.
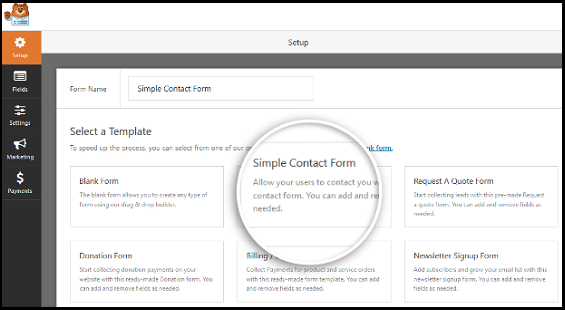
2. Go to WPForms >> Add New.
3. You can break any Form into multi-pages or steps.
So, click on any ready-made form like Simple Contact Form or Newsletter Signup Form. Here, the Simple Contact Form is chosen.
4. Then WPForms creates and opens a new Simple Contact Form.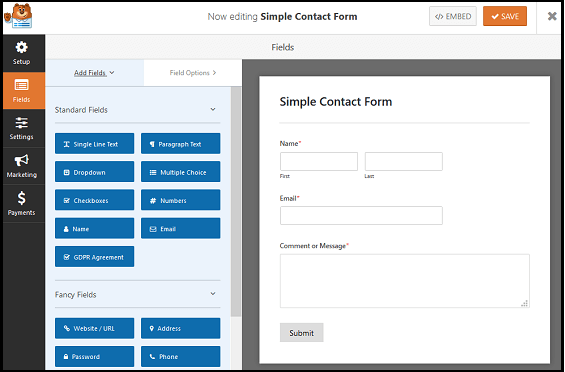
5. By default, your new Simple Contact Form consists of Name, Email, Donation Amount, and Comment or Message fields.
6. But you can add additional fields simply by dragging the field forms from the left-hand panel and dropping them to the right-hand panel.
7. Customize this new form with as many fields as you want to not only engage your audience but also collect more information from your audience.
Step3: Split Your Form into Multiple-Pages or Parts
1. To reduce Form Abandonment, many experts strongly suggest creating Multi-Page Forms instead of Singlepage Long Forms.
2. So, you need to split your new Simple Contact Form which is a single-page long-form, into multiple pages or parts.
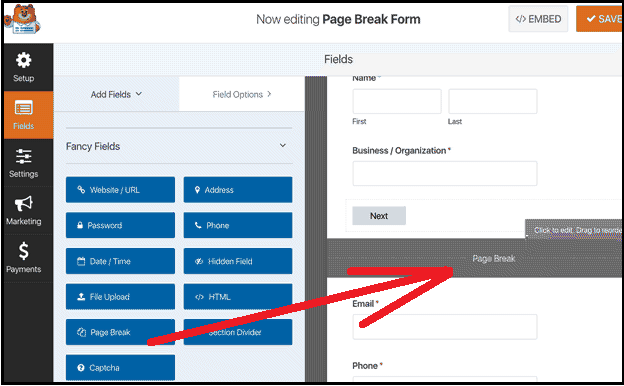
3. To split your form into multiple pages, simply drag the Page Break form field, present under Fancy Fields, from the left-hand panel to the right-hand panel.
4. Likewise, you can drag & drop the Page Break form field, where it is necessary to split your new form into another page.
After dropping the Page Break form field, if you want, you can add additional form fields to complete your new form.
5. WPForms permits you to create as many form pages as you need, but remember not to overwhelm your users. Simply collect the information you require. You can always collect more information later.
Step4: Customize the Progress Bar And Page Break Settings
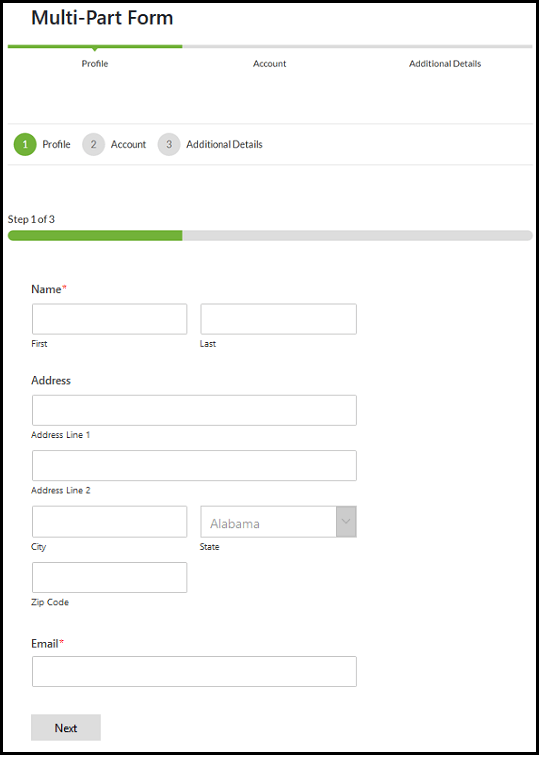
1. A progress bar displays users how many pages are there in your form. And on which page they are currently at and how much they have left to fill out before clicking Submit.
2. WPForms provides three different breadcrumb style indicator bars for your multi-page forms. Those are:
Connectors: displays a connecting bar and page titles of each part of your multi-page form.
Circles: displays one circle and page title per page on your multi-page form.
Progress Bar: shows the progress of the form while the user fills it out.
3. Out of the three indicator bars, you can choose anyone. Most prefer to choose Progress Bar. And it looks like the following in your multi-page form. 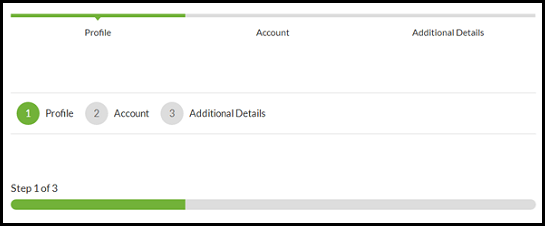
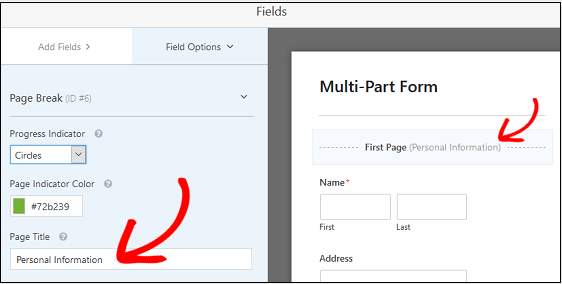
4. Now to choose and customize the indicator bar, click on the First Page break section, present at the very top of your form, where you have added the first Page Break form field. 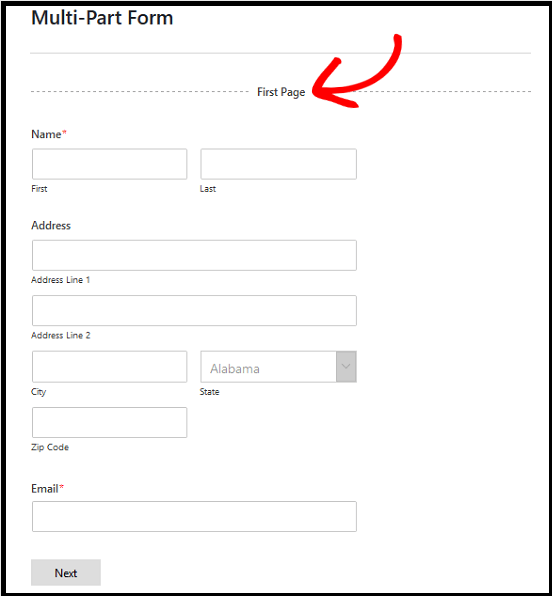
5. Then on the left-hand panel, you can view:
Progress Bar (Drop down menu): To select the type of indicator bar, you want for your Multi-Page Form like Connectors, Circles, or Progress Bar.
Progress Indicator Color: To select your desired color for the progress bar indicator.
Page Title: To add the title of the first page in your multi-step form like Personal Information.
6. Next, you need to customize
Page Titles, Button Text, and Previous Buttons.
7. Now click on the second Page Break form field that you have added in your Multi-Page Form. Then on the left-hand panel, you can view:
Page Title: To add the title of the next page (second page here) like Additional Details.
Next Label: To change this button text like Next Page or Next.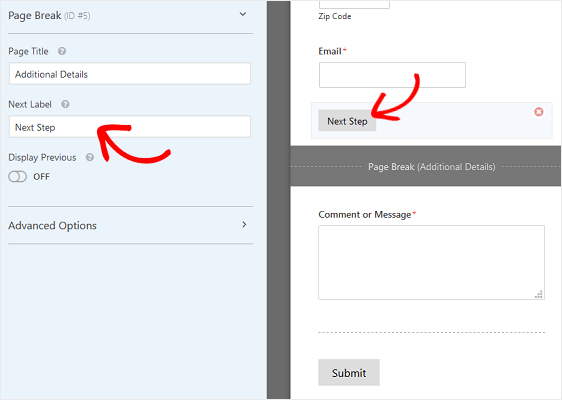
7. Suppose you want to display the Previous Page button to your users to let them go to the previous pages at any time while they fill out your form, then you can do it by simply turning on the toggle switch of Display Previous.
After enabling the previous button, you can view the Previous Label option to change this button text.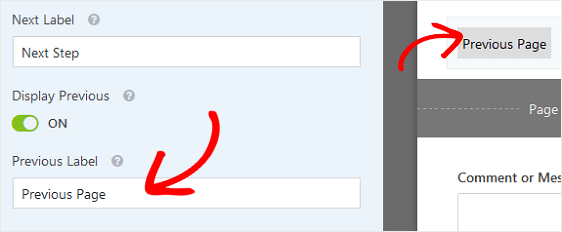
8. Now you have chosen the progress bar type and customized the progress bar and Page Break settings. If you want, you can still customize even more settings of Page Break.
To do this, click on the Advanced Options.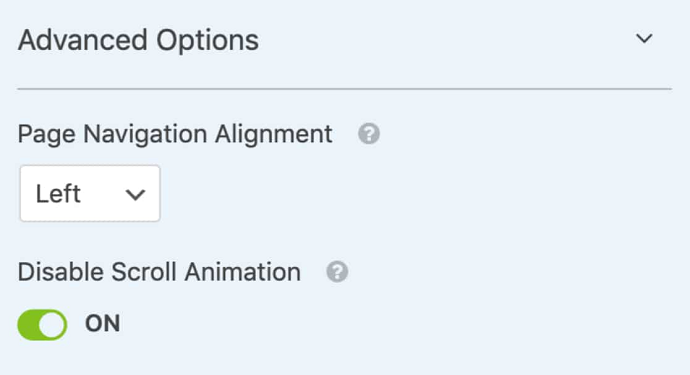
9. Then you can view:
Page Navigation Alignment: To choose where your Form navigation buttons have to be placed (Left, Right, Center, or Split).
Disable Scroll Animation: If you want to prevent automatic scrolling to the top of the page when your user clicks the Next Step button, turn on the toggle switch corresponding to this option.
10. After you have placed all of your Page Breaks and customized them. Then click on the Save button at the top right of your form.
That’s It! Now have you have split your new form into multi-steps or pages. And you have chosen a Standard Progress Bar to let your users know how many pages are there in your form, on which page they are currently at, and how much they have left to fill out before clicking Submit.
Step5: Configure Your Multi-Part Form General Settings
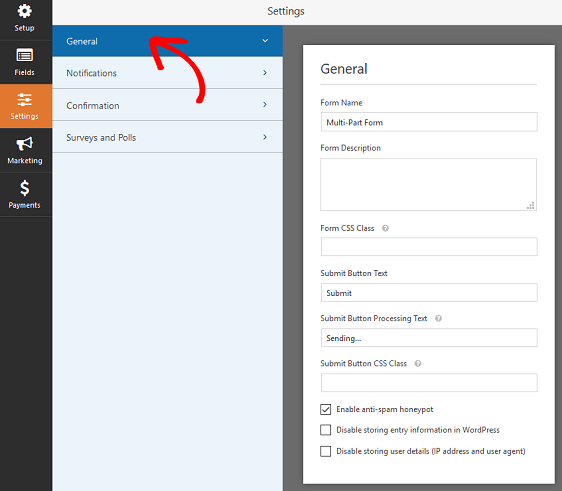
To configure your new split form (Multi-Part Form) general settings, go to Settings >> General. And configure the following.
Form Name: Change the name of your new split form, if you want.
Form Description: Give a description of your new split form.
Submit Button Text: Customize the new split form button copy.
Spam Prevention: Enable the honeypot feature or Google reCAPTCHA to prevent contact form spam.
AJAX Forms: Enable this to allow form submission without page reload.
GDPR Enhancements: To comply with GDPR laws, you have to disable the storing of entry information and user details like IP addresses and user agents.
After configuring the general settings of your new split form, click the Save button.
Step6: Configure Notifications for Your Multi-Part Form To Get and Send Email Notifications

1. Notifications are a great way to send an email to your website visitors whenever they submit your Multi-Part Forms on your site. At the same time, you can also receive an email notification.
2. Now to configure Notifications, move to Settings >> Notifications.
3. You can observe On under the Notifications section. This means, by default, notifications option is enabled to your Multi-Part Form. So, you can receive an email notification whenever someone submits your Multi-Part Form on your site.
4. Suppose you use smart tags, you can also send an email notification to your site visitors whenever they submit your Multi-Part Forms on your site. This ensures your site visitors that their filled forms have reached you.
5. To set this up, simply click on Show Smart Tags to the right side of Send To Email Address.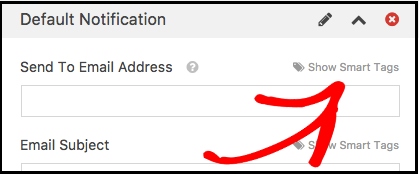
Now select the E-mail field. Then a smart tag will automatically be appended to the Send To Email Address.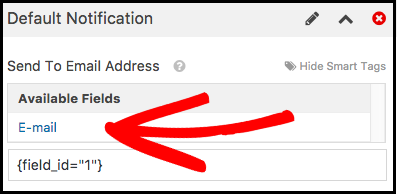
Then, this Smart Tag automatically will pull the email address that your website user/visitor has entered in your Multi-Page Form. And acknowledge can be sent to this email address.
Besides above, you require to configure a few more simple fields like:
Email Subject,
From Name,
From Email,
Reply-To, and
Message.
Step7: Configure Your Multi-Page Form’s Confirmation
1. Form Confirmations are great ways to express Heartful Messages like ‘Thank You for submitting the form’ and more to your website users/visitors, immediately, when they submit your Multi-Part Form on your site.
2. WPForms allows you to select three different types of confirmations to set up:
Message:
This is a default confirmation type that displays a simple confirmation message to your website visitors like ‘Thank You For Submitting The Form And Your Form is Processed Successfully‘ whenever they submit your Multi-Part Form on your site. If you want, you can also customize this confirmation type to further boost your site visitors’ satisfaction.
Show Page:
Choose this confirmation type, if you want to send your site visitors automatically to any webpage on your site like Thank You page after they submit your Multi-Part Form on your site.
Go To URL (Redirect):
Choose this confirmation type, if you want to redirect your site visitors to a different website after they submit your Multi-Part Form on your site.
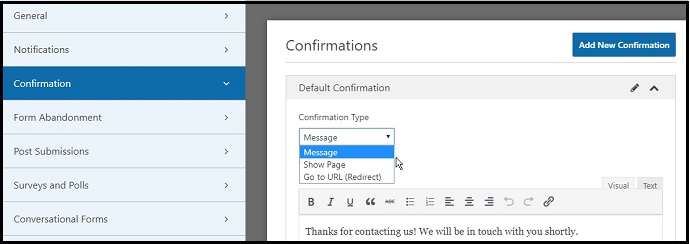
3. Now let’s see how to set up a confirmation type for your Multi-Page Form.
To start, just navigate to Settings >> Confirmation.
Next, select any confirmation type like Message, Show Page, or Go To URL (Redirect). Then customize the confirmation type that you have selected.
Once you are done, click on Save.
Now you are ready to add your Multi-Page Form to your WordPress site.
Step8: Add Your Multi-Part Form to your WordPress site
1. The last step is you need to add your final Multi-Part Form to your WordPress website.
2. WPForms lets you add your Multi-Page Forms to several locations on your WordPress site including your blog pages, posts, and even sidebar widgets.
3. For example, create a new post or page in your WordPress site and click on the inside first block. That is the blank area below your page title.
4. Then click on the Add WPForms icon.![]()
5. Then WPForms widget appears inside of your block.
6. Next, click on the drop-down menu and choose the Multi-Part Form that you have created just now and split into multiple pages.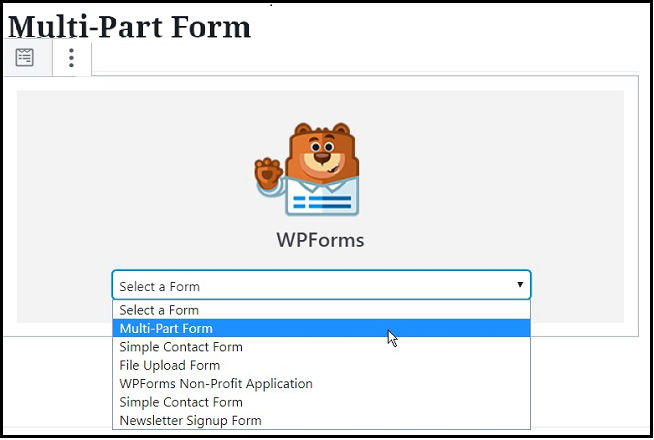
7. Alternatively, you can also search for WPForms widget simply by clicking the Add block icon and type in WPForms on the Search for a block. Then the WPForms Widgets icon appears. ![]()
Next, click on the WPForms Widgets icon and select the Multi-Part Form that you have created just now, from the dropdown menu.
8. Then your Multi-Page Form appears inside your post.
9. Lastly, click on the Publish or Update button to publish your page or post. Then your Multi-Page Form appears on your WordPress site.
Single-Page Form vs. Multi-Page Form
| Characteristic | Multi-Page Form | Single-Page Form |
|---|---|---|
| Multiple Pages | ✓ | X |
| Progress Bar Indicator | ✓ | X |
| Reduces Form Abandonment | ✓ | X |
| Increase User Engagement | ✓ | X |
| Increases Conversion Rate | ✓ | X |
| Collect More Information | ✓ | X |
Final Thoughts On How To Create An Engaging Multi-Page Forms In WordPress In A Snap Using WPForms
You are now able to create engaging Multi-Page Forms straight in your WordPress site in less than 2 minutes using WPForms, the world’s best and No.01, contact form plugin WordPress. And WPForms permits you to split any form into Multi-Page Form. Further, you can create Multi-Page Forms with a progress bar indicator. So that users can know how many pages are there in your form and where they are currently at and how many how much they have left to fill out before clicking Submit. So, this is a great way, to not only engage your site visitors but also give an interactive experience to them.
Finally, you must be thankful to WPForms, because Multi-Page Forms are a great way to not only engage your site visitors but also convert them well.
- Read Next: How To Skyrocket Your Sales And Increase ROI: WPForms+Active Campaigns Can Do This
- How to Easily Create a File Upload Form in WordPress Using WPForms
I confirm that this article How To Create Engaging Multi-Page Forms In WordPress In A Snap Using WPForms is a quick guide for you to learn how to easily and quickly create engaging Multi-Page Forms right in your WordPress site using WPForms to not only engage your site visitors but also convert them well. If you like this article, do a favor by sharing this article and follow BlogVwant on Facebook and Twitter for more tips.
Create Engaging Multi-Page Forms Right In WordPress Using WPForms: FAQs
How do I create a multi step form?
1. Go to the WPForms website and purchase WPForms Basic or Higher plans.
2. Go to your WordPress site dashboard.
3. Install and activate WPForms on your WordPress site.
4. Go to WPForms >> Add New.
5. Select any ready-made form like Simple Contact Form or Newsletter Signup Form. Or select a blank form. Or edit an existing form.
6. All fields are drag and drop. So, you can easily create your form with all necessary fields just by dragging and dropping them where ever necessary.
7. Then a lengthy form may be created.
8. Now use Page Break form field where ever it is necessary to split or break your lengthy form into multiple pages.
9. Add the Standard Progress Bar indicator. Customize the Progress Bar and Page Break Settings.
10. Finally, add your Multi-Page Form to your WordPress site.
What is the best multi-step form builder for WordPress?
WPForms is the best multi-step form builder for WordPress. Using WPForms, you can build great looking Multi-Page Forms right in your WordPress site in a snap without code.
What is the best form builder for WordPress?
WPForms is the world’s best, beginner-friendly, and No.01 form builder for WordPress. Currently, more than 3 million professionals all over the world are using WPForms.