
You must know how to create and Setup Google Analytics account before starting your own website. Google analytics will greatly help you to analyze your website behavior.
Why Should I use Google analytics?
- Google Analytics is a free tool provided by Google which can track your website behavior and your visitor’s behavior.
- Google analytics gives the traffic details about your website.
- You can know from where your website getting traffic.
- How many visitors you are getting per day or hour or week or month etc.,.
- Source of your traffic.
- Live traffic details.
- Complete detailed reports. etc.,
It is must to use Google analytics. It is like authentic reports about your website. When you apply for any ad network or direct advertiser, they might ask you to send them the Google analytics report.
How Google analytics work
You just need to signup to Google analytics website. You need to add your website URL to Google analytics. You will receive a Tracking code from analytics website. Just place that tracking code on your website head section.
Every post on your website has the same head section. So whenever visitor opens your website post, Google Analytics tracking code will run automatically and sends the user information to your Google analytics account.
How to Setup Google Analytics account
Creating Google analytics account is very easy. You can use your existing Gmail account to signup to Google analytics account.
1) Go to https://www.google.com/analytics/ and Sign in with your Gmail.
2) You will see below screen. Click SignUp.
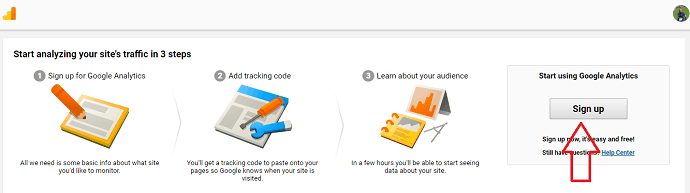
You will see the account fill up form.
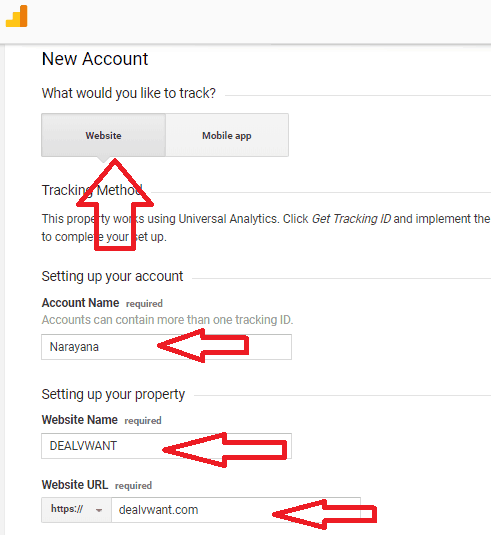
3)Select Website Option. If you want analytics for the app, you can select app option.
Give the account name. You need not give your website name as the account name. Because you can manage more than one website on the same account. You can give the account name as you like.
Next Give your website name and type the website URL in the next fields.
You can select the Industry category according to your website niche.
Select the time zone.
I suggest you select all Data sharing options.
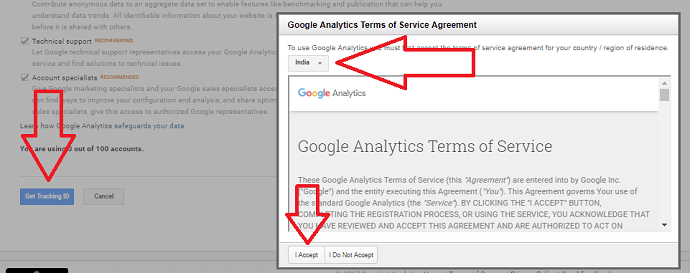
4)Select Get Tracking ID option at the bottom. You will see a popup which shows terms. Select your country and click I Accept.
5)Now you will see Google analytics ID and tracking code in the box. Just copy the code and paste in the head section of your website.
How to get the tracking code in the future
Important Update: Google Analytics 4.0 new version has been launched. Those, who are creating property after October will see a different interface from below. Watch a video for the new google analytics 4.0 property setup
If you need this tracking code in future, you can easily get it from the admin section.
Login into your Google analytics account.
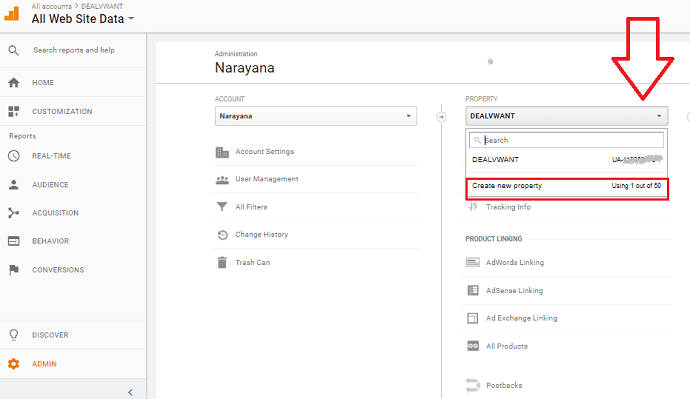
Click Admin option in the left menu. You will see Administration section shows that in below screenshot.
You will see your account in the ACCOUNT section. If you have more than one account, you can use the drop-down symbol to Select the account.
You will see your website in the PROPERTY section. Your website is nothing but a property. If you have more than one website, you can use the drop-down symbol to select the required website.
Select Tracking info option. You will see available options.
Select Tracking Code option. You will get your tracking code.
How to add another website to Google analytics account
You can easily add another website to your existing google analytics account.
Go to Admin section -> Select your Account -> Click on Drop-down symbol at PROPERTY.
You will see option to Create new property. Select that option, you will see the same form to add new website.
Now you have setup Google analytics account. You can check your traffic details regularly.
- Related: 12 Best on-page SEO techniques to get No.1 rank in Google
- What are backlinks in SEO? How to build quality backlinks
- What are follow and nofollow links in SEO? Do nofollow links help SEO
How to insert Google Analytics tracking code on WordPress website
Video Tutorial:
Watch this video tutorial to learn how to insert tracking google analytics 4.0 tracking code to the WordPress website.
1)Most of the themes will give you the option to add analytics code. I suggest you use Genesis themes. They will give you the direct option to place the Google Analytics tracking code.
2)If your theme does not give the direct option, you need to use the plugins like Monsterinsights.
3)If you don’t want to use the plugin, you can place the code directly in the header.php file of your theme. But editing themes files needs some coding skill. If you are a new blogger that step is not recommended.
If you want, you can learn this complete web development course from Udemy which gives you complete coding skills. Don’t want to learn, you can hire an experienced developer from top freelance websites like Freelancer or Fiverr.
I think now you can Setup Google Analytics account. If you like this article, please share it with your friends. Want more blogging tips, follow BlogVwant on Facebook and Twitter.
I hope this tutorial helped you to set up the google analytics tracking code on WordPress Website. If you like this article, please share it with your friends. If you want more blogging tips, follow BlogVwant on Facebook, Twitter, and YouTube.